Taking a timeout!

29

How did you like the last post by Soma? Yup, I knew it! I love her too! And I hope that you didn’t miss me either because I had left you in good hands. Well, I’m going have to leave all you lovely readers of Indian Simmer in a few more good hands for a while since I will not be around for a little. A month to be specific. I’m going to India!

After more than three years I’m finally getting a chance to visit home again and you can only imagine how excited I must be. I can’t wait to go back to the streets where I grew up, sit with mom and talk for hours with cups of chai coming one after the other and relive all those little moments of the past with my brother and old friends. But the part that I’m looking forward to most is introducing my daughter to all of that! Can’t wait to see the look on her face when her grandpa puts her on his shoulder and goes for a walk or when she sits with her grandma for pooja (prayers). The bags are packed and ready to go but the idea that we are actually going is yet to sink in. Maybe it will by this evening when we board the plane and fly thousands of miles away from a home that we made to the home that made us!

Spring

I’ll miss you guys, but try not to have too much fun when I’m not around! I’ll be back soon though with tons of new memories and zillions of photos to share with you. Ciao!

Ghoriba (Moroccan Style Cookies) for Holi by Soma from eCurry

There’s a lot going on behind the scenes of Indian Simmer. A lot of planning, a lot of scheduling and a lot of sleepless nights trying to check off things off of the to-do list! If you know me on twitter then you might have a little idea of it since I keep venting it all there, but if not then very soon I’ll let you know. A part of it that might interest you is that there is a fabulous series of guest posts lined up for you from some fabulous people and wonderful blogger friends of mine. To kick off the fun Soma from eCurry is here today. While thinking of a name that I can trust my little blogy baby with, Soma’s name was the first one to pop into my head. Not just because she’s one person who always inspires me to learn more about Indian cuisine with her innovative yet traditional recipes and neither because she tops it off with a gorgeous photography but because she does it all with two little kids running around her and has a heart of gold! I pleaded her to share something for Holi (an Indian festival of colors) on Indian Simmer and she said YES! So with no further ado I’ll let Soma take over and show you why she and her recipes always make me smile. But after she’s done impressing you, please head over to her blog and see for yourself why I spend hours there. Enjoy these Ghoriba and wish you all a VERY HAPPY HOLI!

Ghoriba_2

I stumbled upon Indian Simmer a few months back and have been totally mesmerized by her mind blowing photographs and crisp and friendly writing and recipes. The exact date and time went unmarked, but we had started conversing beyond our blogs and social media. Prerna is sweet and very talented and she says that she is Trying to blend my two passions Food & Photography into one and simmering it all together at IndianSimmer.” Well, I have to say, her work does not just “simmer“, it also sizzles and it is gorgeous! I was beyond surprised when Prerna generously invited me do a guest post for her blog. I am indeed delighted to contribute to her space. Prerna, thank you very much for this opportunity and honor.

An important Indian festival Holi is just around the corner! Prerna asked me if I can do a Holi special post, so I will share a bit about this exuberant Indian festival today.

Holi is the Festival of Colors and is undoubtedly the most fun filled of all the festivals in India. As the winter trails off, we move ahead to celebrate the advent of spring, on the last full moon day of the lunar month. This festival is tied to a lot of religious significances as are all the other festivals in India, and also signifies the triumph of good over evil. However, as we all see it, Holi is to welcome the season of spring and of love, brimming with a palate of lovely hues. In some states of India, Holi is also known as the Vasanta Utsav (Vasanta=Spring Utsav=Festival). This incredibly beautiful festival paints the soul, and spreads the love; colored powders called Gulaal (pronounced: Goolaal), create a rainbow of joy and promises against the bright blue sky and the crisp air, binding together friends and family with love and warmth, as the weather warms up and the nature takes on its own color.

Gulaal_Holi_1

Memories abundantly flow in and water my soul at this time. The fervent wait, the planning and dreaming with my friends and cousins rippled down to the day of colorful mirth and laughter. Huge bonfires are burnt on the eve of Holi to commemorate the victory of good over evil.

Every citizen looks forward to the pure happiness and fun, music, play and dance, lots of bright colors and to end it all, an extravaganza in food. Numerous buckets stand lined up, shimmering with liquid colors and waiting to be filled into the water squirts and balloons. Colored powders heap and spill over from the newspaper packets. Green, pink, red, turquoise – merging, overlapping and creating their own abstract patterns. The meetings with friends and family initiate with a hug and a tika/tikka (a touch of color/gulaal between the brows on the forehead) and culminates with chasing one another and an unspoken contest of who can smear more color on the other, to an extent where it becomes difficult to recognize a face.

We were fortunate enough to be India a few years back during Holi, and had a rocking “wild” time. Here are a couple of photographs of my immediate family from our last visit to India during Holi, and as you can guess, the day had just begun.

Holi_1

The kids at are play and preparing to fill the squirt with colored water.

Holi_2

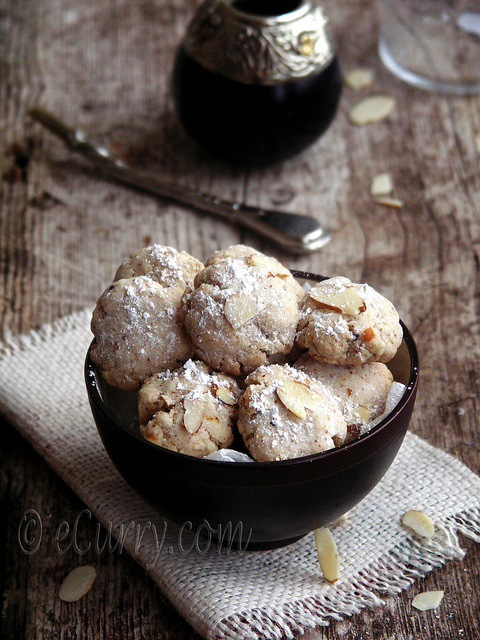
As it is with all festivals, every home in India gets busy with making a variety of recipes for family and friends to share. These Moroccan cookies are very similar to the Indian Lime Cookies or even a traditional dessert snack called Nan Khatai – an Indian version of the short bread cookie.

Moroccan cuisine like Indian cuisine, is exotic and exquisite. The myriad cultural influences and the fresh home-grown fruits and vegetables in both the nations make the cuisines rich, diverse and fascinating. Spices, fruits, nuts, ghee/clarified butter, oranges and orange blossom water and honey are used in abundance to create recipes that are delectable, flavorsome and enticing.

Ghoriba_Ingredients_Collage_2

We will all come together as one and celebrate and welcome a blooming season, with this not so traditional recipe. Ghoriba is a term which refers to a number of Moroccan cookies that are shaped by hand. Today’s recipe is a simple Ghoriba, made of almond flour and flavored with cardamom, orange zest and orange blossom water.

Ghoriba_6

With the looks similar to the crinkle cookies, tasting very much like the short bread cookies but with a bit more crunch, a bit more texture and a whole lot of refreshing flavors, these make wonderful tea cookies or little bites of dessert.

Ghoriba_Collage_1

Almond Ghoriba

(adapted from Fresh Moroccan by Nadeh Sala)

Ingredients:

  1. 3.5 tablespoons clarified butter/ghee (may be substituted with melted butter)
  2. 3 tablespoons peanut/or vegetable oil
  3. 1 cup all purpose flour
  4. 1/2 cup ground almond or almond flour
  5. 5 tablespoons confectioners’ sugar
  6. zest of 1 medium orange
  7. 1 tablespoon orange flower/blossom water
  8. 1 tablespoon water
  9. 2 cardamom pods, seeds finely crushed in 1/4 teaspoon confectioners’ sugar (or use your favorite spice instead of cardamom)
  10. 1/3 cup coarsely chopped almonds
  11. almond flakes and confectioners’ sugar for garnish/to top the cookies

Method:

Pour the ghee/melted butter and oil into a bowl, sift in the all purpose flour and stir in the confectioners’ sugar; add the orange zest and rub the zest in to the flour. Tip in the ground almonds/almond flour. Combine the flour, the oil and ghee together, it will start to form crumbs. Add the orange flower water, water and ground cardamom.
Knead the above mixture for a few minutes in the bowl to form a dough, turn it out onto a clean surface. At first it may be crumbly, but keep kneading, shape it into a ball and place back in the bowl. (if it gets too difficult to form the dough, add water in fractions of teaspoon till the dough just comes together. It should be very firm, non spongy dough). Cover and let it stand for about 30 minutes.
Remove the dough and knead again, then add the coarsely chopped almonds and form into a ball. Pinch off a little dough the size of a walnut and roll and press between the palms to form a round shape. As you press it will naturally crack around its edges. This is how it is supposed to be. The finished cookies will have cracks all over them.
Repeat with the same with the remaining dough.
Place a couple almond flakes on the top of each cookie and gently press down for them to stick.
Place the cookies on a baking sheet and bake in a pre heated oven, 350 degree F for about 10-15 minutes or until the base starts to turn golden.
The base will be golden brown and the surface will have white cream color.
Remove from the oven, cool on a wire rack and serve with sprinkling of confectioners’ sugar.

Ghoriba_3

For Japan with Love

6

Its St. Patrick’s Day and I know you all must be all set for a big party. But I also know that just like me you have not forgotten the disaster and catastrophe that the people are facing. We just sit in front of the television and can only helplessly look at what people have to deal with. We feel a rush to just get up and go help them save their lives but its just not humanly possible but we all want to to our share.

Yesterday I got to learn about For Japan with Love a movement started by the lovely people behind Ever Ours and Utterly Engaged. I was really touched by the way they were trying to help and spread the word in their own little way and felt the need to do it myself.

For Japan with Love has two parts to it.
Fundraising where you can visit the donation page of For Japan with Love and help. The donations will go straight to Shelter Box an organization working day and night in Japan to help the ones in need.
The second part of the movement is the Bloggers Day of Silence where all the participating bloggers (including me) will stay silent and not post anything on their blogs on Friday the 18th of March. Just a small way to show our support and raise awareness.

I and the other participating bloggers invite you to join us and help in whatever way you can. No help is small!

Chicken Tikka Masala and Cumin scented Green Peas Pulao

Chicken Tikka Masala

People are spending hours and days glued to their TVs listening to horrific news and looking at videos and images that can make any heart cry. Bad news after bad news coming from Japan have moved everyone. My roommate for four years and a long time friend lives in Tokyo and the moment I got the news about the disaster, my very first thought was ,”gosh, is she ok?!” Soon after you are relieved to find that the ones close to you are safe, you realize that there are countless people equally important to others who are unfortunately not that lucky. It is these hard times that make you take a moment and reflect on what’s really important. As we go about our lives, it is not that hard to start taking things for granted. And we keep falling into that trap, until woken up again.

Chicken Tikka Masala

It is also the moment that makes you realize that what’s actually true is today and now! A came back home after a crazy month of travel and work and this was the weekend when we got to spend some quality family time. But the same thought kept coming to my mind. The thought of living life and the thought of loving to the fullest. The weather was good enough to pull out the flip flops, put on the sunglasses and enjoy some beer. And the day was good enough to do some cooking and make something that I’ve been thinking of making forever but had been putting off. So I made some Chicken Tikka Masala.

I made a “not so traditional” version of Chicken Tikka Masala. But then again I am not sure if there is anything that qualifies as a “traditional Indian tikka masala”. In fact, Chicken Tikka Masala was not even born in India. Rumor has it that years back in the 1960s, a British gentleman stepped into an Indian restaurant and returned his order of chicken tikka complaining that it was undercooked. Tired of his customer’s rants, the chef opened a can of tomato soup, threw in some cream and cooked the tikka in the sauce.  Ironically, the dish became so popular in England that in 2001, it was declared as England’s national dish. Some Indian critics claim that it was born in the early 1500s when Babar, a Mughal emperor sick of choking on the bones of his tandoori chicken asked his Punjabi cooks to remove all the bones. Cooks terrified of the angry emperor chopped off all the bones before throwing the chicken into the tandoor (clay oven). They cooked the chicken in spices and served it to the emperor.

Whatever be the story, I know that it is one of the most popular Indian dishes and the kind of Chicken Tikka Masala a restaurant serves determines the quality of a restaurant and a chef in my book. Recently Soma from eCurry posted a recipe for butter chicken which stuck in my mind ever since. Its my little brother’s all time favorite dish but needs a little more of love and patience that I can give to my food right now. So I made Chicken Tikka Masala instead and served it with some roti and Cumin scented Green Pea Pulao. This is a quicker and simpler version from a busy mom to some Indian food lovers and I have a feeling that you are going to like it!

Ingredients:

For Chicken Tikka:
4 boneless skinless chicken thighs (cut into cubes)
1 tsp Kashmiri red pepper powder (This is a red pepper which is not very hot but gives a beautiful color. But you can also use cayenne pepper if you can’t find it)
1 1/2 tsp ginger garlic paste
1 1/2 tsp coriander powder
1 tsp garam masala
1/2 cup yogurt (any fat % is fine)
1 1/2 tsp lemon juice
1/2 tsp red food color (optional)
Salt

For the tomato sauce:
1 14.5 oz can of diced tomatoes (pureed)
1 tbsp garlic paste (I prefer fresh but you can use store bought too)
1 tbsp ginger paste
1 tbsp onion powder (optional)
1 tbsp coriander powder
1 1/2 tsp powdered black pepper
1 tsp garam masala
1 tsp powdered fennel seeds
1/2 cup heavy cream
1 1/2 tbsp olive oil
1 tsp chopped cilantro (for garnish)
Salt

Method:

For Chicken Tikka:
Mix all the dry ingredients into the mixture of yogurt and lemon juice to prepare a marinade.
Add chicken pieces into the marinade.
Mix everything well. Cover the bowl and let it sit in the refrigerator for at least an hour. I did it overnight.
Thread the chicken pieces onto the skewers.
Grill the skewered chicken until done or pop it into the oven for 15-20 minutes at a temperature of 400 deg. F.

For the Masala:
Pour oil in a thick bottom pan. Add ginger garlic paste.Turn on the heat and let the paste slowly cook as the oil heats up. This perfumes the oil and also your house!
When the oil is hot, add onion, coriander, fennel, black pepper powder and garam masala. Mix it all together.
Add tomato puree and mix it very well with all the spices. Let it simmer for about 15 minutes until the sauce starts reducing and the excess water evaporates. Stir occasionally scraping the bottom.
Add cooked chicken pieces along with the drippings if cooked in an oven and cream. Mix it all together and let it simmer for another 5-7 minutes.
Turn off the heat, cover with a lid and let it sit for at least 10 minutes before serving. My mom always says that letting the Indian curry sit for a few minutes before serving helps all the spices do wonders!
Garnish with some chopped cilantro and serve with naan, roti, or Rice Pulao like I did.

For Cumin Scented Green Pea Pulao:

Ingredients:
1 tbsp clarified butter or ghee (You can also use olive oil)
1 bay leaf
1 1/2 tsp cumin seeds
1/2 cup green peas (I used frozen sweet peas)
1 1/4 cup basmati rice
Salt

Method:
Wash rice thoroughly with water. Set aside.
Heat oil in a saucepan. Throw in bay leaf and cumin seeds and cook until they start popping.
Add green peas. Cook for a minute.
Add rice and salt. Mix everything and then add 2 1/2 cups of water (the rule of thumb for cooking basmati rice is to add water a little over twice the quantity of rice, I added a half cup extra).
Bring the rice to a nice boil and then turn the heat to medium, cover the saucepan with a lid and cook until all the water is absorbed.
Turn off the heat and let it rest covered for 10 minutes.

Disclaimer: In no way I am trying to promote or endorse Coca Cola through my photos or post. I just found an old bottle of Coca Cola as an interesting prop so I used it in my photos. By doing this, in no way I’m asking you to use it or serve with my food or recipes.

Guest Post on LaFujimama and a Babble nomination

Indian Simmer was recently nominated by you on Babble.com for the Top 100 Food Mom Blogs 2011. You have NO idea how humbled I am just by that. Thank You so much! They have this voting system where if you “like” Indian Simmer you can vote for me. You just have to go and give a “I like this” thumb’s up to Indian Simmer. Although while writing this I’m getting a feeling as if I’m running for the “office” but really, if you like this blog then please vote!

Savory Indian Pancakes

Ok, now the other thing that I am excited about today. I’m sure you all know Rachael from LaFujimama. She and I were talking the other day and she told me about this amazing Pancake Week event she’s holding on her blog. There its all about pancakes lately and she asked if I can share an Indian pancake recipe that I like. I said hell, yeah!

Collage1

Rachael is one of the kindest people I’ve met on the blogosphere. She always has something interesting cooking in her kitchen and you just can’t leave her blog not drooling! She has achieved so much that I won’t even start to tell you or it might take LONG. It was such an honor to cook something for Rachael. After thinking a lot I decided to make Semolina and Yogurt savory Indian pancakes which growing up my mom always used to make for us.

Collage2

I have so many memories attached to these veggie pancakes, in which the “veggie part” was the key for my mom and now it is for me as a mom. We love the slight tangy flavor of yogurt blended beautifully with softened semolina and since it has close to none fat, its good for you too.  I’d love for you to head over to Rachael’s beautiful blog to check out the recipe for my Lowfat Savory Indian Pancakes (Semolina and Yogurt pancakes)

Afghan Ruz Bukhari

IMG_0609

My little monster was down with fever a few days back. This was the first time in my life as a mother (which is about 18 months) that she had a bad fever. A, just like he has been for the past few weeks, was traveling and I was alone at home with her. She was playing and jumping all around and I didn’t even realize that she was sick until I was getting her ready to go to bed. I waited  for a few hours hoping that temperature will come down but finally at midnight I called her doctor. Front desk picked up and promised to return my call. While I was waiting for the call, my anxiety and nervousness was soon turned into panic! I had to keep my mind busy so I logged on to twitter and tweeted about it. In minutes I got so many messages and emails of support and confidence. Rebecca who blogs at Chow and Chatter couldn’t resist picking up the phone and calling to check on me. All of a sudden I realized that I was not alone waiting for the doctor’s call anymore. When someone asks me about what I love most about the blogging world, I have to say experiences like this!

Its just amazing how people you have never met or spoken to get so much closer to you. I’ve met so many talented people through my blog and got to learn so much from them. One such friend I made is Ria who is a great food blogger (also from India) and blogs at Ria’s Collection. A lovely blog with beautiful stories and photos and fabulous recipes! Ria told me about the Afghan Ruz Bukhari recipe that she was going to try. She was trying it for the first time and had got it from another common friend of ours. Bindu, who again we have never met but have gotten closer to. I was so intrigued by the recipe and all the talk about it that we decided to try it together and if it turns out well, maybe we can share it with YOU.

Yes, it turned out pretty good and hence we are here! Sharing it together and sending our love and thanks to Bindu who is not a blogger but is a great cook and definitely an awesome teacher.
I was so amazed at how good this dish turned out to be and that made me curious about its history. So I went to Mr. Google but surprisingly I didn’t find much about it. So if you know anything about its origins, please let me know! But what I can tell you about this dish is that its an Afghan take on biryani, its SO easy to put together and has great flavor with little use of spice. If you consider salt a spice then that’s the only spice I used for this dish!

5490476499_570341d46e_o

Ingredients: Serves 8-10
(I made a few tiny little changes to Bindu’s original recipe but its pretty much hers.)

1.5 pounds lamb with bones (cut into medium size chunks)
3 cups of Sela Basmati rice (Sela basmati is a variety of basmati rice that is just milled a little differently giving it a slightly yellow color and is perfect for slow cooked rice dishes like biryani or pulao. You can find it in any Pakistani or middle eastern store)
3 cups thinly sliced onions 

2 cups thinly silvered carrots
1/4 cups oil
1/4 cup raisins (I used golden raisins but you can use black raisins)
3 1/2 tbsp tomato puree
6 cups water
Salt

Method:

Thoroughly wash the rice and soak it in water for at least a couple hours.
Meanwhile wash the meat thoroughly with water, squeeze out all the excess water and let it out in the air to dry. You can even let it sit in the refrigerator overnight.
Take a big thick bottom pot, heat oil in it.
When oil is hot, add lamb and stir it well so that lamb doesn’t stick to the bottom. Keep stirring until the meat doesn’t stick to the pan anymore.
Meat will start oozing liquid, keep cooking until all the liquid dries out.
Then add onion. Cook it until the onion turns translucent.
Now add water and salt to the lamb. Cook till the meat is “almost” done but not all the way through.
Drain out all the water in which the rice is soaked.
Now in a big vessel with lid arrange a thin layer of rice. Then arrange all the meat on top of the layer of rice, over which you will have to arrange the carrots and then on top of that a layer of raisins which are washed and soaked in water for 15 minutes. Top it all off with all the remaining rice.
After you’re done with the layering, you need to pour the remaining broth from the meat all over the rice and start cooking.

Once the water starts boiling, check the salt (it should be pleasantly and not strongly salted, only then will you be able to taste the carrots and the raisins); add tomato puree; gently stir it in the water above the rice to mix thoroughly.
Cover the pot with lid and let it cook. Normally it should take about 18-20 minutes for the rice and everything else to cook well, but keep checking and if you feel that the rice is not cooked and water is almost dried out, add a little more water.
The finished dish should have rice with each grain separate and a slight orange color from the tomato puree. 
The dish is typically served with a simple salad:
Ingredients:
1/2 cup chopped onions
1/2 cups chopped tomato
1/2 cups chopped carrots
1/2 cups chopped cucumber
1 tbsp chopped parsely
1 1/2 tsp lemon juice
salt
Just mix everything together (this is not the typical Afghan style salad and they make it a little differently but this is what we enjoy in our family!)
Oh wait, there is something else I had to talk about. The winners of the giveaway! Little monster helped me find the four lucky winners of the fabulous cookbook by Monica Bhide. Following are their names with their comments.
Rookie Qookie said…
Congratulations for the lovely year spent in Blogosphere!! Wish you well for many more years to add 🙂 Have been following you and loved all the Indianness you bring to your blog and recipes.Now why whould I not want this Book!! Well I have no reason not to want and would enjoy learning more from all the beautiful recipes..
Cheers,

Reshmi 
Maranda said… Congratulations on your blogiversary!!!! I’m so sad I missed the giveaway. I would have loved to win this cookbook since I’m falling in love with Indian food lately.
I’ve made your garlic chicken a couple times now and it is ALWAYS delicious!! Here’s the url http://mannadonn.blogspot.com/2011/01/garlic-chicken-indian-style.html
Chow and Chatter said… happy birthday to your lovely blog, lovely gift away maybe one day you can give away your cookbook
Sneh | Cook Republic said… You go girl! Congratulations on your Blogoversary 🙂

Congratulations! Please email me your names and addresses.

“Get Grillin’ with Family Fresh Cooking and Cookin’ Canuck, sponsored by Ile de France CheeseRösleEmile HenryRouxbe and ManPans.” 

Celebrating Blogiversary & You with Rice-Pudding Mango Parfait and a Giveaway!

Just a few months after my first baby was born I gave birth to another. I nurtured it and groomed it, and give it all I could so that it could grow and flourish. It slowly grew up and started to shine and reached out to the world and left me awestruck and wondering in disbelief. Today that baby is one year old and I still am not sure when that happened! Yes, today IndianSimmer is celebrating it first year anniversary. Today was the day when, after putting my six month old little girl to bed, I just opened a blogger account and posted something to get in touch with the outer world. That evening I had no idea how proud that little step would make me in an year. I can say that IndianSimmer has come a long way and I owe it all to your love, support and motivation that kept it going. So today from the deepest place in my heart, I just want to say THANK YOU. And today, I want to make it just all about you! Because I want to celebrate you and your love for IndianSimmer.

I have a lot of things that I am excited about and would love to share with you today. Let’s start with the GIVEAWAY.

CookBook Giveaway coming soon!

A while back I bought a book called Modern Spice by Monica Bhide. A great writer and a prominent cookbook author, Monica was born in India and now lives in the US with her beautiful family. What I love most about Monica is her art of storytelling, her ability to engage readers and take them on beautiful journeys. I’ve been to several trips with her – to her childhood, to the streets of India and to her kids’ childhood. To top that, she makes food that tells stories for her. That’s what she does in this cookbook of hers. I’d repeat the words of one of her reviewers: At once contemporary and rooted in tradition, sophisticated yet straightforward, creative but comforting, Modern Spice is perfectly suited to the times; it offers new directions, interpretations and ideas for taking Indian food to next level.

RicePudding-Mango-Parfait

Like this recipe for Rice Pudding Mango Parfait. The part of India where I come from, Kheer (rice pudding) is a symbol of happiness and celebration. If you pass an exam, you get to eat some kheer. If you are cooking for an old friend who is visiting after long, there will be kheer on the menu. You will get kheer (rice pudding) in some form or the other in every Indian celebration. So how could I stay away from it when celebrating a great milestone. And after seeing the twist that Monica gave to a traditional kheer, I had no doubt in my mind that I was making it for the anniversary post.

And the best part was that Monica was so kind to offer a copy of her cookbook to one of IndianSimmer’s readers to celebrate the completion of its first year! Yes, you have a chance to get your hands on this wonderful book which has taken a permanent place in my kitchen! How? you’ll know soon!

Collage1

Now the second announcement is inspired purely by your love and support that you show towards Indian Simmer. It fills my heart with joy every time I get an email or a tweet or a message on Facebook by you lovely people telling that you tried one of my recipes and it turned out good. Sometimes you are too kind to even post them on your blog like my wonderful friends Kulsum from Journey Kitchen who tried my molten chocolate liquor cake or like Sabera from One Life To Eat who blogged about my chocolate cake. Or sometimes you just can’t wait to eat the food and still manage to take a photo like beautiful Joy from Joylicious who sent this gorgeous photo of Palak Paneer:

Joy's-Paneer

Thanks so much guys! So I came up with this idea which I kind of stole from Ellie’s Recipe Shoutout series. But its mine now! The idea is that if you try any of Indian Simmer’s recipe then do let me know. Send me a link if you wrote a blog post on it or if you don’t have a blog then no problem, just take a photo and send it to me and I will post that here on my blog to share it with the rest of the world. We’ll call it Indian Simmer in Your Kitchen! Your blog post or photo will be featured just like the ones featured here today.

Karen'sNaan

Its kind of a coincidence that recently I’ve come closer to one of my friends who is gluten intolerant. At the same time I got to know Jenn from Jenncuisine who has a gorgeous blog and she shares gluten free recipes there. Both these ladies have opened my eyes about the whole topic and kind of inspired me to cook some gluten-free food too. Then a few days back Karen form Cooking Gluten Free tried a gluten free version of my Naan Recipe and sent photos of it posted above. They really inspired me to do something new on my blog as well.

So here’s the third announcement I would like to make today. I will be posting a Gluten Free recipe on IndianSimmer every month either featuring one of you gluten free cooks out there or one of my recipes. So if you have a gluten free recipe that you would like to share here on my blog just drop me a line and I’ll get back to you. The recipe doesn’t have to be of Indian food. It can be anything Gluten Free.

Now lets talk about how you can make that wonderful Rice-Pudding Mango Parfait in your kitchen.
Ingredients: Serves 6

3 cups whole milk
2 to 4 table spoons sweetened condensed milk
1/4 cup white basmati rice (rinsed and drained)
1 tsp cardamom seeds, crushed
1 ripe mango, peeled and diced.

Method:
In a deep saucepan, bring the whole milk and condensed milk to boil over medium heat. Stir constantly to prevent scorching.
Reduce heat to medium-low. Add rice and cardamom and mix well. Continue to cook for about 50 minutes, until the milk is reduced by half and you obtain a creamy consistency. Stir frequently while cooking.
Remove from heat and allow to come to room temperature.
Refrigerate, covered, for at least an hour.
When ready to serve, spoon some pudding into a wine glass, layer with some mango, and add another layer of rice pudding. Serve immediately.

Notes by the author: 
Use 4 tbsp of condensed milk if you like your rice pudding really sweet. With 2 tbsp, its is sweet but not overwhelmingly so.
If you have a mango that is firm, peel it and then use a vegetable peeler to create thin mango slices. Arrange the slices on a plate and place a scoop of the rice pudding in the center of the mango “carpaccio”.

Rules for the giveaway:

  1. In the comments section, tell me why you would want to win this book.
  2. For an extra chance you can go follow Monica on twitter @mbhide and/or on Facebook, come back and tell me that you did.

Last date for entering the giveaway is 1st March 11:59 pm EST. A total of four winners will be chosen two from the US and two from India separately. And the results will be announced on my 2nd March post. So hurry! If you reside in the US or India or have an address in either of the countries then you are eligible for the prize. 

Food Photography: Q&A

48

I’ve been very bad with keeping track of time lately. I’m planning just a lot of things right now while trying to balance a life with a toddler, a hungry family and a million other things on my hand. I am mostly successful at this but my plan for doing a post on food photography Q&A kept falling outside the ‘mostly’ category. Until now! I was very happy to see lots of emails with interesting questions. I tried to pick three or four questions which were common and I am trying to answer them here today.

IMG_2403

This photo got most of the questions so I’m discussing it first. Following is the camera setting for the photo:
Lens: 50mm f/1.4
ISO:1200
f-stop: f/5.6
Shutter Speed: 1/60
Photo was taken in the afternoon around 4-5 pm when sun was not very harsh in a room with just a single source of light coming from 3 o’clock right.

Question: I read that you use 50mm f1.4 lens for food photography. I want to know if you use the same lens to take top view photographs and what minimum f-stop range do you use so that everything is in focus?

Response: Yes, I use the 50 mm f/1.4 lens most of the time to take my food photos. In order to take a top shot and to keep everything in focus I first set my camera to aperture mode and then I try to use as high an aperture value as possible while keeping the shutter speed more than 1/80 seconds to prevent any shake (I hand-hold the camera). Typically I’d be happy with f8.0 but even a 5.6 is good enough. Photos with dark backgrounds and single source of light get tricky because the dark background and less ambient light usually ask for a small aperture value so that the shutter speed is high enough to prevent any shake. Again, I hand hold the camera – if you have a tripod that helps you position the camera well for a top view, that might be an option to explore (that way you can have long exposures and still not see any shake/blur in the image). For me the obvious option is the dial up the ISO, so I go as high as needed to prevent the shake. The downside of high ISO is high grain in the image but post processing software will allow you to remove that noise.


Another point that I keep in mind while taking a top view like this is to use props that are not too tall because taller props are more likely to go out of focus and become distracting.

Question: I see that you mostly use natural light. What if light in my house is not very good? 
Answer: I’m lucky to have good source of light in the house but still sometimes its not very bright outside and if I still need to take photos I first try to get as close to the source of light as possible. Again, in this case too I rely on higher ISOs. Reflectors come to rescue as well. White foam core boards from art and craft store are my best friends. Set them up as close to the subject as possible opposite to the source of light.

IMG_2172

Camera Settings:
Lens: 50 mm f/1.4
ISO: 320
Shutter Speed: 1/400
f stop: f/2.0

Question: What’s your thought process while styling a “not so sexy” food?
Answer: That’s a fabulous question! That’s what I asked the famous food stylist Tami who also blogs at Running with Tweezers once. You can get a detailed answer to that question on her post. As far as I am concerned, I try to make it look sexy by sometimes adding props, adding color to a flat colored food or sometimes by playing with light.

FoodPhotography-Q&A

Lens: 50mm f/1.4
ISO: 500
f-stop: f/2.2
Shutter Speed: 1/250

Question: How much do you rely on post processing or would you recommend post processing software?

Answer: Although I don’t like to post process my photos a lot but I do recommend having software that can help you brighten things up. I use Photoshop to increase the exposure of photos that don’t look well-lit and I also sharpen them as needed. Curves is my favorite tool because it helps in accentuating the contrast while keeping the subtleties intact. I am also exploring Lightroom. A cheaper option is Photoshop Elements. If you don’t want to spend money, then you can try using photo editing software that came with your camera. They will typically have very good implementations of common actions such as exposure and sharpness. I’ve heard good things about open source software such as Gimp as well. 

I hope some of these were questions that were also in your mind and that I was able to answer them. If not then do let me know and I’ll try to cover them in my next Food Photography Q&A post.

After seeing your wonderful response and having some great discussions with some of you I would like to request one thing here. If you have any tips/techniques that, even though small, help you in your photography, please share them here so that others can also benefit from them!

Chocolate and Pear Tart – To Love!

To LOVE!!

When A was packing his bags and getting ready to go on another one of his trips, I got really upset because more than a week-long trip meant that this would be the first Valentine’s Day when we’d be apart! But to tell you the truth, this one turned out to be probably the best Valentine’s day I had ever had (sorry A!) because for the first time, I got to spend it with the love of my life. Just the two of us!

The day began with us waking up to each other in the morning. Then a nice breakfast with us chasing each other all across the house followed by a long walk on a sunny and warm day. By the evening, we were so tired having fun all day long that we just cuddled on the couch watching our favorite movie and eating chocolate (chocolate and pear tart to be specific!). And just a little while back we ended our most wonderful Valentine’s Day with a good night kiss!

I am sure you have guessed it by now! Little monster was mommy’s Valentine and she just made the day perfect just like she does effortlessly with every day of my life ever since she was born!

ChocoPearTart4

But whatever I do, she is and will be a daddy’s girl. She has been missing Papa so badly for the past few days and whenever we miss papa, we just make what papa loves. I’m sorry if you are fed up of seeing chocolate after chocolate recipes on Valentine’s Day. But what can I do, chocolate is his favorite dessert and someone around here is missing him a lot!

ChocoPearTart3

I found this recipe for Chocolate and Pear tart here a while back but just like a lot of other recipes this one was sitting in my “recipes worth trying” folder for a while now. “Chocolate needs an occasion”, I’d say to myself every time I would look at this one. Recently, while I was looking at the recipe, the little monster saw a photo and jumped, “Ma! totlate (chocolate)!”. So I decided, let’s just make it and I got the ingredients, which were so simple that I didn’t even have to make a trip to the grocery store. Both of us had a ball melting the chocolate and messing up the whole kitchen. And you should have seen her face when the tart came out of the oven!

ChocoPearTart2

Do you see those holes in the tart? That’s because those tiny little fingers couldn’t resist poking into it!

Now the recipe that I was referring to used sliced and poached pear while I used fresh fruit wedges which I think tasted better as you could eat nice chunks of pear with creamy and smooth chocolate. You can check out the link mentioned above if you want a process for slicing and placing thin pear slices.

Ingredients:Adapted minimally from this recipe  (Serves 6)

For the crust (lightly adapted from Dorie Greenspan)
1 1/2 cups all purpose flour
1/2 cup confectioner’s sugar
1/4 tsp salt
1 stick butter, very cold, cut into 16 pieces
1 cold egg, lightly beaten

For the filling
3 Pears (ripe and firm)
8 oz good semisweet chocolate
3/4 cups of heavy cream
1/4 sugar
1 egg
1 egg yolk
seeds from 1 vanilla bean or 1 tsp of vanilla extract
Confectioners sugar for sprinkle

ChocoPearTart

Method:
Mix together flour, sugar and salt in a mixing bowl.
Cut butter into very small chunks. Add it to the dry ingredients and pulse it in a food processor so that butter and flour mix together.
It will still look crumbly. Add eggs and pulse the food processor again.
A dough will form. Take it out of the food processor and work it with hands on the kitchen counter. Knead the dough for a couple minutes until the crumbly mixture is nicely incorporated.
Take a tart pan and lightly press the dough into the tart pan. The dough should cover all the sides but not lose its crumbly texture. Try not to work it too much or the butter will start to melt. Place the tart pan in the freezer for 1/2 hour.
For the filling:
Preheat the oven to 375 deg. F
Peel, core and cut the pear into quarters. Cook it in a microwave until they are just about tender.
Take out and let it cool.
In a double broiler melt the chocolate with cream. Whisk thoroughly so that it all incorporates well.
Then add sugar to the chocolate and mix it till the sugar dissolves well.
Set it aside and let it cool.
Whisk egg and egg yolk in a mixer. Add vanilla beans or extract and mix it together.
Once the chocolate and cream mixture is cool enough pour it into the egg with mixer on medium low to combine everything together.
Take out the tart pan from the freezer. Arrange the pears and then pour the custard into the pan carefully not to pour on top of the pears but from the sides.
Place it into the oven and bake for about 45-50 minutes but I start peeking after 40 minutes.
When the chocolate custard is puffed and set, its done. It should be a little firm to touch and slightly cracked from the edges.
Take it out and let it cool before serving, only if you can resist!

Guest post on Rasa Malaysia – Samosa Recipe

Samosas the most popular Indian street food.

I got to know Bee from Rasa Malaysia a couple months back. Wait, let me rephrase that, “Bee got to know about me and Indian Simmer a couple months back” because I’ve known her forever! Ever since I was not even a food blogger. Like everyone else, my first go-to place was her blog every time I wanted an Asian recipe and she has been an inspiration for me all this time. So you can imagine how I felt when I got an email from her saying how much she liked my blog and my heart almost skipped a beat when it was followed by a request to do a guest post.

Bee asked if I can share a recipe for Samosa. Samosa is one of the most popular snack/street food from India and I have so many memories related to it that I just jumped at the opportunity and said yes! It’s true that I had to make a couple of calls to my mom to get all those little tips which finally helped me make the perfect samosas that we get in the shops at every street corner in India.

So if you’d like to know how my samosas came out, please head over to Bee’s blog and check out my guest post at Rasa Malaysia.

Matar Paneer

Buttered roti with curry

Yay, I’m finally here with a paneer recipe! I know a lot of you made it last week and I was starting to get emails that went “what the heck do I do with the paneer that I just made? Is a recipe coming anytime soon?” So folks here’s the recipe for Matar Paneer. Sorry it took me so long and as usual I can give you the same old lame excuse that things kept me busy and I did’nt get time and la la la… but in reality I was trying to make good use of the paneer that I had worked so hard for and so I was waiting for the right day. Then came Super Bowl Sunday and I grabbed it!

Super Bowl feast in my house!

So tell me how was the game for you last night? Are you one of those crazy fans who live and breathe football and wait for the Super Bowl Sunday for the whole year? Or perhaps more like me who also look forward to the day for the whole year but mostly because of the feast and buzz part of it? Our evening was perfect. I didn’t care much about the game personally although a few people in the family did, BIG TIME!! But yes, there was a feast and I loved it! There were a lot of things on the menu and a lot of leftovers still in the fridge which I can’t wait to finish up before the husband comes back from work but let’s just stick with the Matar Paneer here!

IMG_0322-3

Matar is a hindi name for peas and paneer as you know is Indian cottage cheese and when they are cooked together in a creamy and rich curry sauce its called Matar Paneer. There were a few very good and important questions that you had for me about paneer when I posted the homemade recipe for it, so I first want to address those.

Cook Snap Repeat asked: How much cheese does this recipe end up making? And, just out of curiosity, can you do anything with the liquid that is left?
The posted recipe makes about 180-200 grams of paneer. When cubed I got about 2 cups. I use the left out liquid to make dough for roti, naan, and even pizza dough. You’ll be amazed how soft the bread comes out to be.


Rella asked:  Do you happen to know if using lactose-free milk will still work with this method of making paneer?
As far as I know, yes you can. But I have never tried it, so do let me know how it works out for you.

Gaia asked: Is it something like the middle eastern Labna? 
I am not really sure about Labna. But I’d love to know more about it and if any of the readers know Middle Eastern food well, then please share and I will update this space.

Squirrel Bread asked: Can I assume you started with whole milk? I have 2% right now — do you think that’d work?
Yes, for this particular recipe I started with whole milk but I have made paneer with 2% and even skimmed milk in the past. It works absolutely fine and paneer is soft.

This is not exactly a question but a tip from someone who didn’t mention their name but I thought I would share:
I have been making Paneer for about a year now! This is a very typical recipe for making it. For some variety, try adding some chopped chives or some Indian spice to the milk just as it starts to curdle. 

Matar Paneer

Alright let’s get to the recipe, shall we?
Ingredients: Serves 8

2 cups of cubed paneer
1/2 pound of sweet green peas (frozen or fresh)
1 cup onion paste
1 tbsp ginger paste
1tbsp garlic paste
1 1/2 cups tomato puree (you can even used canned tomatoes or fresh diced tomatoes. They just need to be cooked a little longer to melt with the masala)
1 1/2 tbsp coriander powder
1 tsp turmeric powder
1 tsp green chili paste (optional) I don’t use it since I have a toddler at home. You can make it spicy according to your liking.
1 tsp freshly ground pepper
1 1/2 tsp garam masala
1/3 cup cream or half n half
2 1/2 tbsp oil
Salt to taste
Sour cream n chooped cilantro for garnish (optional)

Method:

Take hot water, add 2 tsp salt to it and dip your paneer cubes in it. Set aside.
Heat oil in a thick bottom pan. Add ginger garlic paste. Cook for about 15 secs and then add onion paste.
Turn heat to medium low and cook the onion, ginger, garlic paste until all the water has evaporated and the paste turns light brown.
Add coriander, chili paste (if you are using it) and turmeric powder, mix it all together and then add salt. Adding salt at this time will help loosen the paste a little and oil will start separating. That’s when you know that the paste is cooked.
Now add tomato puree or if you are using diced tomatoes, add them and let it cook for about 3-4 minutes. When all the excess water evaporates from the tomato, add garam masala (my dad always says don’t let the pan stay open without a lid after adding garam masala for long because all the aroma sneaks out!)
So right at this time add cream, mix it with the paste and then add the peas, mix well and cover with the lid.
I use frozen peas all the time and they cook fast. If you are using the same then let them cook just until the peas are tender and that will take just a couple minutes. In case of fresh peas it might take longer. So according to your peas adjust the time.
Now again I like my curry to be thick and free flowing but if you like yours thinner add a little water at this time.
Once the peas are close to being done, take the paneer, drain out all the water and add it to the matar curry.
Mix it all well together but go a little light handed while mixing since the paneer is soft and might break.
Cover the lid again and cook for about 3-4 minutes.
After the peas are all cooked through and paneer has absorbed all the tasty juices, I turn off the heat and let it sit for another 10-15 minutes before serving.

Nutella = Bliss

Happy Nutella Day!

At first I thought I would be able to give “Nutella Day” a pass since I neither had time nor a recipe that could do justice to Nutella! But after looking at such fabulous posts from some of my favorite bloggers, I realized I had to celebrate my all time favorite spread/snack in some way. And what better way to enjoy nutella than eating it right from the box or simply spreading it over a nice and crispy toast?!

Enjoy your nutella however you like it. Happy World Nutella Day everyone!