Wordless Wednesday (sort of!)

Somehow my photography series Wordless Wednesday has been getting neglected for a while now. Rather, as much as I wished, I have not been able to update Indian Simmer too and I am sure many of you have forgotten about it! So today after finally moving into our new place, I thought I would start what had been left behind, all over again. So I am sharing a few photos I took in the last few days. These past few days have been really hectic and filled with some ups and a few more downs!

As if it wasn’t crazy enough, the little one fell off the chair and hurt herself. A run to the emergency room and a few more trips to the doctor and she is doing MUCH better than she did a week ago.

We moved into our new place and this was the first time I was seeing it (I know I trust my husband WAY too much!). But the place is nice and has tons of natural light. You know what that means to a food photographer/blogger, right?

We also managed to steal some time and went cherry picking with friends.

Kids loved eating cherries picked straight off the trees and we had our own little picnic in the farm.

And enjoyed some California sun and beauty!

DMBLGiT May 2011 Winners

Packing, finding a house, working with a mover, throwing stuff you hung on to for years, power connection, internet, water…arghh! Nothing related to a move is pretty. So you can imagine how ugly my life must be right now. We left our old house a week back and have been living with friends until we move into our new place (most likely) today. Its great living here with friends because now there is no cleaning or fixing dinner, rather you get everything served on a platter. But nothing gets better than your own bed, a kitchen where you know what is where and a place you can call home. This is what’s keeping us from having a schedule and me from cooking something that I can share with you. All your emails and tweets are helping me survive all this and assure me that its ok not to post for a little while to take care of other important things is life. Thanks so much for that and trust me I am missing you WAY more than you are!

So today I got an excuse to steal some time from my crazy schedule to come here. Today I have the results from last month’s DMBLGiT event and I know a lot of you were waiting for this post. But before I announce the winners, can I just complain how difficult you made the lives of all five of us judges! All 73 of you. I was amazed at the emails pouring into my inbox with your photo entries. Every entry was gorgeous than the previous one and was it was indeed difficult to pick one in each category. But finally we agreed with each other and picked the following photographs which we loved the most.

Overall Winners:

 First Place: Fork Spoon Knife by Asha Pagdiwala (Nikon D5000, 50mm lens).

Second Place: U Try it by Amy Tong (Nikon D3, 18-200mm)

Third Place: 6 bittersweets by Xiaolu Hou (Canon EOS Digital Rebel XS, EF 50mm f/1.8 II Lens)

Individual Category Winners:
These are the photos that scored highest points in the particular individual category:

 Edibility Category Winner: Food and Story by Asri (Nikon D700)

 Originality Category Winner: Just Home Made by Radhika (Nikon D90 / 18-105 mm)

Aesthetics Category Winner: Kathryn Grace Photography by Kathryn (Canon Rebel Xti with 50mm 1.8 lens).

Host’s Award:
As the host of this month’s contest I can choose one photograph that I loved so much but was not a winner in one of the categories. I have to admit there were two photos that made my job difficult. But I ended up picking this photo by Claude-Olivier Marti mostly because just by looking at the photo, I could immediately connect with the subject and knew what the accompanying story will be. Asparagus was the hero in the photo, light was lovely and I liked the depth of field.


1001 recettes by Claude-Olivier Marti (Nikon D300, Sigma 70-200mm f2.8 EX DG Macro).

Congratulations to all the winners! And thanks so much everyone who sent in their gorgeous entries and helped making this contest a success. If you want to participate in this month’s contest then you might want to visit Charline Cuisine who is the host this month or contact Andrew if you want to learn more about hosting the contest yourself.

Indian Stir Fried Noodles

Hey everyone, I’m still alive! That’s what I’ve been reminding all my friends and family who have almost stopped calling or checking on me. Well, mostly because I have been “off the grid” because of all this moving and packing madness going on in our household. Its only when you have to pack them in boxes that you realize how big of a hoarder you are. I’m writing about this just to tell you that this is what’s keeping me from coming here on Indian Simmer and doing what I love to do. So please hang in there with me!

India

Alright, lets talk about some happy things! I might have told you how fun and special my recent trip to India was. I got to do a lot of things, some of them new and some after a long time. Rode around the city in an auto rickshaw after years. What an experience it was to walk on the same streets you grew up in, this time with a camera in hand and a different perspective maybe.

India

This was the first time I got to spend a few days with A‘s family (my in-laws) without the husband! I was anxious and nervous, very nervous. I had friends telling me that its a whole different ball game with his family when the husband is not around. Hence the anxiety and nervousness to see how that experience was going to be. Well, it really was a different ball game! I got to know them in a way I was not able to do before and got closer to them like never before. Papa (his dad) is a simple man. You just cook him his favorite dal makhani and he’s all yours. He will talk to you about politics, world issues and stock market at the same time he can tell you about what’s the latest trend in India right now or which movie is not doing very well in the box office. You can have a conversation with him on any topic and he’ll be right there with you!

India

Mumma (his mom) is not very much a talker. You will have to either meet her in the kitchen or talk about her kids or maybe both! Stand by her side learning how to make A‘s favorite gulab jamun or pani puri. Through her glasses you can see a sparkle in her eyes when she shares those recipes and every little story attached to them. She would religiously try to learn my recipe for his favorite pasta or chocolate cake so that the next time when the son visits she can surprise him with some. We would climb the mango tree (well, I climbed the tree but she was the one who motivated me to!) to get some raw mangoes so that she can make her signature mango mint chutney that A still misses.  I was nervous how I would relate to them with A not around, but forgot that it is A who relates me to them.

You know how there are a few dishes that only your mom can make the right way? Every person has one, so does Mumma. These stir fried noodles is one of them. Its a very simple recipe using sevaiyan (thick vermicelli) with few ingredients involved but however hard I tried, I could never get it right for him. Sometime the noodles were too thin, the oil too little or sometimes it was just about the curry leaves. I wondered if it was simply about a different set of hands or cook. So one of my agenda’s from this trip was to perfect the art of cooking his mom’s stir fried noodles.

I shared the same with mumma and I could see the excitement on her face just hearing that. She made several trips to the chaurahe waali dukan (corner shop) until she found the right noodles, managed to pluck some curry leaves from the neighbor’s plant while they were having their afternoon siesta and made sure I listened! Yes, I listened and took notes. After coming back home this was first thing that I cooked. Did it again and again until I exhausted the whole stock of vermicelli that had she sent with me and until I came close enough to her taste. I guess I can never make it taste like mumma’s but close enough is good enough for me! Here I am sharing the recipe with you.


Ingredients:

2 cups thick vermicelli (wheat vermicelli that you can find in any Indian market if not in your local store)
1/2 cups finely chopped onion
2 tbsp curry leaves (roughly chopped if the leaves are too big for you)
1 tsp black mustard seeds
1 tsp coriander powder
1/2 tsp curry powder
2 tbsp oil
1 tsp lemon juice
Salt
Water

Method:

In a saucepan boil some salted water. Add salt to taste. Set aside.
Heat oil in a separate wide pan or my mom-in-law uses an Indian wok. Add mustard seeds.
Once they start to pop, add curry leaves. Step aside after adding the leaves as they can pop and splatter oil on you.
Add chopped onion and cook until its translucent.
Add coriander and curry powder. Mix and add the vermicelli (if you got long vermicelli, break them smaller – 2 to 3 inch in length).
Fry the noodles for a couple of minutes for them to nicely coat in oil.
Start adding water slowly. A little less water can leave the noodles undercooked and a little extra can make them soggy. So the trick is to add a little water, keep stirring for noodles to cook and at the same time extra water to evaporate. Keep doing the same until the noodles are just a touch undercooked.
Turn off the heat, add a splash of lemon juice, mix and cover the noodles for a few minutes. Steam trapped in the pan will cook the noodles through.
Serve hot.

Announcing DMBLGiT Judges and Indian Simmer Giveaway Winners!

5
Let me just start this post by telling you how excited and amazed I am to see all the gorgeous photos you guys have been sending. Every time I check email, my inbox has emails with DMBLGiT entries. Thanks so much for sending your photos for the contest. If you have not sent your entry yet then don’t worry, you still have plenty of time to pick a photo and send it to me. Entries will be accepted till 20th May. Just by looking at the photos, there is one thing I can tell already – the judges are going to have a very hard time picking a winner!

Speaking of judges, let me introduce to you a very talented group of photographers and my lovely friends whose work always helps me learn so much. I want to “officially” thank them for helping me judge the photographs and making my work a little easier. They were also kind enough to share a quick photography tip that they think never fails to help them, so please welcome!

Kimberly Taylor:
Kimberly is a very talented photographer and one of the sweetest persons I’ve ever met. She shares her life with her loving husband and gorgeous boys in their little farm on a hill. When asked to share a little something about her photography she says, ” I think my photography is an expression of what I love about life.  I photograph food and the places it comes from. I love natural light and shooting on location so that the experience of gathering the food is part of the journey”.

Photography Tip: Lighting is my number one priority – turn off the flash and if at all possible, use natural light.  Content is important, but lighting can make or break your photograph.
Website: Kimberly Taylor Images

Jenn Oliver:
Jenn is a scientist living in Switzerland who photographs and writes about making and converting recipes to gluten free on her cooking blog Jenn Cuisine.  She calls herself an amateur photographer very much still learning the techniques and methods of food photography (which I completely disagree with!). She loves creating images full of color and showing that gluten free food can look and taste both rich and flavorful. Checkout her photography tutorials which I found very helpful!

Photography Tip
: Don’t be afraid to experiment.  Reading books and tutorials are great and there are many many helpful and informative resources available, but nothing solidifies new concepts learned like spending some dedicated time with your camera trying a bunch of different settings and arrangements.

Website: Jenn Cuisine
Email: jenncuisine[at]gmail[dot]com
Twitter: @jenncuisine
Facebook: http://www.facebook.com/jenncuisine

 Joy
Joy is just a pure joy to talk to and joy is what you feel when you look at her breathtaking photography. I want to give a special shout out to Joy who is on a honeymoon with her lovely new husband and still has been tolerating all my stupid emails and chats with me online if I ever need help. Muaah to you Joy, have fun there! 🙂
She says,”I stumbled upon food photography by pure chance.  I’ve always had a life long passion for food and photography and thankfully with the support and encouragement of family and friends I’ve been able to combine the two into an exciting career.  Embracing the natural beauties of nature, life and love I wake up every day excited about discovering the allurement and artistry of food photography.”

Photography Tip: When shooting food, I always strive to use natural light opposed to artificial.  Never shoot under direct sunlight as it causes harsh shadows and flat lighting.  I typically shoot right by a north-facing window as the light will be soft, indirect and fairly even all day long.

Website: Joylicious
E-mail: joy [at] joylicious [dot] net
Also on Facebook and Twitter

Dario Milao

Who knows better about food photography than a former chef turned food photographer? Dario, once a chef, now has a very successful food styling and photography business of his own in Sydney. In his spare time, he writes a blog where he shares very useful photography tips (definitely not worth missing!)

Photography tips: Don’t overdo the food and in general keep things as natural as possible.

Website: Food Pixels
Twitter: @foodpixels

Again, thank you all for helping me out!

Alright, now the part you were looking forward to the most. Winners of the giveaway hosted on Indian Simmer last week. Here they are:

Esther: Thanks for your beautiful pictures and writing, as always! I’d looooove the Rudraksha beads and the box of Indian style peanut brittle please!
Marla: I follow your tweets too 🙂
Tyran: I would like to win the coasters

Congratulations guys! Please email me your information so that I can send you your gifts.
Now I need something in return as well, don’t I? Tomorrow, 12th May is the last day to cast your votes for the blogger you like most on Saveur Magazine‘s Best Food Blogs Award 2011. If you like Indian Simmer then please help me with your votes! Click on the icon on top right corner of the blog, register (if you are not a member of Saveur already) and vote for Indian Simmer in the Best Regional Cuisine category.

Announcing DMBLGiT (Does My Blog Look Good in This) May 2011

I’m excited to announce that I will be hosting the May edition of DMBLGiT (Does My Blog Look Good in This). A popular food photography contest that was started by Andrew of Spittoon Extra.

Andrew and many others call it “the grandest food porn event available” on the web! Its a photography contest open to all bloggers who have a photo of food or drink posted on their blogs and every month a blogger hosts the contest. I’ve been submitting my food photos to the contest and was lucky to win a couple. So if you have a food or drink (or both together!) photo that you posted on your blog last month and you think its gorgeous, just send it to me and enter the contest. A group of five judges (including me) will score the photographs based on three categories – edibility, aesthetics and originality. A total of 6 winners will be announced next month.

To check out last month’s entries and winners please visit lovely Rose’s blog Magpies Recipes.

General DMBLGiT Rules:

  • Only one food/drink photograph may be entered per person.
  • The photograph must have been taken by you.
  • The photograph must have been posted on your blog between April 1 through 30, 2011.
  • The deadline to submit your entry is May 20, 2011 at midnight, whenever that is in your part of the world.

Scoring:
A panel of 5 judges, to be introduced later this month, will choose 6 winners based on the following criteria:
Aesthetics: composition, food styling, lighting, focus, etc.
Edibility: does the photo make us want to take a big bite out of our computer monitor while drooling on our keyboard?
Originality: a photo that makes you stop, look twice, and think “Wow! I never thought of photographing it like that before.” Three overall winners will be selected plus one in each of the 3 categories. As host I have the privilege of choosing one photo that I think stands out, but wasn’t chosen as a winner. My post announcing the winners for this month will be published by June 1, 2011.
 
How to Enter DMBLGiT:
Send an e-mail with “DMBLGiT Entry” as the subject line to me at indiansimmer [at] gmail [dot] com. In your email, please include:

  • An attachment of a single qualifying food or drink photo you’d like to enter. It should be without text or watermark and no more than 500 pixels in width.
  • Your name
  • Your blog URL
  • The title of the image/what it is
  • The URL of the post containing the photograph
  • The camera and lens you used

Photographs will be loaded into this Picasa gallery as I receive them. If you don’t get an acknowledgment from me within 72 hours of sending your entry, please leave a message in the comments section of this post, drop a message on my Facebook page or catch me on Twitter. By submitting a photo, entrants agree to their photo being redisplayed and altered in size on the host’s page and on the Spittoon Extra DMBLGiT page.

If you have any questions about this month’s event, please feel free to email me. Anyone with interest in hosting a future edition of DMBLGiT should email Andrew with “DMBLGiT Host” as the subject. So what are you waiting for? Dig into your lovely blog and send in your best photo to indiansimmer [at] gmail [dot] com. Also don’t forget to enter the giveaway on at Indian Simmer till 10th May.

A trip back home and some gifts for you!

Indian Simmer is a finalist for Best Regional Cuisine in Saveur’s Best Food Blog Awards. Winners are chosen by reader vote. Please click on the icon to the right, sign up and vote for Indian Simmer at Saveur.com by May 12.

You must be thinking where the heck did I disappear after showing my  face for a little. Well, we are packing again. Mmm hmm.. again! I returned a week back, got a few good news and boom! back to reality. Back to the trips to Home Depot, brown boxes and measuring tapes and to a room full of things most of which I never used but still packing them. You may have heard me say this before but I am going to say this anyway – “packing sucks and packing to move sucks even more!” I’m doing all this staring at the light on the other side of the tunnel where I’ll be moving back to California. Not that I don’t like Charlotte but California is where my heart belongs I guess. That’s where we made our first home as a new couple and created a new life for us thousands of miles away from our real home!

Trip back home

Our recent trip back to the real home a week back was great too. Its always good to see family and seeing them after years and specially after some of the most defining years of life, it was amazing and emotional!

These things have take place of doodhwalas in India now!

I was surprised to see how much has changed in these few years though. Tall buildings have taken place of the open fields. These funny milk machines have taken place of doodhwalas (milkman) who would come every morning to give milk and mom would complain everyday that he’s added more water to the milk today!

Old grandpa's fan!

But some things never change. Like my grandfather’s century old table fan, which now doesn’t even work but still has a reputed place in the house.

Fresh breads selling by the street

Like the smell of freshly baked breads by the local baker sitting in his stall by the street.

Bangle store in India

Like the sparkling, colorful bangles of chooriwala (bangle sellers).

Yup, that's me :-)

Like the smell of henna (Indian version of temporary tattoo).

An Indian shop

and like the mango leaf toran (garland hung on the doors, considered sacred) outside every Indian house and tiny shops.

They never change and they never fail to make you nostalgic even with the mere thought of them! This trip turned out to be all we had expected it to be! But what we never expected was how well the little one took all the changes she had to adjust to in a month’s time.

Little one off for a walk in the park :-)

She loved morning walks with her dadu (grandpa).

IMG_9374

The cousins met and kinda got along!

IMG_9583

Although the gatekeeper was not as happy with her but she couldn’t care less. This trip was supposed to be all about her and she made the most of every opportunity she got. Ate cookies for breakfast, chocolates for lunch and ice cream for dinner! Do I still need to say that she had a good time? So now I and A are detoxing her and keeping her away from all the “good” things and closer to all things “green” as much as possible.
I have so many stories and memories from this one trip and I’ll keep sharing them with you but I have something else that I want to share with you too. Some gifts I got for you from India. Some tiny little tokens of love and a few bits of India for you. Consider this my Mother’s Day gift to you!

Rudhraksha

First thing I got for you is something that is considered sacred and can be called a rosary for hindus. It is called Rudraksha beads. You can learn a little bit about it here. It is believed to have medicinal benefits too and it is claimed that wearing rudraksha beads is good for heart.

P.S – I tried my best to get the best rudrakhsha beads that I could find but I don’t claim them to be real bead since I am neither a jeweler nor an astrologer. I’ve bought it as an accessory and not a medicinal cure.

Then a food blogger needs to get some kind of food right? Due to strict custom rules I couldn’t bring all the delicacies I tried there but still managed to sneak in some Indian version of peanut brittle for you. We call it chikki in India and I promise you’ll love it!

IMG_9707

Then I found these coasters with beautiful carved metal on them. They looked cute so I got one for myself and one for you.

IMG_9718

The last thing I got for you is this cute little ethnic Indian decoration on the right. You can hang it on your door or find a tiny little place in your house to decorate them. 

IMG_9727

Every time I give something away I tend to neglect the lovely supporters of Indian Simmer on Facebook and Twitter who have slowly become close friends of mine. So this time I thought I’ll organize a giveaway for everyone. Please read the steps carefully to get a chance to win what you really like out of the three items.

  1. If you would like to win the Rudraksha beads and a box of Indian style peanut brittle, then please leave a comment here stating that.
  2. If you “like” Indian Simmer on Facebook then leave a comment here stating that and get a chance to win the 4-piece coaster set with silver carving on it.
  3. If you “follow” Indian Simmer on Twitter then leave a comment here stating that and get a chnace to win the ethnic Indian decoration.
  4. If you already follow Indian Simmer on facebook, twitter and subscribe to its emails then please leave a comment stating that to get a gift of your choice.

Entries are open until 10th May 11:59 pm EST. Winners will be announced on 11th May. This giveaway is open only to US addresses, so if you have an address in the United States or a friend with a US address then you are eligible.


I’m Back and Doing a Happy Dance!

49

India Trip

Hello Hello! How are my favorite people doing there? Aww, I missed you and I missed Indian Simmer! Its good to be back, not so happy about all the comforts gone and actually having to do things on my own but it still feels good to be back. The last one month spent visiting home was the most refreshing, emotional and much needed time I had to myself. Especially after having a naughty toddler at home, what can a mom ask for more than some time with closest people in her life and peace that the kid is taken care of. Yes, I had no idea where the little monster was when I would nap for hours but trust me she couldn’t care less and had a time of her life herself!

India Trip

She visited the places her maa and papa spent their childhood at, she ate food her maa and papa grew up eating and she was pampered and spoiled by the same people her maa and papa were spoiled by. We laughed, we cried, we ate, we shopped and made tons of memories. Good times! Although I left one home, it is good to be back to another and its good to talk to you again!

Will tell you all about the trip soon but there’s something else I’m SUPER excited about today and can’t wait any longer to share with you. Here comes the “happy dance”- Indian Simmer has been selected as a finalist in SAVEUR magazine’s Best Food Blog Awards! It made it to the final few in the Best Regional Cuisine Blogs category. Being chosen by SAVEUR among thousands and being nominated by you lovely readers is like winning to me! Ok, who am I kidding? I want to win it ALL the way! PLEASE please help me get there and vote for Indian Simmer in the Best Regional Cuisine Blog category! You will need to create an account if you don’t already have one. Voting is open until May 12, and the winners will be revealed on May 17. Thank You so much!

Now a few more good news that welcomed me when I came back home. Indian Simmer was also awarded a Reader’s Choice Mom Food Blogger 2011 award by hugely popular Babble.com, an online parenting magazine. Then my Savory Indian Pancakes were picked and featured on the Food News Journal. A couple more projects are on their way but it might be too early to talk about them. Will keep you posted. But just wanted to let you know that it has all happened because of you, your love and your constant support. I owe you big time!

UPDATE: Lovely people from Saveur contacted and informed me that international readers (living outside of US or Canada) can also vote for their favorite contestants now. They are trying to fix their systems but for now  international voters should select USA or Canada as their country, and proceed from there by adding their own address. Once they update the system (which may take some time), they may go in and modify their profiles if they wish. I got so many emails from my friends outside of India who were bummed that they can’t vote, now they can. So please help me with your votes! I love you 🙂

Orange Grand Marnier Soufflé by Xiaolu from 6bittersweets

I’m just so excited about this post and the beautiful blogger that I am introducing with you today that I have no idea where to start. Well, I shouldn’t call it an introduction because I’m sure if you are even a little bit familiar with the blogging world then you would should know Xiaolu from 6bittersweets. If you don’t know her yet then where have you been?! Xiaolu was someone who was so helping and supporting of me when I was starting as a blogger myself. I remember being always amazed by her photography and hoping to one day take photos like her. I tried to study every shot of hers and wrote emails asking for tips and always got a prompt reply. She might say that she’s learning but trust me she’s one seasoned photographer/blogger and a person who has so much to learn from. Today is Easter and I know I’m a little late at coming to you with a festive recipe but I’m sure Xiaolu’s post will make up for it. Enjoy the recipe and her souffle and wait for me because I’m getting back home soon. Next time I talk to you I’ll be doing that sitting on my couch in my living room!Please welcome Xiaolu from 6bittersweets!

Guest Post by Xiaolu 1
Hi there! If you’re reading this, you’re probably aware of how talented Prerna is…at cooking, blogging, photography…you name it! And not only that. She’s also an amazing mother, wife, and a lovely person all-around. I know I’m preachin’ to the choir, but preparing this post brought back memories of my 1st encounter with Indian Simmer. I don’t recall exactly how I wandered here, but I know the post that started it all for me: her falooda kulfi. Even now I can still feel my excitement growing as I scrolled from one stunning photo to the next. What gorgeous light…and skillful styling! I could practically taste the nutty flavors and feel the cool creamy kulfi melting in my mouth.
Eagerly I turned to her older posts, certain I’d find the hefty archives of a seasoned blogger. But that wasn’t the case — Indian Simmer was just a baby, barely 6 months old! Needless to say I was so impressed I subscribed right then, and every post from Prerna since has made me evermore glad I did. I hope you feel my full sincerity when I tell you what an honor it is to be posting here today for Prerna and for you all. Thanks so much for having me!

Guest Post by Xiaolu 2

The treat I’m sharing today is the love child of my fondness for fresh seasonal fruit (especially citrus) and my obsession with cute, innovative ways to serve food. While these orange soufflés baked right in their shells fit my criteria for blog-worthy desserts perfectly, it’s Chef Stephane of Zen Can Cook who deserves all the credit for coming up with such a creative presentation. Never one to leave a good thing alone, I did add some small twists of my own. Most notably, I swapped out a small portion of the orange juice for milk, resulting in a hint of orange creamsicle flavor in the resulting soufflé. For me this was an improvement. But if you prefer to enjoy your orange desserts without the distraction of dairy, feel free to simply use more orange juice instead of milk.

Guest Post by Xiaolu 3

If you’re familiar with my blog, you know I like to be honest about my failures and share the lessons I learned from them. So here’s the truth: I made these soufflés 5 times over 3 days before I got them right. And it was the same problem each time. The soufflés would rise too quickly then collapse and overflow. Though I knew I’d used too much juice the 1st time, I immediately jumped to trying other batter recipes, batter amounts, and baking temperatures rather than ironing out the kinks in the original. It was only after the 4th failure that I realized I’d been using too large oranges the whole time. So what can did I learn (and what can you learn) from my mistakes? (1) Finding recipes with exact measurements and really following them is usually critical with baking, especially desserts as delicate as soufflés; (2) when a recipe isn’t working, try to identify what went wrong before jumping around to other recipes as you may have made a technical error that will sabotage those results as well; and (3) have a sense of humor even if things don’t go as planned. My fallen soufflés were still delicious. Tasting them motivated me to get it right, which allowed me to share this with you. Whether you make these to impress your friends or yourself ;p, I hope you enjoy these as much as I do!

Orange Grand Marnier Soufflé [Printable Recipe]
Adapted from Zen Can Cook Makes 6 soufflés

Ingredients:
6 medium oranges (about 2 1/2 inches wide)
3 large eggs, separated
1/3 cup sugar PLUS 2 Tbsp sugar, and more for sprinkling
3 Tbsp cornstarch
1 cup freshly squeezed orange juice
1/4 cup milk [not skim]
2 tsp freshly grated orange zest
1 Tbsp Grand Marnier liqueur OR defrosted orange juice concentrate
Pinch of salt
Powdered sugar, to serve

Method:
Cut off the top part of each orange (about 3/4-inch) and a tiny sliver from the bottom so the oranges can stand straight. Using a microplane grater, grate the zest from the top part. Reserve 2 teaspoons for this recipe, then freeze the rest for another use. Empty the orange shells with a grapefruit spoon (making sure not to pierce the skin). Press the orange flesh through a strainer. Measure out 1 cup of juice for this recipe. Set orange shells on a large baking tray.

Preheat the oven to 375 degrees F. Dry orange shells if damp and lightly grease the insides with softened butter. Sprinkle bottoms and sides with excess sugar. Shake out extra.

Separate the eggs. In a medium bowl, whisk the egg yolks with the sugar and cornstarch until smooth. Whisk in the orange juice and milk. Place the mixture in a saucepan and heat over medium heat while stirring constantly until it thickens. Remove from the heat and add the zest, Grand Marnier, and salt. Let cool completely.

Using an electric mixer, whisk the egg whites until they hold soft peaks, then gradually add the 2 tablespoons of sugar and keep whisking just to stiff peaks. Fold 1/4 of egg whites into the orange custard to lighten, then add the custard mixture to the egg whites and gently fold in until fully incorporated. Fill the orange skins just to the top with the mixture. Flatten the tops with a spatula. Use your finger or a damp cloth to wipe clean the rim of the orange skins. Bake for about 20 to 25 minutes, or until puffy and golden on top. Sprinkle with powdered sugar and serve immediately.

A New York Sunday Brunch, Eggs Benedict by Asha from Fork Spoon Knife

Its only when you are having a good time that you realize how fast the time passes. An entire month just flew by and its almost time to start packing the bags and leave home to go back to another home. After all the pampering and getting completely spoiled, we sadly have to head back to the reality. But there’s still a week left and I am planning to milk these 7 days of luxury as much as I can! Talking of luxury, let me introduce you to another favorite blogger of mine. Asha from Fork Spoon Knife. Another fabulous food blogger/photographer who like me is an Indian by birth and has brought a rich heritage of culture and memories from her country to the US. Why the word luxury reminds me of her blog? Well, once you visit her blog and see lip smacking recipes and flawless photography, you’ll know the answer. Her guest post today is a perfect example of how she takes simple everyday food and makes it all look so luxurious. Please welcome Asha and enjoy a New York Style brunch with her!

Eggs Benedict
I am not a cookbook person. No, really! Yes, I know, your jaw just dropped open. How can I be a food blogger and not be a cookbook person, right? Well, actually, I love cookbooks, I just don’t collect them. I like ogling at them at bookstores, turning pages filled with beautiful images of how a dish looks, feels and even tastes. I draw inspiration not only from the recipe that the image spells but the image itself, the styling, the light, the setting, the mood, the props.

Then, it is only natural, that I almost always reach for the most potently photographed and graphically presented books. “Almost“, I say, because there are indeed some exceptions. Books of yore, written by legends, that need no illustration to summon up the perfect image of how the finished dish should be.
Eggs Benedict1
Julia Child is an author, whose books you could read just for some light reading. She is witty yet succinct, describing each dish and it’s history in meticulous detail while somehow managing to keeping the reader completely engrossed and not the least bit bored. To her graceful words, the illustrative sketches are just the perfect complement.

My dear friend recently gifted me her two volume compilation of Mastering the Art of French Cooking (my favorite cuisine). This is my first recipe from her book. The first time I made Hollandaise, some three years back, I scrambled the eggs and found the whole experience much too stressful. LOL. Now, I am a more seasoned cook and I figured I could handle a multi part brunch with more panache than before.

With Julia’s precise instructions on hand, it was indeed a pinch to recreate the Perfect NYC Sunday Brunch, which, New Yorkers patiently wait, even hours, for, in the leisure of home, enjoyed in pyjamas! 🙂
Eggs Benedict on Thyme Shortbread
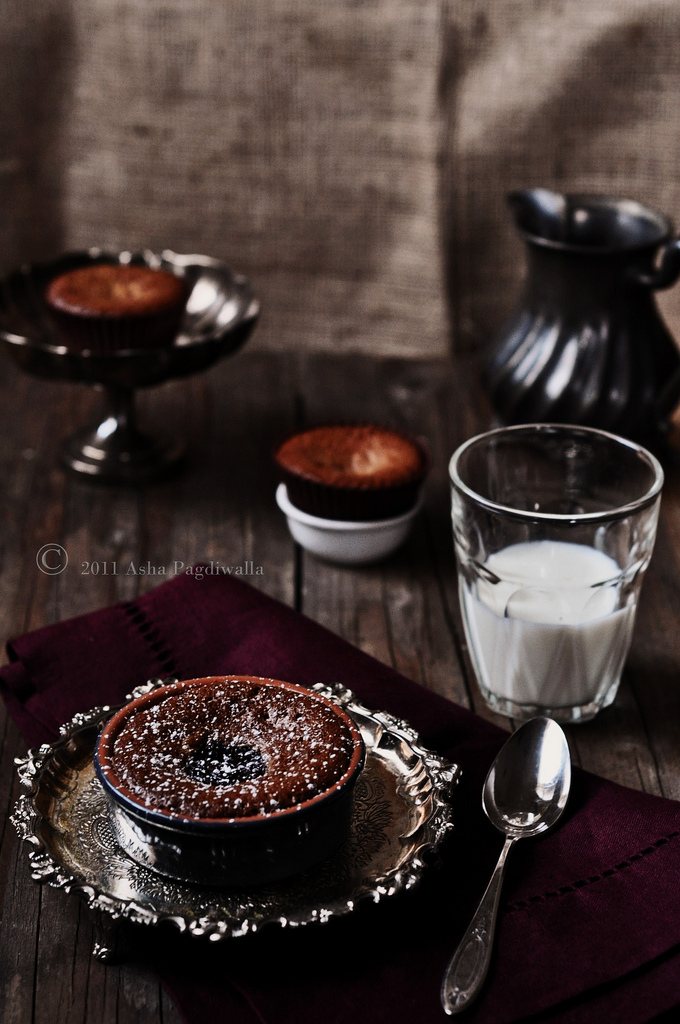
And the Hollandase! Oh! the decadence of it! Rich, buttery and instensely satifying. Perfectly worth the pain of flexed biceps and all that…perfectly executed too, btw!! ;-))
Voila! Je présente les Oeufs Benedict – oeufs pochés sur sablés au thym, avec sauce hollandaise… 🙂 Bon Appétit!

Eggs Benedict
(Homemade Thyme Biscuit, Asparagus, Poached Egg and Hollandaise Sauce)

For each sandwich:
1 thyme biscuit
1 egg, poached
2 spears of asparagus
3 T Julia Child’s Hollandaise sauce
salt as needed
1 tsp butter, softened
Cut each biscuit in half horizontally. Spread butter on the bottom half. You can toast if you like. I just prefer fresh out of the oven biscuit as is. Place the asparagus spears on the biscuit. Gently

Thyme Biscuits

200 g flour
1 tsp sugar
2 tsp salt
1.5 tsp baking powder
2 tsp thyme, finely minced
60 g cold butter, cubed
140 g buttermilk
1 yolk + 1 T cream for egg wash
Sift together the flour, salt, sugar and baking powder together. Cut into the mixture the cold butter until they are no more than the size of peas. Stir in the thyme and mix well. Add the buttermilk and mix for form a dough. On a floured surface knead just a bit to make into a non-sticky dough ball.
Pat the dough out with your palms to 1/2 inch thickness. Using a cookie cutter, cut out scones and place on a greased baking sheet. Brush egg wash over the scones. Bake at 425F for 10-12 minutes until golden brown on top. Cool on rack.

Poached Eggs
4 eggs, freshest you can find
3 tsp vinegar
Bring a shallow pot of water to boil in a wide vessel. Reduce the heat to barely a simmer. Add the vinegar and swirl it in. Break each egg into a ramekin and gently slip them one by one into the hot water keeping the lip of the ramekin as close to the water as you can, without touching the water.
Using a spatula, gently tease the white fingers closer to the center while making sure that the egg does not stick to the vessel. Cook for two minutes until the whites become opaque but the yolk still runny. Using a slotted spoon, gently remove them onto the biscuit.

Sauteed Asparaus
8 spears of Asparagus (2 per egg)
Blanch the Asparagus spears in the same water that you poached the eggs for a couple of munutes. Drain and quikly saute in butter for a minute and remove.

Lemon Raspberry Tart by Sylvie from Gourmande In the Kitchen

If you know me a little then you know how important photography is to me. It has exposed a whole new aspect of life to me and has also made me learn a thing or two about myself. And it has helped me know a few very talented people as well. One such person is Sylvie. I met Sylvie a while back through flickr. She liked one of my photos and wrote me an email telling me that. Her sweetness and kindness reflected straight through that email and I immediately wrote back to her after looking at her breathtaking photography. One email led to another and the next thing we know, we were friends. Sylvie then told me how she was planning to start her own food blog and I was so confident that she and her blog would be a big hit. Now I can brag by saying that, “Sylvie, I told you so!” She is not only a great photographer but a very engaging writer who can take you to a different world with her stories. No wonder she now has a very successful blog Gourmande In the Kitchen. So when I was thinking of some great people to take my place while I am gone, she had to be one of them. Please welcome Sylvie who is here with a lovely post and recipe!

Thank you Prerna for inviting me to share my recipe with your readers, I am very happy to be here.

lemon raspberry tart guest post (1 of 1)-7

Inspired by the countless hours I’ve spent eyeing the gorgeous displays in patisserie windows, I wanted to share my Lemon Raspberry Tart with White Chocolate Drizzle.
When I first walked into the pastry shop, I didn’t know where to focus my attention.  What had lured me in were the colorful rows of delicate macarons displayed in the shop window.  Once inside my eyes darted frantically around the room landing first on the rows of individual chocolates.   Countless varieties of creamy ganache-filled squares sat just out of reach behind the glass case.  Across from those were the boxed gifts stuffed with tuiles and buttery miniature cookies.  Just down from the chocolates were the pastries.  Oh, the pastries!  A case full of exquisitely crafted pieces entranced me, and the above was quickly overlooked.

lemon raspberry tart guest post (1 of 1)-3

Insatiable.  That’s the appropriate word for my appetite when it comes to dessert.  My face lit up, and the wheels started turning in my head. “They all look so amazing. Should I get one?  Which one should I try?”  Oh the agony of choosing!  I quickly reminded myself that it is very possible to overlook gems if your focus is always on the most ornate offerings, so I composed myself and refocused.  Elegant yet understated, it was the simple aesthetic of the lemon tart that caught my attention.  But the minimal and straight lemon tart exudes simplicity in its content as well as its form.

lemon raspberry tart guest post (1 of 1)-6

While it sounds rather ordinary, a good lemon tart is a brilliant juxtaposition of intensity and delicateness.  The pastry crust is sandy and light in texture, yet rich with butter flavor.  The bright tartness of the citrus filling is tamed ever so slightly by just the right amount sugar.  The creaminess of the sweet-sour filling contrasts in turn with the crumbliness of the cookie-like crust.  Bold and boisterous when it first hits the tongue, the gooey bed of lemon quickly melts and melds with the crunchy bits of crust, the two smoothly rolling around the mouth.

lemon raspberry tart guest post (1 of 1)-3

You don’t need any advanced pastry skills to make my version however.  The food processor does all the mixing for the pâte sable.  No rolling is required either; you just press the dough into the tart pan. The tart shell is blind baked, then filled with a mixture of eggs, sugar, lemon juice and heavy cream. Quickly whisked together and briefly baked, it requires only the slightest attention.  The tart is finished with a thin layer of raspberry jam and a drizzle of white chocolate for a big impact with little effort.
Oh, and that lemon tart I was eyeing… I got it; that, and a few more pastries.

Lemon Raspberry Tart with White Chocolate Drizzle
Serves 8 to 10

For the Crust
1 1/4 cups (166g) unbleached all-purpose flour
1/2 cup (50g) confectioners’ sugar
1/4 teaspoon salt
8 tablespoons (114g) cold unsalted butter, cut into 1-inch pieces
1 large egg yolk
½ tsp vanilla extract
For the Lemon Filling
3 large eggs, at room temperature
¾ cup (150 g) granulated sugar
1/3 cup (75 ml) strained fresh squeezed lemon juice
1/3 cup plus 2 tablespoon (100 ml) heavy cream
For the Finish
1 cup (320g) good quality raspberry jam
4 oz good quality white chocolate, finely chopped

lemon raspberry tart guest post (1 of 1)

Make the crust:
1. Place the flour, confectioners’ sugar, and salt in a food processor and process to combine. Add the butter pieces and process briefly to blend, until the mixture resembles bread crumbs (about 10 seconds). Mix the egg and vanilla together in a small bowl just to combine. With the motor running add the egg yolk and vanilla extract, then pulse in 1 second intervals until the mixture starts to come together (do not overmix).
2. Turn out the dough onto the bottom of a greased 9 inch false-bottomed fluted tart pan and press the mixture into the pan firmly with your fingers into an even layer over the entire pan bottom and up the sides. Prick the bottom with a fork and refrigerate for at least 1 hour to firm.  (The crust can be made ahead of time and kept in the fridge or freezer until needed)
3. Adjust an oven rack to the middle position and heat the oven to 375° F (190° C) Place the tart pan on a baking sheet.  Line the dough with parchment and evenly fill with pie weights (or you can use dried beans).  Bake the crust for about 20 minutes, or until the edge of the crust is golden. Remove parchment and weights from crust, and continue baking until the entire crust is a light golden color, about 5 minutes more. Set aside to cool while you make the filling. Leave the oven on.

Make the filling:
1. In a medium bowl, beat the eggs lightly to just combine them. Add the sugar and lemon juice and mix just until blended. Stir in the cream slowly just until blended.

Bake the tart:
1.Pour the filling into the partially baked tart shell. Return to 375°F (190°C) oven and bake for 18 to 20 minutes, or until the filling appears set, and only the center quivers a little.
2. Transfer to a wire rack and let cool on the pan for about 20 minutes.
3. Refrigerate the tart just long enough to chill, about 30 minutes.

Finish the tart:
1. Heat the raspberry jam until just warm to make it easier to spread. Spread evenly over the cool tart with an off-set spatula.  Place the tart back in the fridge to firm up while you melt the chocolate.
2. Slowly melt the white chocolate in double boiler or alternatively, place in small microwave-safe bowl. Microwave on medium (50% power) for 1 minute. Stir. Microwave 30 seconds more or until the chocolate is softened, stir until smooth.
3. Drizzle tart with melted chocolate, using a small spoon, or alternatively put in a squeeze bottle and squeeze across the top of the tart in a zig-zag pattern.  Return the tart to fridge to allow chocolate to set for another 20 minutes or longer.
4. Slide the rim of the tart pan down so that the bottom of the pan is released as the metal rim slips down.  Cut the tart into wedges with a sharp knife.

Chocolate Cake Pops – Guest Post by Joyti from Darjeeling Dreams

How are you all doing there? I know it has been ages since I last came here to say hello but you can imagine how busy I must be these days. By busy I mean shopping all day long! And searching for the fast food stall that I used to frequent years back, needs a lot of of time. Little monster is enjoying all the attention and doesn’t even remember that she has a mom and dad too, and trust me I am enjoying it! But today I managed to take a break from all the fun and introduce to you someone whose work I really adore. I am thrilled to welcome Joyti from Darjeeling Dreams. Another blog that I fell in love with during the days when Indian Simmer was a little baby. More than that, I fell in love with Joyti’s warmth. I not only looked up to having a blog as gorgeous as her’s but she also inspired me to lend a helping hand to someone asking for one. I have no doubt you will fall in love with her as soon as you visit her blog but just look at what she made for us today… Cake Pops!! Now who can beat that?! Please welcome Jyoti!

Cake pops in hand
When Prerna first asked me to do a guest post for her, I was thrilled. Of course, its flattering to be asked to be a guest on a blog as beautiful as hers. Its a blog that is filled with not only with beautiful photographs and useable, delicious food, but also the wonderfully friendly, charming spirit of the blog editor herself. And, at the same time, I felt intimidated as well. I’m sure you can understand.

Cake pop with milk
It took me quite a bit of time to come up with a recipe to share. I thought that I should not only make something for Prerna, but for her little princess as well. For, after all, in Hindu households such as Prerna’s and the one that I grew up in, girl children are treated like princesses. It is believed that daughters are a living form of the goddess of good luck and prosperity, and thus, bring these in to their birth family. Also, having once been a little girl myself, I can still remember thinking that if a guest brought a gift or a treat, it should have been for me. So how can I be a guest in Prerna’s space without bringing something for her princess?

slice of chocolate cake 2
In that spirit, I made cake pops. I would imagine that most little girls would enjoy them, they look like adorable candies but are basically the smallest, cutest form of cake imaginable. Cake pops have become insanely popular in the last few years, but their popularity is deserved. They actually taste good. Yes, they’re cake, but deliciously moist candy-covered cake. And they are on a stick, so they make a perfect finger food. Or finger dessert – which should be a separate category of sweet altogether. Moreover, cake pops would be so nice and easy for little princesses to hold and still keep their hands clean.

Chocolate Cake Pops

Makes 32-36
– 1 recipe Glazed Chocolate Cake
(or any 9-inch round chocolate cake)
– 12 oz. whipped cream cheese
– ½ cup granulated sugar
– 28 oz candy melts or other meltable white/dark chocolate
– optional: sprinkles, cake pearls, edible glitter, or fondant…
You will also need lollipop sticks, which you can find at craft stores, Sur la Table, or on Amazon.com.

Carefully cut the glaze or frosting off of the chocolate cake, reserve. Crumble the cake with hands or food processor, and put crumbs into a large bowl. Combine the reserved glaze, whipped cream cheese, and sugar in a medium bowl. Mix this mixture into the cake crumbs thoroughly.

Form 1 tbsp-sized balls, and stick onto lollipop sticks. Freeze for 2+ hours. Melt candy melts or chocolate in microwave or over double boiler. Be careful if using the microwave – do not overmelt or the candy melts/chocolate can seize. Roll the cake balls in the mixture. If using sprinkles or other décor, apply at this point.

Freeze for approximately 30 minutes to harden shell.

Poppyseed Lemon Cupcakes with Vanilla Cream Cheese Frosting by Guilty Kitchen

A warm hello to all of you from India. We reached here a couple days back and it all still feels unreal to me!  I am more than surprised to see how much change can come in just a few years. A lot of good changes and some not so good but one thing remains constant, the essence of home! The smell of morning breeze and the beauty of  sunset is just different here. We are trying to soak it all in a few days that we are here. But still missing talking to you all so I’m here again, with another favorite blogger friend of mine –  Elizabeth from Guilty Kitchen. A person who never fails to amaze me and whose work has always inspired me from long before I could call myself a food blogger. Lets just say that a person who can balance life with two active kids, a new and promising business and a very popular blog with amazing photography and features in endless publications is a superwoman in my eyes! She does it all and comes out with flying colors. Please welcome Elizabeth from Guilty Kitchen.
Don’t forget to hop on over to her website after this.

Guest Post1

Although I may have said a few times over the last year that cupcakes are totally an unsustainable fad in our industry, I still love them. I do, on the other hand, find it a big extreme to open a store that sells nothing but cupcakes, but that’s just me. Cupcakes are fun, come in every flavour, colour and design and please kids and adults alike. The fact that they fit in the palm of your hand is merely an afterthought to most.

Guest Post 4

Some of you may have experienced people’s less than thrilled attitude at the thought of eating a whole slice of cake. As if eating one slice of cake may throw off their entire diet/workout routine/lifestyle change/etc. So having tiny, cute, paper wrapped cupcakes on hand can appease even the most picky of dessert eaters. This is not a problem in my house, to say the least. If anything, there is a collective sigh when cupcakes are made, and a settling on the fact that you should only eat one and not the whole batch.
More than my love of tiny confectionary is my love of this time of year. There’s just something special about the time just before spring. The birds begin to chirp each morning, the sun is out earlier and stays out just a bit later. But my favourite is the peak of citrus. There are so many to choose from coming out of California. Many that I have never even tried, such as Buddha’s Hand, Pommelos, mandarinquats, etc. A plethora of fantastic flavours to add to salads or desserts, or simply to peel and eat. Being seasonal is important to me and even desserts should fall in that category most of the time.

Guest Post 2

When I thought of what I absolutely needed to have dessert-wise, citrus was my first thought. That bright, bursting in your mouth, juicy flavour of meyer lemon was the top of my list and good thing, because there is a case of them in my fridge.
These cupcakes are sweet, citrusy and with just the right amount of vanilla. I love a good pronounced nuttiness from the poppyseeds, so there is more of them in there than you may be used to , but just trust me. The cream cheese frosting marries perfectly with the citrus and you’ll be wishing you doubled the recipe after you take that first lemony bite.

Poppyseed Lemon Cupcakes with Vanilla Cream Cheese Frosting
Yield: 12 cupcakes
Prep Time: 20 minutes
Cooking Time: 30 minutes

Ingredients:
1/2 cup butter, room temperature
1 1/2 cups cake flour
1/2 tsp Baking powder
1/4 tsp baking soda
1/4 tsp salt
1 cup sugar
2 large eggs
zest and juice of one meyer lemon
1 tsp vanilla extract
1/2 cup buttermilk
1/4 cup poppy seeds

Guest Post 3


Method:
1. Preheat oven to 350°F. Line 12 cupcake tins with paper or silicone liners.
2. Sift flour, baking powder, baking soda and salt into a small bowl.
3. In bowl of a stand mixer, beat butter and sugar until fluffy, about five minutes.
4. Beat in eggs one at a time, ensuring they are completely incorporated before continuing to the next one.
5. Mix in the zest, lemon juice and vanilla.
6. Add flour and buttermilk to batter in two separate additions, beating completely between additions.
7. Fold in poppyseeds.
8. Fill cupcake liners 7/8 of the way to the top. Bake for 25-30 minutes, rotating half way through baking time.
9. Remove from oven and cool completely before frosting.

Vanilla Cream Cheese Frosting

1/2  cup butter, room temperature
4 oz cream cheese, room temperature
1 tbsp vanilla extract (or one vanilla bean + 1 tsp vanilla extract)
1  1/2-3 cups icing sugar
1. Beat butter and cream cheese together until fluffy.
2. Slowly add in vanilla.
3. Slowly stir in icing sugar on low speed one cup at a time.
4. Pipe onto cupcakes and serve immediately.