Malai Kofta in white gravy

Malai Kofta in white gravy

Malai kofta is a classic North indian dish. It is very rich , creamy and delicious dish because koftas stuffed with dryfruits and gravy is made from cashews. It goes well with chapati, naan , poori and parantha . No onion no garlic recipe of Malai Kofta.

Ingredients:

For koftas
7 oz paneer or 200 gm paneer
11/2 tbsp Maida (All purpose flour)
1 boiled potato
1/4 tsp salt

Stuffing
5-6 cashews finely chopped
5-6 raisins finely chopped
1 tbsp coconut (optional)
1 tsp cardamom powder

For curry
3/4 cup Kaju (cashew) (Soak for an hour)
2 tbsp Poppy seeds (khas-khas)
2 tbsp melon seeds
2 cup milk
1 cup water
11/4 tbsp salt (or as per taste)
1 1/2 tbsp sugar
11/2 tsp garam masala powder
2 tbsp oil
1/4 tsp Cardamom powder
Oil to fry koftas

Garnishing
Some grated paneer

Method:

Koftas

Take a bowl . Grate the paneer. Add boiled and mashed potato. Mix Maida and salt . Mix well. Knead the mixture for 3-4 minutes and make the soft dough. (Grease your Palm and knead the dough). For koftas dough is ready.

For stuffing , mix all stuffing ingredients in a bowl .

Divide the dough into equal parts and give each part a round shape of ball.
Take one ball and flatten it in the center and put 1/2 tsp stuffing (stuffing should be like 2-3 pieces of cashew, rasins and little coconut and cardamom powder should be in each and every koftas) and carefully wrap from all the side and make round ball.( Wrap properly otherwise stuffing can come out while frying).
Repeat the process with other balls and make koftas.

Heat the oil in a pan for frying the koftas. Make sure oil neither should be hot nor cold.
Put the koftas in the oil , cook the koftas until they become light brown in color. (I don’t want dark brown color, if you like then fry for more seconds.)
Koftas are ready ; keep aside them.

Gravy

We can use the poppy seeds and melon seeds (your choice) in two ways.
1) Soak poppy seeds and melon seeds in water for two hours .
then blend in a blender with little water then add in the cashew paste.

2) Grind the poppy seed and melon seeds in a grinder then add in the cashew paste (No need to soak in the water)

In this recipe
I am using grinding process , grind poppy seed and melon seed together in a grinder and make fine powder.

Blend the cashew with 1/2 cup milk in a blender.
Add poppy and melon seed powder in cahew paste and again blend for few seconds.
Cashew paste is ready.

Heat oil in a pan.
Add cashew paste and stir for 7-8 minutes on medium gas continuously.

Add milk and water. Mix well. Stir for 5-6 minutes on medium gas.
Add salt and sugar. Stir for more 1-2 minutes. Add Garam Masala powder and cardamom powder. Stir for few seconds. Turn off the gas.

Cashew Curry is ready.
Serve Kofta with curry. (When you are going to serve only then add koftas in gravy, otherwise koftas will break because koftas are very soft)

Garnish with some grated paneer ….Malai Kofta with cashew gravy is ready to serve.

Tips :-

1) Koftas should be cook on medium gas otherwise it will burn from outside and uncook from inside.
2) While frying koftas , first thing when your oil is hot then drop little ball of paneer dough and see that it is frying well or not . if it is spreading that means dough is not ready to fry. Then you can add little more Maida and check it again. But dont add more maida other wise it will become hard.

3) In gravy , you can add onion also. Make the onion , green chili and ginger paste.
heat oil in a pan . Add onion paste and stir for 3-4 minutes then add cashew paste and then do it as above manner.

4) We can make any gravy with onion or without onion. But if we are using onion then we have to stir onion firstly, then we will add other things.

5) Quantity of water and milk can adjust as per thickness of gravy.

Read full post: Malai Kofta in white gravy

Crispy palak poori (Crispy Spinach Poori)

Crispy palak poori (Crispy Spinach Poori)

Crispy palak poori or spinach poori is a crispy poori which made by mixing wheat flour, chopped Spinach, kasoori methi and Green chili and ginger paste.

Ingredients:

1 1/4 cup wheat flour
1 1/4 cup finely chopped spinach and drained
1 tsp green chili paste
1 tsp ginger paste
1 tsp salt
1 tsp kasoori methi
2 tbsp oil

Oil to fry poori
Around 2 & 1/2 tbsp water

Method:

Take a bowl or plate or parath for kneading dough . Add wheat flour , salt green chili and ginger paste and mix well . Add finely chopped spinach and Kasoori Methi and mix well . Add oil and mix well and try to knead the dough . Add water slowly slowly and knead a firm dough . We need firm dough for Spinach pooris so don’t need to add more water.(Because Spinach has also some water) .

Grease your palm and then knead again for few seconds.

Heat oil in a pan for frying
Now divide the dough into equal parts
Roll them and make ball shape and press slightly .
Then roll it as like normal puri .
Roll all the puris .

Now oil is hot
Drop the Pooris in the oil for frying .
Fry on medium gas until it become brown in color and crispy . Palak poori is ready to serve .
Believe me this is very yummy crispy poori. You can enjoy it with any curry vegetable or dry vegetable or pickles .

Read full post: Crispy palak poori (Crispy Spinach Poori)

Blackened Spiced Roasted Chicken

Blackened Spiced Roasted Chicken

Roast a platter full of chicken thighs so that everyone gets a juicy, roasted piece of chicken. While roasting chicken, the most important things to note are the marinade and the technique to make the skin super crispy.
This recipe uses a spicy red pepper sauce and a unique blend of spices to marinate the chicken. Sumac and thyme add freshness of flavor, whereas cumin and fragrant garam masala add a spicy Indian touch. Roasting the thighs on a bed of thick cut vegetables ensures the perfectly blackened chicken with super crispy skin. Plus, you get to serve the roasted vegetables too!

Ingredients:

For the roasted chicken thighs

Chicken thighs – 6 (with bones and skins still on)
Spicy red pepper sauce – 2 tbsp (ingredient list follows at the bottom)
Lemon – 2, divided
Cumin powder – 2 tsp
Cayenne powder – 2 tsp
Dried oregano – 2 tsp
Sumac – 2 tsp
Garam masala powder – 2 tsp
Salt – 1 tsp
Red onion – 1 large, cut into thick rounds
Potato – 1, cut into thick rounds
Carrot – 1, cut into thick strips
Olive oil – 1 tbsp
Fresh thyme – a few sprigs
Garlic – 5-6 cloves, crushed

For the spicy red pepper sauce

Olive oil – 2 tbsp
Cumin seeds – ½ tsp
Red bell pepper – 1 large, seeded and roughly diced
Garlic – 2 cloves, crushed
Red chili powder – 2 tsp
Cilantro leaves – ½ cup
Lemon juice – 2 tbsp
Salt – ½ tsp (or to taste)

Method:

1. Make the spicy red pepper sauce first. Heat oil in a large skillet. Add cumin seeds and allow them to crackle. Now add the garlic and red pepper and saute for a minute. Add red chili powder and cilantro and saute for another minute. Remove from heat and cool slightly.
2. Blend this in a blender along with salt and lemon juice. Reserve the leftover sauce to be served as a spicy sauce along with the roasted chicken.
3. Pre-heat the oven to 400 deg.F. If you are using a metal baking pan, line with foil or parchment paper and set aside.
4. Pat the chicken thighs dry with a paper towel. Rub 2 tbsp of red pepper sauce generously all over them. Squeeze the juice of a lemon over the chicken.
5. Mix the dry spice rub ingredients together in a small bowl (cumin, cayenne, oregano, sumac, garam masala and salt). Rub this spice mix all over the chicken and even under the skin.
6. Toss the vegetables with olive oil and a generous pinch of salt. Arrange them in a single layer on the baking pan. Arrange the chicken thighs on top, skin side down. Tuck in the sprigs of fresh thyme and garlic in between the pieces of chicken. Slice the other lemon and place them in between the chicken pieces as well.
7. Bake in the oven for 30 minutes. Take it out and flip the chicken thighs over so the skin side is up now. This will ensure the skin gets nicely browned and crispy. Bake for another 30 minutes or till the chicken juices run clear when poked with a knife.
8. Rest the chicken for 5-10 minutes. Transfer chicken and vegetable to a serving platter. Serve with the leftover spicy red pepper sauce and any other sides of choice.

Read full post: Blackened Spiced Roasted Chicken

Milk Tea, Cardamom and Rose Cake {With Cardamom Flavored Brown Butter Glaze}

Milk Tea, Cardamom & Rose Cake {With Cardamom Flavored Brown Butter Glaze}

Chai, the quintessential cup of Indian tea is perhaps the most misunderstood and misrepresented beverage. The perfect cup of chai is milky, sweet, strong and lightly spiced. And now you can have it in cake form as well with this recipe!
Bake this beautiful loaf cake with all the flavors of the Indian milk tea and also rose and cardamom. Top it with a generous drizzle of a cardamom flavored brown butter glaze. This is one deliciously decadent cake you will be proud to present at your Holiday table.

Ingredients:

For the cake,

All purpose flour – 2 cups
Baking powder – 1 1/2 tsp
Baking soda – 1/2 tsp
Salt – 1/2 tsp
Cardamom powder – 1/2 tsp
Yogurt – 2/3 cup
Sugar – 1 cup + 1 tbsp (the extra tablespoon is to account for the tea being used in the recipe)
Oil – 1/2 cup (use some kind of non-flavored oil like vegetable oil)
Rose water – 1 tsp
Milk – 2/3 cup
Black tea dust – 3 tsp (I like to use Indian blends like Assam or Darjeeling black tea)

For the brown butter glaze,

Unsalted butter – 1/4 cup
Powdered sugar – 1 cup
Cardamom powder – 1 tsp
Milk – 1 – 1 1/2 tbsp

Method:

1. Pre-heat the oven to 350 deg.F. Line and grease a 9×5 inch loaf pan. Set aside.
2. Brew the milk tea first so that you have enough time to cool it. Heat milk in a saucepan and add the tea dust. Bring to a boil, remove from heat and keep covered for 3-4 minutes to allow the tea flavor to develop. Strain with a fine mesh sieve and bring this milk-tea (chai) to room temperature before using in the recipe. You need 2/3 cup of chai, so I would advise you to use a few extra tablespoons of milk while brewing tea to account for the loss via evaporation and straining.
3. Sift the flour, baking powder, baking soda, salt and cardamom powder together and keep aside.
4. In a large mixing bowl, beat the yogurt and sugar on high for 2 minutes. Add the oil and rose-water. Beat for 2-3 minutes till the mixture is well combined and creamy. Do not skip this step.
5. Add the sifted dry ingredients and the milk-tea to the batter alternately, beginning and ending with the dry ingredients. Gently fold in the dry ingredients with a spatula and do not over-mix.
6. Bake for 35-38 minutes or till the cake passes the toothpick test. Remove and cool in pan for 5 minutes before pouring the glaze on top.
7. Make the glaze in the last ten minutes of baking. To begin, sift the powdered sugar and cardamom powder together. Set aside.
8. Take the butter in a saucepan and start melting it on low heat. Keep going for 5-8 minutes till butter browns and you see some sediment on the bottom. Do not burn the butter, a light browning is what we need.
Pour this browned butter carefully into a glass bowl or jar, leaving the sediments behind. You can use a very fine mesh sieve if you have one.
9. Add the powdered sugar, a little at a time, and whisk to combine. Add a few teaspoons of milk to thin the glaze. The glaze should look like thick cream, it will thicken further when completely cool.
10. Gently remove the still warm cake to a wire rack and drizzle the glaze on top. Cool the cake completely, cut into pieces and serve.
11. This cake can be stored lightly covered in parchment paper or with a dry tea towel on the counter-top for a couple of days and can be refrigerated after that (if you still have leftovers, that is!!).

Read full post: Milk Tea, Cardamom & Rose Cake {With Cardamom Flavored Brown Butter Glaze}

Six-Strand Braided Challah Bread

Six-Strand Braided Challah Bread

Challah bread is a jewish bread which have a wonderful rich texture with a beautiful crust eventhough butter or milk is not used in this bread. This bread is served with meats during Jewish festivals.

Ingredients:

4cups All purpose flour
1+1/2tsp Instant yeast
1/4cup Sugar
1tsp Salt
2nos Large eggs
1/4cup Oil
1/2cup Water
Black poppyseeds
Sesame seeds

Egg wash:
1no Egg yolk
1tbsp Water

Method:

In a lare bowl, combine the eggs,oil and water, stir well.

Mix in the flour,yeast,sugar,salt and knead everything together to form a stiff dough,knead well for few more minutes until the dough turns soft and smooth dough.

Transfer the dough to a greased large bowl and cover it with plastic wrap,let it sit in a warm place until its doubled in size for about 2hours.

Gently press down the dough,reflate it and cover it again, let it sit again for about an another hour.

Take the dough in a lightly floured surface, divide into three large balls and again divide each balls into two more medium balls again.

Now you have six balls, roll them as medium sized ropes.Line them side by side, pinch the pieces together at one end and start braiding.

Transfer it to the baking sheet lined over a baking tray, let it sit again in a warm place for half an hour.

Meanwhile mix the egg yolk and water for egg wash.

Preheat the oven to 350F.

Brush generously the rised braided bread with the egg wash,springle the black poppy seeds and sesame seeds generously.

Bake the bread for 30-35minutes or until the crust turns golden brown.

Transfer to a wire rack and cool completely before slicing.

Julekake – A Norwegian Christmas Bread

Julekake - A Norwegian Christmas Bread

Julekake or Julekaka/ Julekaga is a rich holiday bread flavoured with cardamom which is traditionally served at Christmas in many Scandinavian countries. It is particularly popular in Norway and Denmark.Julekake means “Yule Bread” in Norwegian.

Ingredients:

2tsp Active dry yeast
1/4cup Lukewarm water
1/2cup Lukewarm milk
1no Egg
50gm Butter(room temperature)
1/2cup Sugar
1/4tsp Salt
5 pods Cardamom(powdered)
2 +1/2 cups All-purpose flour
1/2cup Golden or dark raisins
1 tbsp milk
Pearl sugar or chopped almonds

Method:

Take the water, milk and 1 tsp sugar (from the 1/2cup) in a small bowl and add the yeast to it.

Mix well and keep aside for 5 to 10 minutes till it becomes “frothy”.

Take this yeast mixture, the egg, butter and sugar and salt in a larger bowl.Mix well, and then add the flour and the powdered cardamom. Knead well until you have a dough that is soft, smooth and elastic.

Take the dough out and flatten it as a circle. Sprinkle the raisins evenly and then roll it up, swiss roll style. Then just knead the dough lightly by hand and roll it up into a ball.

Place the dough in a greased bowl, cover loosely and let it rise till double in volume, for about an hour .

Lightly knead the dough to deflate slightly and shape it into a ball.

Place it on a greased baking round pan, let it rise for about 45 minutes.

Brush it with milk and sprinkle it with sugar pearls or chopped almonds.

Bake at 180C/350F for about 30 minutes till the bread is golden brown and done.

If you find the bread browning too quickly, cover it with foil after about 15 minutes in the oven to avoid further browning.

Let it cool completely before you slice it.

Read full post: Julekake – A Norwegian Christmas Bread

Gujiya and 30 Diwali Recipes

Diwali sweets

Mother-in-law was visiting around this time last year on Diwali. So there was a lot of cooking going on. From Khasta kachoris and flaky mathri to rich and seductive gulab jamuns and pipping hot gujiyas which practically melted in your mouth, we were cooking non-stop. Butterfly ran through the house stealthily grabbing some for herself and a few for her dolly friends who were apparently “very very hungry for some gujiyas” at the time. My 7 month pregnant self was fatigued, tired and bothered by the fact that Abhishek had not put up the diwali lights yet. He had been promising me for several days now that it will be done right away and it was almost diwali night. No sign of lights still! And those rangoli colors. Somehow they manage to find a safe place in the storage to hide every year, right before diwali.

Gujiya

Hurriedly going through every possible box with the butterfly, looking for the boxes of red, green and yellow I suddenly realized- it felt like diwali! The same aroma filling up the air in the house. A weird yet unforgettable mixture of the smell of crumbly gujiyas frying in the kitchen, hugging the sweet smell of jasmine scented agarbatti (incense sticks) escaping mumma’s room. The same sense of urgency to get things in order before it’s time for the whole family to sit together in our finest attire and joining hands for pooja and thanking god for all he has blessed us with. It felt like Diwali! Even more so with the parents being here.

Gujiya

That’s what festivals are for right? About celebrating what we are blessed with. Not about lights, or rangoli or gujiyas maybe. Although those rangoli making with your little one and frying gujiyas with your mum-in-law makes memories. Good ones! So they need to be done too. Although I will not be able to do that with mum-in-law this year as we are a long distance apart but gujiyas still need to be fried. So while missing family here in a land which we cannot call foreign anymore for it’s what’s home now, it still feels foreign on festivals. Hopefully these gujiyas will help.

Wish you and yours a Very Happy and Prosperous Diwali!

Gujiya Recipe

A deep fried dumpling made with a crispy and flaky pastry covering with some kind of sweet filling inside.
Course Dessert
Cuisine Indian
Keyword Diwali, Indian, Sweets
Prep Time 40 minutes
Cook Time 20 minutes
Total Time 1 hour
Author Prerna Singh

Ingredients

For the filling:

  • Mawa- 1 cup  solidified reduced milk available at any Indian store
  • Powdered Sugar- 1/4 cup
  • Almonds-1 tablespoon  coarsely chopped
  • Golden Raisins- 1 tablespoon
  • Cashews- 1 tablespoon coarsely chopped
  • Ghee- 2 teaspoon
  • Cardamom powder- 1/2 teaspoon

For the pastry:

  • All purpose flour- 2 cups
  • Ghee- 2-3 tablespoons warm and melted
  • Cold Water approx. 1/2 to 3/4
  • Oil for deep frying

Instructions

Preparing the filling:

  1. Crumble the mawa/khoya or grate it.
  2. Heat ghee in a pan on medium low heat. Add mawa/khoya. Cook the mixture until the crumbles soften and come together, stir continuously for 3-5 minutes.
  3. Turn off the heat. Add sugar, nuts and cardamom. Mix it all together and let it cool completely.
  4. Kneading the pastry dough:
  5. In a large mixing bowl mix together flour and ghee together. Rubbing between your palms slowly mix the two until it looks crumbly and holds itself when held tight in the fist.
  6. Now slowly add water and knead it into a soft dough. Follow the instructions in this video.
  7. Cover with damp cloth. Let it rest for 15-20 minutes.

Bringing it all together:

  1. Divide the dough into equal sized balls, golf ball size.
  2. Dust the work station and roll the dough into circular disks, approx. 4 inches in diameter. (Try using as little flour as possible for dusting as extra dusting flour on the pastry will separate in the oil when fried.)
  3. Place the rolled dough either on the gujiya mould or lying flat on the work station, add 1 1/2 tablespoon of filling on one half side of the circle. Lightly moisten the edges with a paste of water and flour mixture, fold the other half over the stuffing and press the edges to seal. Pinch the edges either with a fork or a gujiya cutter.
  4. Repeat with the rest of the filling. Cover the prepared gujiyas with damp cloth while working on the rest before frying.
  5. Heat oil in a pan or wok. Deep fry untill the pastry is golden. Either serve piping hot or cool it down before storing in an airtight container.

Here are some other recipes that might fit in your diwali celebration menu.

Doodh Ka Sheera

Mango Pudding

Coconut Laddu

Apple Halva

Jalebi

Kaju Katli

Gajar halwa

Cocoa Covered Pistachio Truffles

Rose Petal Jam (Gulkand) Ice Cream

Firni

Khasta Kachori

Dahi Vada

Sweet And Savory Orange Cumin Shortbread Cookies

Baked Misti Doi

Nankhatai

Goriba

Peach Gujiya

Falooda Kulfi

Rice Pudding Mango Parfait

Besan Halwa

Some more recipes from friends:-

Spicy Sev Recipe By Sia of Monsoon Spice

Mewa Chikki By Tanvi of Sinfully Spicy

Sweet Potato Gulab Jamuns By Kankana of Playful Cooking

Nolen Gur Rice Kheer By Deeba Rajpal of Passionate About Baking

Apple Jalebi By Pavithra of Dishes From My Kitchen

Coconut and Saffron Semolina Cake (Basbousa) By Kajal Tensinghani of Applemint

Samosa Pinwheels By Richa or Vegan Richa

Moong Daal Mini Samosa By Hina Gujral of Fun Food and Frolic

Paal Kozhukattai (Rice Flour Dumplings in a Coconut Milk Pudding) By Anjana of Happy and Harried

Caramel Custard Pudding By Ishita of Ishita Unblogged


Roti Taco

Roti-TacoAfter feeding to her heart and belly’s content the little one nursed herself to sleep. Still nestled in my arms, snuggled tightly against my chest, her hand still tightly gripping on to the pearl pendant, her dad got me as an anniversary gift, she was sound asleep. I was looking down at her warm and cozy self wrapped around me. Nothing in the universe can compare to that heavenly look on a baby’s face with their eyes tight shut and floating in dreamland. Staring at those big curly eyelashes touching her butter smooth cheeks and looking at that button nose, I was saying to myself – motherhood is tough!

Roti-TacoRoti-TacoWait, I meant parenthood is tough. Doesn’t matter if you are a mum, dad, grandparent or a caregiver. Caring for these little creatures is a tough job. Caring for two, is tougher. Caring for two, five years apart and with completely different interests and needs, even tougher! Of course there are perks. Of course there’ s a lollipop and a princess sticker waiting after every doctor’s visit. Like this quiet one, with she burrowed in my arms and I listening to the sound of her breath going up and down like a soft breeze. But then very soon that breeze turns into a storm when the monkey wakes up and the next thing you know, things are going in the toilet, bugs in mouths and crayons all over your white walls (“snow slope” painted to be precise!). You then question the choice of color for the walls which looked absolutely breathtaking in the photographs of that designer mom with four kids (exactly the double of what I have) AND a dog, a speck clean house, with “real life” plants all over and a dashingly dressed husband with gel laden hair.

How on earth does she do that?

Not just being able to convince the husband to put gel on his hair, but everything else.

I hate her right now! But also wanna be her.

Roti-TacoWith all these thoughts in my mind I finally decide to gently get off the bed and carefully place the baby in her crib. Her favorite lion with her name engraved on his chest, a gift from her uncle, was waiting for her, ever so lonely on her crib. Lion takes my place, snuggles with her and they go to sleep. I tip toe to the door, try to close it without making any noise but of course the only time it will make a nasty creaking sound would be now! No damage done though.

Off I go to climb another mountain, dinner!

Normally butterfly gives me company while both of us stand in front of the refrigerator, deciding. Me deciding what will work and she, what will not! Anything involving the keywords fish, quick and “she can help” always wins. Today roti-taco won. Yes roti-taco. As in, a fish taco, dressed in an Indian saree and ornaments. A Singh family favorite. Here’s the recipe:

Roti-TacoSpicy salmon fish Roti- Taco: Serves 3-4

For Roti: Recipe here. Following videos on an easy to follow method to make roti at home can be helpful:

How to knead a roti dough.

How roll dough for roti.

How to cook roti.

For Salmon:

3-4 salmon fillet (skin on)

1 teaspoon cayenne pepper

2 teaspoon tikka masala powder

1 teaspoon salt

1 tablespoon olive oil

Method:

Preheat the oven at 350 deg. F.

Mix cayenne, tikka masala powder and salt together.

Evenly sprinkle on the fish.

Heat a cast iron skillet. Skin side down, cook the fish on medium high until the skin leaves the pan, 3-5 minutes. Flip, cook for another minute. Flip back to the skin side and finish cooking in the oven for 3-5 minutes.

Take out. Let it rest a few minutes before serving.


For Mint Yogurt Dressing:

1 cup greek yogurt

1 cup fresh mint (or 1 1/2 teaspoon dried powder)

1 teaspoon roasted cumin powder

1 1/2 teaspoon extra vigin olive oil

salt to taste

Method:

Put all the ingredients in a food processor. Blend together on medium speed until the sauce comes together.

Extra add ons for the roti-taco: (This is what I included on my taco. Feel free to play around with your add on per your liking)

Thinly sliced red cabbage (approx 1 cup)

Sliced avocado.

Julienned raddish

Chunky tomato salsa (chopped tomato, onion, cilantro and green chili)

Putting the Roti-Taco together:

Start with one roti, place a few pieces of fish on top. some cabbage, salsa, avocado and then finally a nice drizzle of the yogurt dressing. Enjoy with your favorite beer or soda, chilled!

How to cook Roti (Video)

We’ve learned how to transform a bowl of dry flour and water into a beautiful soft dough by learning how to knead dough for roti. Then we also learned the magic of a simple kitchen tool – rolling pin and magically turn that dough into a circular moon (doesn’t matter if the moon still looks like the map of texas on your work station. we will get there, slowly and steadily). The satisfaction of enjoying home cooked, hot roti can not be described (even if it looks like texas!). So let’s finish the tutorial with this last and important step, shall we? How to cook roti.

How to roll dough for Roti (Video)

After learning how to knead dough for roti comes another important step which is not as tricky as bringing the dough together but needs some practice. It’s just about being able to know how to use the rolling pin and keep the work station well dusted to keep the dough from sticking. Here’s a simple video on how to roll the dough for roti. Fell free to ask if you have questions.

How to knead dough for Roti (Video)

Making roti at home is one of those things which is easiest but at the same time one of the trickiest. As much as it is therapeutic to some, it can prove to be a huge challenge for others who are not used to it. So here I am to tell you that do not let that bowl of aata (wheat flour) and that rolling pin intimidate you. All it takes is a few tricks and techniques (and to be honest a little bit of patience and perseverance) to master this skill. So instead of writing a long list of steps we thought it will be easier if we just share a video where you can see how to make roti in a few easy steps.

But let’s conquer this devil slowly shall we? Let’s divide the process into three main categories and take it one step at a time. First up kneading. Trust me it will be really soothing to feel the flour slipping from under your palms and mixing with water to take shape. Punch that sucker until it gets warm and soft. That’s what makes soft pillowy rotis. My mum always said that if you add just a few tablespoons of milk in the dough while kneading, that will make your roti softer. So watch this video and feel free to ask if you have any questions. Then we will head over to ROLLING.

Essential Indian Spices

spicebox

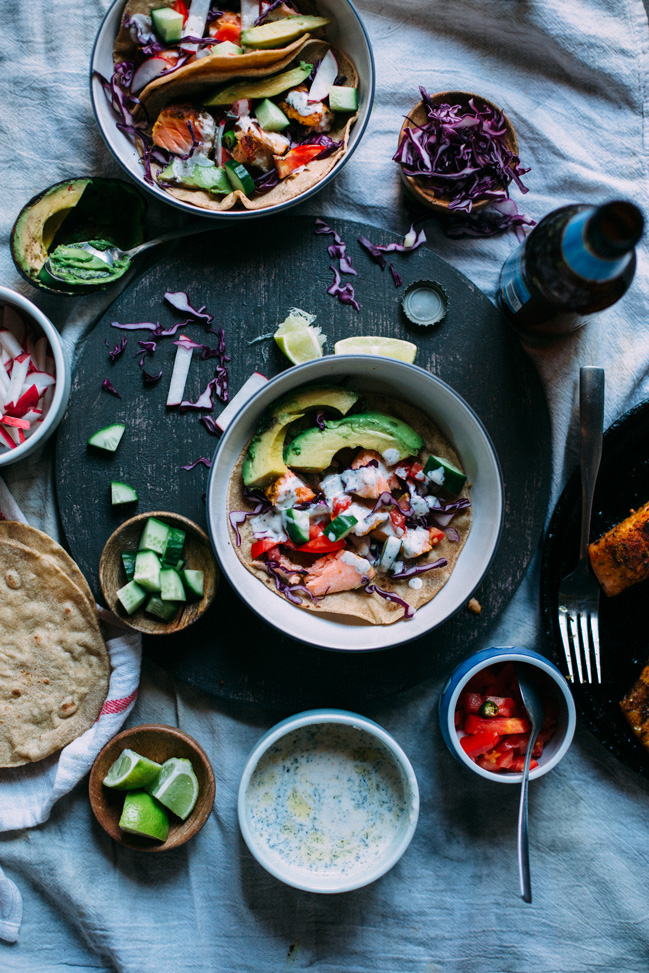
Yes, yes I had to come to this post one day! I had to address this elephant in the room and answer some questions about what I stock in my Indian spice pantry. Indian cooking can be intimidating when you are starting. I remember myself as a kid leaning over her kitchen door, watching her in awe when mummy would cook in her 4×4 ft. small kitchen, throwing spices into the karahi (wok) like a magician. The aroma, the flavors and the art of combining them together was intoxicating. When at the same time the sight was hypnotizing, it was also confusing because I had no clue why hing went only in dal tadka and not in curry and why when she used a bay leaf, never used a curry leaf for the same recipe. But then slowly and steadily when I got the courage to enter that kitchen and hold the masala dabba (spice box) in my hand, I started using those spices myself, one recipe at a time and learned the art and science of Indian spices.

So lets take it slow first. Lets start with a few spices at a time and then slowly grow this list. Something in my mind says 10 is a good number so lets start with the top 10 Indian ingredients that I have in my spice pantry. This will be an ever growing list and we will keep adding ingredients to it until the list is exhaustive, which I do not think will ever happen considering the wide variety of spices used in Indian cuisine.
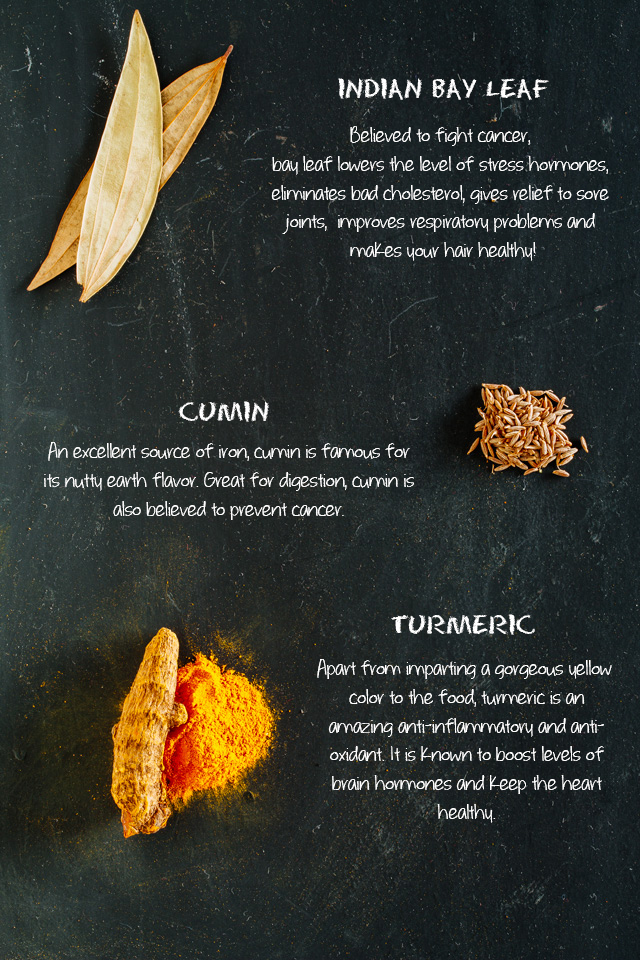
S94A5765-text-rev2

Turmeric (Haldi):

If there’s one spice you cannot live without when starting an Indian kitchen, it has to be turmeric or haldi as we call it in hindi. Doesn’t matter what part of the country you belong to if you are cooking Indian food, chances are you are using turmeric. It can be used fresh, dry or in ground form. Turmeric belongs to the ginger family, probably that’s the reason fresh turmeric looks very much like a ginger root only yellow(er). I feel fresh turmeric has a stronger flavor than a powdered one but dry powder is what’s commonly used in an Indian kitchen.

More than flavor, turmeric is used to add color to food. In fact, some people call it “Indian saffron” and back in the old days, it was used as a cheaper alternative to saffron. Be it a simple stir fry, a dal (lentil soup), a spicy curry or an Indian pickle, turmeric is used everywhere. In addition to being called on for its brilliant yellow color and mild flavor, turmeric is also used as a preservative. To make pickles, my grandma would coat raw mangoes or vegetables with a mixture of salt and turmeric and leave them out in the sunlight to dry. Those pickles would last for years! Turmeric is also used to color cheese, yogurt, spice mixes, salad dressings and even butter and margarine.

Outside of the kitchen, this spice is known for its therapeutic properties. Did you know that turmeric is a fabulous anti-inflammatory agent and an antiseptic? As a child, whenever I came home with a cut or bruise, my mom would rub a paste of turmeric and water on the afflicted area and it worked like magic. If I had a fever, she would give me haldi doodh (a little turmeric mixed with warm milk). In India, when a girl is about to get married, she gets a body massage with a paste of turmeric, as it is believed to improve the skin tone and considered a great anti-aging agent.

It is due to all these medicinal, culinary and cosmetic qualities that turmeric has earned a sacred place in Indian culture and history, especially in a Hindu home.

Indian Bay Leaf (Tej Patta or Tamalpatra):

Although from the bay leaf family, Tej Patta or Indian bay leaf is slightly different or maybe a lot different! Indian bay leaf is much larger in size than a commonly found bay leaf and is a lighter shade of green. When you look at the two you will see that Indian bay leaves have three prominent veins running through them whereas a normal bay leaf has one single vein running through the middle. The former has a more sweet cinnamony flavor whereas the other, which is believed to be mediterranean, is slightly lemony and bitter.

Crushed or used as whole, Indian bay leaf is mostly used in dried form in Indian food. Same as other indian spices, it is better to first roast or cook in oil before using this spice because the process will bring the best flavors and aroma out of it. It’s widely used in curries and gives biryani the flavor that people crave for. Tej Patta is also ground with a few other whole spices to make garam masala.

Cumin (Jeera):

Cumin or jeera seeds come from an annual plant which is actually from the parsley family. Another quintessential in every Indian kitchen, it has a strong, distinctive aroma and can be used whole, ground, roasted or as is. There are two types of cumin: white and black. Black cumin, also known as royal cumin or shahi jeera, has a slightly sweeter taste to it. It is also a bit more rare than white cumin.

Both types of cumin have a warm and earthy flavor, which works really well with lentil soups or hearty stews. Roasting adds to the aroma of the cumin seeds, making them perfect to flavor cheese or breads. Roasted, ground cumin seeds also make a wonderful garnish for raita (a cooling, yogurt-based dip) and yogurt. Another excellent use for this spice? Cumin aids digestion, and the most common way it’s enjoyed in India is in a beverage called jal jeera—an Indian form of lemonade (in Hindi, jal means water and jeera means cumin).

S94A5764-text

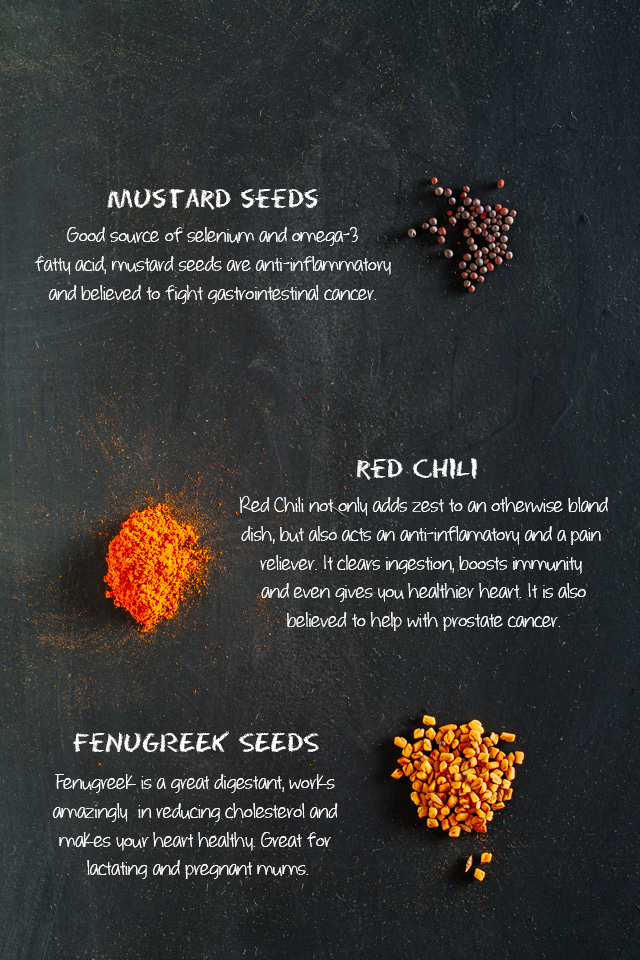
Mustard Seeds (Sarson):

Mainly known for its pungent flavor mustard is one of those spices that’s used in all regions of India in some form or another. From sarson ka saag (cooked mustard greens) in Punjab to aava pindi (powdered mustard seeds preserved in oil) in the south, mustard plays a big part in Indian food culture and traditions.

Unlike in the Western hemisphere where yellow mustard rules, black mustard is used more frequently and found more easily in India. Mustard seeds make a good ingredient in salad dressings, curries and vegetables. This spice also plays an important role in preserving pickles. Oil extracted from its seeds (mustard oil) in India is as common olive oil in Italy (of course after ghee)! Before vegetable oils and other refined cooking oil hit the markets, mustard oil was used for almost all preparations in Indian kitchens and homes, from cooking to body massage, because it’s inexpensive and very good for health. However, if you’re not used to it, it might take time for your palate to get used to its strong taste.

When I was a child, my grandma would put a teaspoon of salt with a few drops of mustard oil in my palm and ask me to massage my gums with it. She said it would make the gums strong and whiten the teeth. From toothache, colds and stomach disorders to bronchitis and rheumatism, mustard is said to heal everything. Drink mustard tea before bed and kiss your fever or cold goodbye—at least that’s the remedy I grew up with!

Red Chili (Lal Mirch):

Lal mirch, or Indian chili, is very similar to cayenne pepper, which we can find easily in the US and Europe. It is believed that chili was first introduced to India by the great Portuguese explorer Vasco da Gama. The spice was a welcome addition to the cuisine and India’s climate helped cultivate many varieties of chili across the country. Unlike many Mexican or American chili powder varieties where salt or spices are added to the pepper, Indian chili powder is pure ground red pepper. Dried red chilies are powdered after being sun dried until they are nice and crisp. The red chili peppers range from orange to dark red and have a sharp aroma to it than can be a little bit towards the pungent side and have a very strong bite. So try not to get your nose too close to that box of red chili powder!

Used both as whole and powder, Indian cuisine uses mainly two varieties of chili powder- the usual red chili powder which is fiery hot and and the milder kind, which is called kashmiri lal mirch. Kashmiri mirch is named after Kashmir, the norther most state of Indian where it comes from. It has a much milder heat and, like turmeric, is used primarily to add color to the dish. The tandoori chicken and beautiful red curry that your local Indian restaurant serves get their vibrant hue from kashmiri lal mirch. Chili powder can be used in practically any dish. An Indian cook cannot live without lal mirch; we like our meals on the spicy side!

Fenugreek Seeds (Methi):

We had a space by the house next to his garden where papa grew some vegetables and some herbs. Mustard greens, cilantro and fenugreek leaves were some of the produce that we practically enjoyed all year long because they are so easy to grow. So much so that I even grew it in my patio garden after moving to the US. Just sprinkle a few seeds in the ground, water them and enjoy fresh greens all year long. The plants, when mature, bear fruits and, seeds then dry and can be either used as a spice or recycled again to grow more greens.

Fenugreek or methi is used very widely in Indian cuisine. Greens are used to make bhaji or curries. Leaves of kasuri methi, one of the varieties with a stronger aroma, are dried and used to add extra flavor to rich curries and lentil soups and seeds are used in just about anything. Stir fried vegetables, kadhi (yogurt soup), pickles and curries. This yellow to slightly amber colored cuboid spice is bitter in taste, so it is roasted or cooked in hot oil to reduce the bitterness. It’s used whole as well as in powder form. Some of the most common spice mixes, it is a part of panch foran and sambhar masala. 
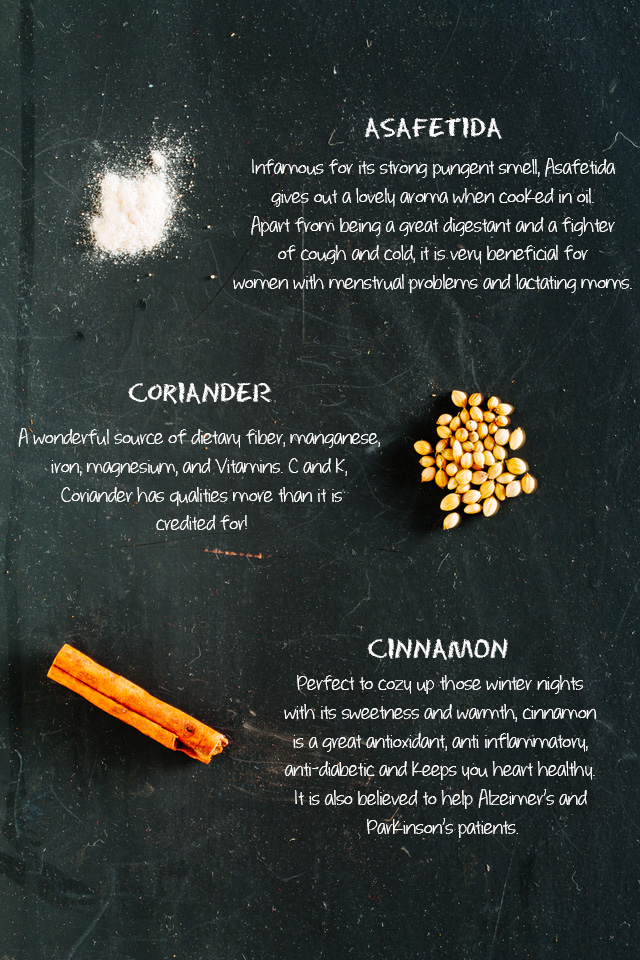
S94A5766-text

Asafetida (Hing):

Let me tell you off bat, if you are one of those people (like me!) who smells their spices and ingredients before using them then you are never going to be using Asafetida or hing as we call it. In its raw state, it has a pungent, sulfurous smell. The odor is native to the entire plant, including the stems, from which this spice is derived. Not very common in the Western world, it is a staple in Indian cooking (commonly used in tempering lentils or mixed with ground rice), and it gives a lovely flavor to dishes when cooked in hot oil.

Asafetida has great medicinal qualities, too. I swore by heeng (Hindi for asafetida) when I had my first daughter. My mom, who was there to help me, would run to the kitchen cabinet to grab a bottle of asafetida every time she suspected my daughter had gas or a cough—or even for her oil massage. And those are just a few of its therapeutic uses!

Apart from being a fabulous digestive aid, asafetida is also believed to help with breathing problems and lung diseases like asthma and bronchitis. Back in the days when people were more superstitious, it was said that the strong smell of asafetida could help drive evil spirits away from children. It was also said to help get rid of alcoholism and anxiety. I’m not sure how true any of that is—but I grew up listening to such stories and, in some way, started believing them.

Asafedita is very commonly used in lentil dishes. Add a pinch (or even less) in hot oil and it will perfume the whole dish and aid digestion. Just remember, it’s potent—a pinch goes a long way.

Coriander Seeds (Dhaniya)

I cannot spend a single day in my kitchen without using coriander seeds. Their sweet, earthy smell perfumes my kitchen and house and I love it. Coriander, better known in the US as cilantro, is a very commonly used herb in India. It’s used to make marinades, chutney and pesto, cooked in curries and used as garnish. The fruit from this herb bears small seeds which, once dry, have a sweet, citrusy flavor and a nutty, spicy smell. In Hindi, coriander seeds are known as dhaniya.

Dhaniya is a must in an Indian kitchen. I buy whole seeds from the market, roast them either in the oven or on medium-low heat in a pan. When you roast them on low heat, they slowly start giving out a beautiful smell and get slightly darker—it’s the perfect way to use coriander seeds for full flavor. Then, coarsely crush the seeds and make a marinade or rub on a piece of meat with some salt and citrus before grilling. Or make a powder to use in curries. Or, like my mom, mix them with a couple of other spices and stuff your veggies with them before baking. Coriander seeds can make anything and everything taste like Indian food should taste!

Cinnamon (Dal Chini)

More than candy I have to keep my jars of cinnamon sticks away from the butterfly for every chance she gets she would steal a stick or two and very happily indulges herself into those small wood quills which are actually barks of a tree, like she would her lollipops. “Its sweetness warms me from the inside Maa”, she says! She’s the writer in the family, I am telling you. Her command on words and her ability to express herself is already way better than me and she’s just mere six. Not a huge fan of complex flavors but she can easily live on cheese rinds and cinnamon sticks! Kids are surprising to say the least and so are these sticks.

Pronounced Daal-chee-nee in hindi these sure are packed with a lot of good things for a humble looking bark of a tree. Great source of manganese, fiber and calcium cinnamon works wonders for diabetes patients. Famous for its warmth probably because of its anti-clotting properties, that keeps the blood warm cinnamon has a sweetness to it hence the last name “chini” which is hindi for sugar. A native of Sri Lanka, cinnamon is mostly used in sweet dishes like cakes, puddings and breads (think cinnamon rolls!) in the western countries when they were primarily used in meat dishes, as preservative in other parts of the world like India. Slowly it made its way into curries like vindaloo and now garam masala, the quintessential Indian spice mix is incomplete without cinnamon.

Its used both as whole or powdered form but I like sticks better because they stay fresh longer when powder just looses its aroma faster. As much as I like cinnamon in my pulao (spiced rice dish) and warm curries, I love to add a hint to a creamy kheer (rice pudding).
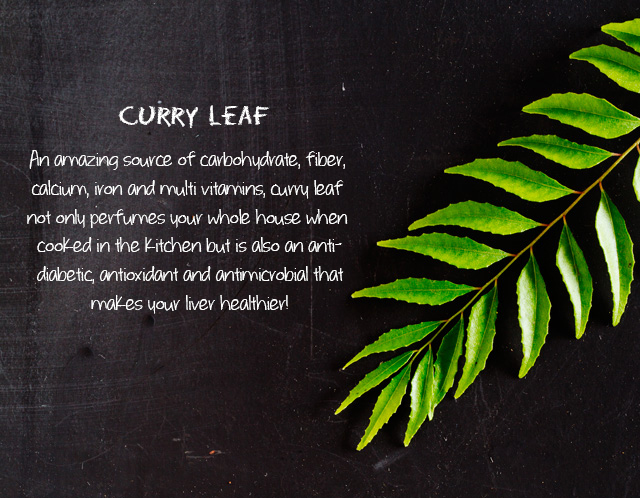
S94A5768-text

Curry Leaf

We Indians love curry so much that we named a whole plant after it! I remember the time when as kid I’d fish the curry leaves out of the kadhi pakora mummy would make and as a result would get a long talk over the nutritional qualities of the leaf and only an ignorant can throw away those precious qualities instead of eating them. At that time it seemed like an unsolicited advice but today I try and tell the same to my daughter. Packed with carbohydrate, fiber, calcium, iron and multi vitamins, curry leaf not only perfumes your whole house when cooked in the kitchen but also is very good for your heart, improves the insulin levels in your body and also has several antioxidant qualities. 

With the passionate sputtering of the leaves when thrown into a pan of hot oil to be later mixed in a vibrant curry or a leisurely dal (lentil soup) or the unhurried toasting of the leaves in an open flame to be later crushed and sprinkled over a sour soup, curry leaves definitely qualify as one of my most loved ingredients to cook with.

I will soon come back with another set of my favorite spices and will chat more about them. Until then feel free to let me know if there’s any spice in particular that you’d like to discuss so that we can add it to the next list. And don’t forget to admire them a little more when you cook with them next time.