Gosht Shorba- Guest Post for Spices And Aroma

Gosht Shorba from Everything Indian Slow Cooker Cookbook.

I am not a phone person. I never was, not even in my teenage, when its supposed to be one of your daily rituals to glue your ears to the phone for at least a few hours a day. No, not even then! I can find a 100 reasons not to be able to pick up the phone and call someone. It has always been like that. I guess I believe more in eye to eye and face to face conversations than long chats over an electronic device while staring at the ceiling or wandering around?
Then I never remember special days of friends and family. I always call a week after birthdays of friends and act to have remembered a wrong date. I over commit and then try to work night and days to keep the commitments. Sometimes I succeed and sometimes I do not. These are all bad habits, I know but that’s who I am. I have lost touch with friends due of this, but those who understood, stuck around.

Gosht Shorba

I cannot say that I was ever the most popular kid in the class. Not in school, nor in college and not even after that but I have always been lucky to have friends. Many good ones who even after calling me for the nth time still call to check on me and also complain in the end that I don’t call. Ones who call me on their birthdays and remind me to wish them. Ones who know what my “problem” is, (I know that they do because they have told me several times) but still make sure I do not fall flat on my face because of that.

Vijitha or Vij as I call her has become one such friend. Someone I met with a couple other blogger friends at a coffee shop an year and a half back and thought what a chatterbox this girl is. And now she has become one of the reasons why I am thankful for starting a food blog. She isn’t used to me saying so many nice things about her, all at the same time so I will stop right here.

Spices for Gosht Shorba

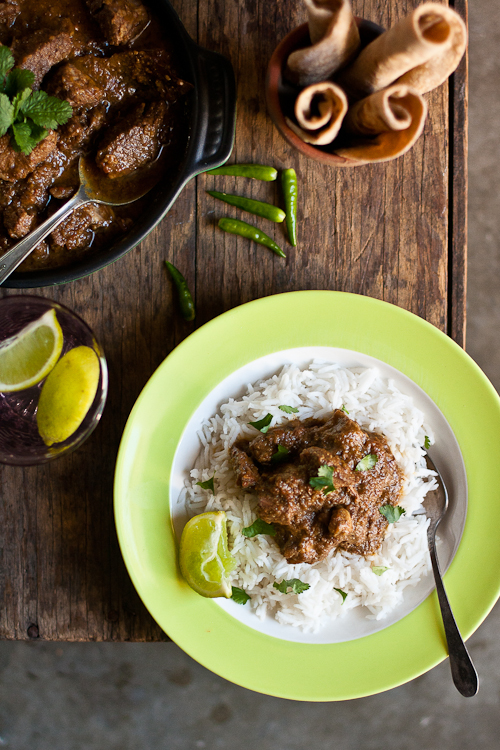
Now even before my book came out Vij had asked for a signed copy of the book so that we can give it away to one of the loyal readers of her blog. So after many reminders and then a few threatening emails and personal  home visits I finally sat down today and worked this post up for her. The recipe I am sharing  today is one of the traditional ways goat meat is cooked in North India. You can find this and many other slow cooker recipes on my cookbook “The Everything Indian Slow Cooker Cookbookt” which you also have a chance to win today.
So head over to Spices And Aroma for my guest post and recipe. Also do not forget to surf around her wonderful blog. If you are someone who has or knows someone with gestational diabetes or thinking of following South Beach Diet or simply trying to watch your waist and love Indian food then this trip to her blog might turn out to be a treat for you. Enjoy!

Pulled Lamb Sandwich With Caramelized Onions and Chipotle Garlic Aioli

Picnic

She checked the clock twice in a minute to make sure it was still working. Checked her phone to see if there were any calls that she had missed. Rushed to the sound of a passing car and she peaked out the window hoping it was him. Then disappointed went back to the couch rubbing her sweaty palms against each other, sat down and began shaking the legs again.

Sandwich

He promised he will be home from work by 8 and it was almost midnight. No phone calls, no messages and no news of him being well. He never does that, then why today? Something must have gone terribly wrong. An accident or maybe that back of his? Worst things come to mind at times like this.

Tulips

Then trying not to concentrate on her pacing heartbeat she picked up her favorite book. While turning to the page she had last left, she heard something. Maybe the sound of footsteps approaching, which were being faded by that pouring rain outside of her apartment. A ring of the doorbell and she shook with excitement. This might be the best sound she had ever heard. She ran to the door, opened it and there he was. Drenched in rain but a smile on face.

collage-2

Before she could complain his hand holding flowers appeared from behind. “Why do you have to like red tulips?” he complained ” I thought I’d pick some for you but then they always run out of them?” She couldn’t hold the tears back anymore so let it all out but accompanied with a big laugh. “What’s for dinner?” he asked. “Sandwiches”, she said. “Alright, then lets have a picnic in our living room tonight!”. He entered the house and just like that everything just brightened up.

Ingredients

Thanks to American Lamb for sending some really good all-natural lamb for me to try for this recipe! I will be sending this recipe to the Lamb Lover’s Photo Contest.

Ingredients: Makes 4-5 Sandwiches

For Slow Cooker Pulled Lamb:
1 1/2 – 2 lbs boneless leg of lamb
3/4 chicken stock
1 1/2 teaspoon rosemary
1 tablespoon olive oil
2 cloves of garlic (smashed)
1 1/2 tablespoon balsamic vinegar
1 teaspoon cracked black pepper
1/2 teaspoon red pepper flakes

For Caramelized Onion: (Slow Cooker version in “The Book”)
4 cups thinly sliced
1 1/2 tablespoons olive oil (or butter)
1 1/2 teaspoon salt
1 1/2 teaspoons sugar

For the Chipotle Garlic Aioli: Makes 1 cup
I followed this recipe for garlic aioli on David Lebovitz’s blog, tweaked just a little. Just omit the garlic from this recipe and add chipotle garlic paste instead.

2 tablespoons Chipotle and Roasted Garlic Paste
1/2 tsp salt
1 large egg yolk, at room temperature
1/2 cup (250ml) extra-virgin olive oil
1/2 cup pure olive oil  
You’d be surprised to notice that I use two kinds of olive oils. I once read a chef  mixing half of pure live oil to the quantity of extra virgin olive oil to cut on the strong taste of oil in the aioli. I tried and it works for me. If you’d rather use 1 cup extra virgin then go ahead. You will not be breaking any rules.

Remaining ingredients I used for the sandwich. You can always play around here!
Baguette bread (you can use your choice of hard crusted bread)
Some greens (arugula or baby spinach go well with this)
Sliced tomatoes
Sliced avacado

Method:
Preparing Lamb:-
In a mason jar add all the ingredients except for the lamb and chicken stock. Close the lid and shake vigorously for 5 seconds. (This is how I make my vinaigrette)
Pour the vinaigrette to a ziplock bag. Add the lamb. Seal the bag and squish it so that all the vinaigrette is coated well around the lamb. Let it sit for 30 minutes.
Take the lamb out of the Ziplock back. Heat a cast iron skillet. Transfer the lamb to the skillet and cook on each side for 3-4 minutes.
Pour chicken stock to the slow cooker. Transfer the lamb to the slow cooker discarding all excess fat.
Cover and cook on low for low for 6-7 hours.

For Caramelized Onion:
Use a wide thick bottom saute pan (I use a cast iron skillet). Heat oil/butter
Add sliced onion. Stir well to coat the onion with oil/butter. Turn the heat to medium and let it cook on its own, stirring occasionally.
As the onion turns brown and looses its water it will stick to the bottom. Let it stick a little but keep an eye so that you do not burn them and keep stirring occasionally.
Towards the end the onions might all come together and begin to stick more to the bottom. Try adding a couple tablespoons of water to deglaze the pan. Turn the heat off and let it sit in the hot pan for 10 minutes before you move it to dish.

For the Aioli:
I followed the recipe as on David’s blog. Its explained well there and always works for me. Just substitute garlic with Chipotle and Roasted Garlic Paste.

Putting the sandwich together:
Take the leg of lamb out of the slow cooker. Using two forks shred the meat. I always reduce the remaining liquid in the slow cooker and pour it over my meat. So I did the same here.
On a bed of greens over sliced baguette put some pulled leg of lamb, add caramelized onion, tomato and avacado. Smother some aioli on the other half of the baguette. Place it on top and enjoy with a glass of cold beer and your honey!

Chipotle And Roasted Garlic Paste

I like putting the butterfly to bed. The whole house is nice and quiet. Sitting in a dark room next to her, holding her soft chubby hand and running fingers through her hair. Listening to the tick tock of the clock, then being disturbed by the whooshing sound of a strange car passing by the house every once in a while. Its nice AND quiet! If you live in a house with a very curious butterfly whose only job during day is to fly around the house in circles until the whole house comes down with her, you know how golden that “nice and quiet” is!

Chipotle Garlic Paste

I barely get a second in my day where I can just sit, close my eyes and think. That nice and quiet is my opportunity when I do nothing but think and get transported to some other place for a while. Yesterday it was a trip to Mexico that we went on an year back. To the stuffy, noisy but colorful streets of Old Puerto Vallarta.

IMG_1920
IMG_2006

It was our third day in the city when we finally decided we’ve had enough sun bathing for our Indian skin so we pulled ourselves out of the beach, strapped the kid to her car seat in our tiny rental and headed to the old town. The hotel employees warned us that the we might find a little too much culture that a tourist can take but we were relentless. Later we were glad that we were. Because I am quite sure that we could never have got a better tasting pork tacos, creamier avocados and more refreshing Piña Coladas than anywhere else.

Street food in Mexico

Colorful vendor stallCars hustling on the streets along with pedestrians, tiny shops lined in a row selling everything from pillows to bird cages, old historic church with tall clock tower whose bell would go off every hour to tell us how fast the time is passing. So much color and so much life everywhere.

Kids playing soccer on the streets Spice shopAnd then I saw something which made me jump. I might have shrieked, I am not sure and my family is still too embarrassed to admit. I saw a spice shop! Not your spices-boxed-in-fancy-little-colored-jars kind of a spice shop but the I-can-smell-the-place-from-a-mile kind of spice shop. It was tiny but overflowing with a zillion kinds of spices, half of which I had no idea what they were. I went nuts and bought a little of this, a little of that and couldn’t stop until the “better half” gave a stare. I managed to buy some dried chipotle pepper as well. The smokey-and-sweet-yet-carrying-a-punch kind.

IMG_1997

Chipotle

So holding her chubby hands with my eyes closed and brushing her hair with my fingers yesterday, I was thinking of those chipotle peppers. Thinking of ways how I could use them this time. I thought of that chili garlic paste that mummy would always keep in her kitchen just to add an extra punch to any sad dish. I thought why not do it with chipotle pepper and mix them with garlic to make a smokey chipotle garlic paste. Now I do not know about you but there’s something about roasted garlic that I love. It must be the aroma or the depth it adds to any dish but there is something.

Roasting garlic

So next morning soon after waking up I got busy with the peppers. Cut them, cleaned them, toasted them, rehydrated them and then pulled out my mortar and pestle. Threw in some roasted garlic with those peppers. Then with a little love and lot more muscle a beauty came out. You can use this paste to spice up any bland dish from a creamy pasta sauce to a simple vegetable stir fry. It also adds so much flavor to meat.Add a little bit of salt to your taste and this can act as a good spread for any bread.
I referred this amazing tutorial by Gourmet food editor Chef Ian to educate myself more about peppers and how to use them.

Ingredients:
16-18 dried chipotle pepper
1 garlic head (bulb)
1/3 cup olive oil +1 teaspoon
4-5 cups water (to rehydrate the peppers)

Method:
Using this video as a reference, I cleaned and prepped my Chipotle peppers. Check it out, you might learn something new about peppers. I know I did.
In order to roast garlic, preheat the oven to 400 deg. F.
To prep the garlic you can either chop about a 1/4″ of its top just enough to expose the garlic or cut it into two across its circumference like I did.  I do not think it makes any difference.
Place the exposed side up on a piece of aluminum foil. Pour 1 teaspoon olive oil over it. Bring the two exposed sides back to their place. Tightly wrap the foil making a ball. Place it in the oven and bake for about 25-30 minutes or until the garlic is soft.
Take it out of the oven. Let it cool for 10 minutes and then either pinch the cloves out of the skin or take it out using a fork.
Now to make a paste you can either use a mortar and pestle or to make things easier you can use your food processor.
Place the garlic and peppers together and grind them into a paste.
Olive oil here is used only for preserving purpose so you can add it after grinding or if using a food processor add it while grinding to help the blades move smoothly.
Place in an air tight container and store in your refrigerator.

Do not forget to check out the giveaway running on the blog. You still have a few days to enter.

How To Make Ghee In A Slow Cooker From “The Book” and A Giveaway

Homemade ghee

Is it still allowed to wish someone a Happy New Year because “technically” the year is not exactly new anymore. But since we are still holding on to the first month of the year by its tail let me just go ahead and send you all my warm and loving new year wishes. Hope you had a fabulous 2012, kissed it a farewell with smile and wish you have a much much better 2013!

Organic butter

I can call my 2012 “eventful”! I know it wasn’t as eventful on the blog as you and I would have wanted it to be but it definitely was behind the scenes. There were some very interesting writing and photography gigs that I was offered which kept me busy, The Book being one of them. Then there were some hospital and emergency room visits that were not as pleasing as those gigs but they sure kept me busy as well. You did not get to hear about them on the blog because I just did not feel very comfortable talking about it. But then as they say, “all’s well if it ends well!”. So it all ended well and the doctors have given a green signal now. Waiting for that green signal was boring though so we thought we’d celebrate ourselves in the meantime and took off for some quiet and hassle free time with family in India. Spent a refreshing few weeks there and now we are back home. Back to the routine, back to work and back to the blog and you!

The Book

I spent a huge part of the past year writing my first cookbook- The Everything Indian Slow Cooker Cookbook. Developed many new recipes, modified some shared by friends (whom I cannot thank enough!) and tested countless number of them, several of which failed and which didn’t made it to the book. You can find 300 of my favorite Indian slow cooker recipes in the book. Probably the part of the book that I like most is the chapter named “Indian Slow Cooker Foundation Recipes”. In this chapter I have shared some very basic recipes like how to make rice in a slow cooker, how to make yogurt and curry paste in your slow cooker. And one of my favorites is making ghee using a slow cooker. This recipe will make your life so much easier that you will never go back to your store bought ghee again.

Butter

All you need is some good quality, organic butter and you are good to go!

Making ghee in a slowcooker

The slow cooker in this picture is a little big but if you have a 3 quart one then that would be perfect. Place 8 sticks of butter in the slow cooker. Set the slow cooker on low and cover with a lid propping it open just enough for the steam to escape. I use a chopstick or my mini spatula for that. Cook for 8-10 hours.

Making ghee in a slowcooker 2

In the end you will get 2 cups of clear golden ghee. Scum will be floating on the top; spoon it off and discard it. Burnt milk solids will stick to the walls of the slow cooker. Do not scrape the sides or bottom! Let the ghee come to room temperature and then filter it using a strainer or cloth.

Making ghee in a slowcooker 3

Store in airtight bottles and use it for cooking curries, making stir fries or just add a dollop on fresh warm bread or rice.

Making ghee in a slowcooker 4

I would love to giveaway a few copies of The Everything Indian Slow Cooker Cookbook for you to take a closer look. So please drop a line in the comments section below if you’d like to participate in the giveaway (or even if you do not!). On Feb 10th I will randomly choose three lucky winners who will receive a copy of my cookbook.
Looking forward to seeing what you think about it!

We have winners! And their names are….
Ramona
Dena Testa Bray
Megan@What’sMeganMaking
Congratulations people! Please drop me an email with your addresses so that I can send your copy of Everything Indian Slow Cooker Cookbook.

Entry to this giveaway is closed. 

Cocoa Covered Pistachio Date Truffles

Cocoa covered date truffle

The whole mood around festive season stays the same, doesn’t matter if its Thanksgiving in the US or Diwali in India. Irrespective of the country, people, language or culture if its the holidays season there will be a struggle against insanity! I have spent enough Diwalis and Holis in India amongst boatload of relatives and friends to know that! Long lists of menus being created, destroyed and then created again, a month in advance. Some new recipes being developed and some of grandma’s tested ones thrown in the mix. The whole talks about who is cooking what and who cooks it best.

Date Truffle Collage 2

I wouldn’t call my mother any less of a risk taker when it would comes to her in the kitchen but still holiday season was no time for playing around. She had her favorite and “tested” list of dishes and she would stick to them . Dahi vada (fried lentil dumplings served with spiced yogurt), boondi laddoos (a sweet dish made with chickpea clusters), gulab jamuns and chola masala served with hot puffed poori and a few stir fried vegetables is what the menu would mostly look like every year.
She had the patience of getting up very early in the morning to start cooking the dinner. Nothing could be made a couple days in advance because its just impolite to feed your guests baasi (a day old) food. So the day would start very early even before the sun comes with a shower and prayer, then cleaning up of the kitchen followed by a cooking marathon which would only end when the guests would start trickling in the evening. I never understood why this hardship was required but she had her set of rules and she grew up following them.

Dates

I, on the other hand have a different set of rules and one of the perks of living in a foreign land is that mummy wouldn’t know that! I believe in band-aids, microwaves and quick fixes. So when planning a big meal like Diwali or Thanksgiving I concentrate on one or two big dishes which ask for most of my attention. That’s what people are going to dig into anyway, rest are all side kicks. But don’t neglect the side kicks either, just try to keep them easy, quick and if possible make in advance.
Now one of my favorite side kick right now which practically changed my life is this recipe for date truffles. I quickly softened my dates in a little bit of butter before grinding them and the extra caramelized flavor that added to it is amazing. This ones easy enough that I made it with my 3 year old, doesn’t ask for many ingredients, its delicious and is healthy too- Jackpot!

Date Truffle Collage 1
Ingredients:
1 lbs pitted dates (coarsely chopped)
1/2 cup shelled pistachios
1 tablespoons butter
1 1/2 tablespoon sweetened cocoa powder

Method: Makes approx. 16
Melt butter in pan. Add dates. On medium heat cook the dates until they loosen up and begin to look pulpy.
Transfer the dates into a dish or to a food processor.
Now in the same hot pan quickly toast the pistachios for a couple minutes until they give out some aroma. Turn the heat off. Let the pistachios cool.
Transfer both pistachio and dates into a food processor and grind it into a paste. After a point it might get a little difficult for the blades to move. Just move the mixture around with a spatula or spoon to aid smooth grinding but do not add any water. The paste does not necessarily need to be very smooth but enough to not have lumps in it.
Wait the mixture is cool enough to touch. Then oil your hands a little and roll them into small balls.
Take sweetened cocoa in a plastic ziplock back. Drop all the truffles in it. Seal the ziplock back and shake it vigorously for 15 seconds.
Take the Cocoa Covered Pistachio Date Truffles out and enjoy after a nice and hearty Thanksgiving meal!

Indian Simmer Loves- Veggie Belly

butter-roasted-masala-potatoes2-2
It has been a long time since one of my favorite sites was featured here on Indian Simmer. Things have been really crazy here in the background  with me, both work wise and health wise. But when I thought of coming back with the “Indian Simmer Loves” series I figured what better way to do it than come back with a blog and blogger who has been on the top of my favorite list ever since I started as a food blogger! Sala Kanan was the very first food blogger who when saw my food blog for the first time sent me an email telling how much she loved it. It was a short email with just a few lines of praise and an invitation to come visit her whenever I am in her hometown. And that few liner not only made my day but weeks because it was a huge thing for a new amateur blogger like me to get praises from Sala Kanan of VEGGIE BELLY! Its been over two years now and we have grown to be good friends and still can say that Sala is the same. Gracious, always ready to lend a helping hand and kind enough to share her knowledge with everyone. Now if you are a foodie and like to surf through food blogs then chances are you already know Sala and her gorgeous blog Veggie Belly. With her simple yet innovative recipes, impeccable photography and her intriguing stories of travel around the world, its no wonder that Veggie Belly is one of the most popular Indian food blogs. I am super excited that Sala agreed to guest post on my blog and happy to announce that Indian Simmer LovesVeggie Belly.

butter-roasted-masala-potatoes3

Tell us about yourself and what you would say is your food philosophy?
I grew up in South India. I’ve lived in the UK and now the US – Baltimore, MD, Washington DC, and now Portland OR. The travel bug has bitten me hard, and I’ve traveled to over 40 countries in 6 continents. Apart from travel, I really enjoy cooking and photography. Veggie Belly is the result of all of these interests coming together.
My cooking is pretty eclectic, and always meat free. I love the spices and flavors of India and the far east, and I think that reflects in my cooking.

What led you to starting a food blog?
People always ask me for recipes or guidelines for how to cook something. I was always sharing my recipes with people – either emailing them or scribling them on pieces of paper. So I decided to share my recipes with the world through my  blog.

What would you say “Veggie Belly” is all about and please share a recipe that best describes your blog?
Through Veggie Belly I share my vegetarian recipes, and hope to inspire people to step in the kitchen and make vegetarian food for their families. My blog has hundreds of vegetarian recipes that are inspired by my travels and by my upbringing in India.

Collage-3

When butter and potatoes come together, you just cant go wrong. Add some homemade curry powder to the party, and you have a super tasty, easy side dish! The best part is, this recipe is so easy to make – you just toss everything together and it pretty much takes care of itself in the oven.

I love curry leaves and use them in everything (even pasta!). They have a beautiful earthy flavor that is just perfect for this masala potato dish. Just throw a sprig of curry leaves on top of the potatoes and they will get fragrant and crisp in the oven.

My home made curry powder is easy to make – all you do is toast up dry red chiles, coriander, cumin and fennel seeds, then grind them in a spice grinder. This powder will keep for weeks in an airtight container, and can be used in curries, roast vegetables, salad dressing etc. So make sure you make extra!

I like using baby potatoes for this recipe and I used a mix of white, purple and red. But you can just as easily use regular sized potatoes, just make sure you cut them up into even, bite sized pieces. And make sure you don’t crown the potatoes in the sheet pan – they need to be in a single layer so they can brown properly.

butter-roasted-masala-potatoes4

Butter Roasted Masala Potatoes

Ingredients-  Serves 3-4 as a side dish
1 ½ pounds baby potatoes (white, red, purple, or mixed)
1 tablespoon butter
1 tablespoon olive oil
½ teaspoon Sea salt
1 Curry leaf sprig
1 teaspoon homemade curry powder (link:  http://www.veggiebelly.com/2012/10/homemade-curry-powder-recipe.html)

Method
Pre heat oven to 400f
Scrub the potatoes clean and pat them dry on a towel. Cut the larger potatoes in half, so that everything is the same size.
Melt butter in a small saucepan, and let it simmer till it is golden.
Place the potatoes, melted butter, olive oil and salt in a bowl and toss well.
Arrange potatoes in a single layer in a sheet pan, that is lined with parchment paper.
Bake for 30 minutes. Then flip the potatoes over. Put the curry leaf sprig on top of the potatoes. Return to the oven.
Bake for another 20-30 minutes or till the potatoes are golden on the outside.
When the potatoes are done, remove from oven and immediately sprinkle the curry powder evenly on top. Mix well. Then fish out, and discard the curry leaf stem, keeping the leaves. Serve hot.

Quick Stir Fried Peas And Carrots- In Her Lunchbox

Stir fried carrots and peas

I have literally been running between birthday parties, doctor’s appointments and lunch dates that I almost forgot to share my this week’s lunchbox plan with you. And now its Halloween today! So before I run to the potluck party at the butterfly’s school let me share a quick recipe and my plan for the week. Sorry I am not sharing any spooky Halloween recipe with you instead sharing a simple recipe for stir fried peas and carrots.

Lunch Box recipe

Like the last one this recipe again is my rescue lunchbox recipe. Remember those morning when you open your eyes in horror realizing you forgot to set up the alarm the night before, the clock says its 7:00 am and the kids need to be out of the door in 45 minutes? Yes, this recipe is for those days just to make your morning a tad bit easier. For such days I always keep packets of frozen peas, carrots, sweet corn, beans or a medley of all or couple of them in my freezer. Just heat up the oil, temper a couple spices, throw in the veggies, cook for a few minutes and done! Pack the lunch with some bread, boiled eggs, maybe a fruit and you are set.

Collage-2

In case you do not have the convenience of just grabbing a couple packets of frozen veggies then you can always prep up the veggies at your leisure. Steam them or blanch them, cool down and then store in the freezer for the busier days. Keeping this post very quick and coming straight to the recipe. Oh, and Happy Halloween!

Ingredients:

1 cup frozen peas and carrots medley (thawed) – I just drop frozen veggies in room temperature water and it thaws in a minute.
1 teaspoon cumin seeds (can use mustard, fennel)
1 1/2 teaspoon olive oil
Salt to taste
1 tablespoon grated dried coconut (optional)

Method:
Heat oil in a pan. Add cumin seeds. As they sputter add peas and carrots. Give a quick stir. Add salt. Stir again.
Cook until the veggies are heated well. For about a couple minutes.
Throw in the coconut. Give a quick stir and done!

Here’s what I am sending “In Her Lunchbox” this week:
Crustless Mini QuicheI am just in live with the make ahead quiches now! They serve as a great wholesome meal, they taste delicious and I can make them with the little one when both of us have time that in turn makes her more interested to try the dish.
Indian Stir Fried Noodles– She calls it “Breakfast Pasta”. She likes it plain with no veggies added to it so I have to usually add a side of veggies but you can always stir fry the veggies with the vermicilli.
Juicy Chicken Meatballs by Rasa Malaysia or another version here at Ginger Garlic Meatballs by Simple Reem– Both the recipes are not very different from each other. Both are juicy and delicious, just the butterfly is a little partial to the ones with green peas. With Reem’s suggestion I prepare and freeze the meatballs for 2-3 days and bake the morning I want to pack it for lunch.
Quinoa Pilaf by Pure Vegetarian– Another great idea for a wholesome meal.

Fava Beans and Pumpkin Seed Pesto- In Her Lunchbox

Fava Bean and Pumpkin seed pesto

I’ve had a fun , adventurous and blessed childhood. I grew up in a small town. The kind where almost everyone knows each other, if not by name then at least by face. One of the most important part of my childhood memories is the time at school. I went to a Christian missionary school. It was a great school, some would say the best in town. Sisters were strict and made sure we paid attention to our academics. Sir Michael would drag us to the field for our PT exercises every afternoon, miss Rashmi would let our imagination go wild in the craft class and Father Joseph, our Principal would monitor everything from a distance. There were rules, a number of them and the students as well as the teachers knew they had to follow them.

Untitled

I can say that those were good times and the best part was the time I had with my friends at school was over lunch. Though lunch time in our school was a little different. It might be a part of the “small town charm” but in our school the parents were allowed to bring or send in fresh food for their kids during lunchtime. So for several years mummy would cook, pack two lunch boxes, one for me and one for my brother and Ganga (our house help) would come riding his bicycle to our school everyday sharp at 12 pm. The lunchtime bell would ring and as we peek out the window, sure enough Ganga would be standing there with two stainless steel lunch boxes. And we would go sit under a huge shady Gulmohar tree with our friends, talk whatever the heck kids that age talk about and eat steaming hot rice with lentil soup one day or flaky parathas and stir fried vegetables with some tangy lemon pickles the other. Though I never realized this until today but it was such a blessing to have hot home cooked food everyday, AT school. I just loved my small town. There was no rush to get anywhere, no adulteration of any sorts and no deadlines to catch up on. Just pure, organic, closer to the roots joy!

Untitled

Unfortunately I am not that lucky anymore. Now I need to be at several places at the same time and I just cannot meet the deadlines if I do not follow a schedule. Now I need to be up at 5 in the morning and pack lunch for my daughter just to make sure she doesn’t have to eat reheated frozen pizza at school. Doing that day after day, everyday takes a lot of planning and creativity in the kitchen. And still many times I run out of ideas on what to put in her lunch box and I am told by my friends that they too get clueless many times.

Fava Beans for the pesto

So after being pushed by them for almost an year I finally gave in and hence starting this new series on Indian Simmer. Nothing fancy, just an attempt at sharing what I send “In Her Lunchbox” every morning. I do not promise the food will be “traditional” or “Indian” all the time but I do promise it will be healthy and something that my kid loves and will be hoping that yours loves it too. I’ll try to share a few tricks here and there about how I work in advance so that I am not rushing in the morning to pack lunch. How sometimes I am amazed how the same food becomes “edible” by the kids just by adding some fun element and how healthy doesn’t always means packing a bowl of salad. But just for the record, I in no way am trying to say that I am an authority in kids nutrition. All I will try to do is tell you what I plan to pack “In Her Lunchbox”.

Collage-2

One of the things that always helps me in making sure I am able to survive through all the chaos in the morning and still get the lunch box ready and have them out of the house in time is some advance prep work. Do as much as you can in advance or a night before so that all you need to do in the morning is to put things together. Kids (at least the ones I know) love pasta so I always make several varieties of pesto whenever I have time in hand. Store it in the refrigerator and pull it out whenever you are in a hurry and can’t be very creative, mix it with pasta, spread it on bread or add as a dip for veggies. My daughter loves Fava beans and Fava Bean Pesto  is always available in my kitchen. I added some pumpkin seeds in this recipe just in the spirit of fall and Halloween. Also if Fava is too bitter for your taste add extra lemon juice, that helps cut the bitterness and brings in a fun tang to the dish. Here’s the recipe.

Ingredients:
1 cup fava beans (blanched and skinned)
1/4 cup green pumpkin seeds
Juice of 1 1/2 lemons
1/2 cup Parmesan cheese
1/2 cup olive oil
2-3 cloves of garlic
1 teaspoon black pepper
Salt to taste

Method:
Put all the ingredients (except oil) in a blender or food processor and turn it on.
While the blade’s still moving slowly pour the oil into the food processor through the opening on the lid.
In the end you should get a smooth (or a little granular, depending on your taste) pesto. Spread it on the toast or mix it with pasta.

What I plan to send “In Her Lunchbox” this week:
Healthy Millet Patty by Spices And Aroma – Try using whole wheat or even whole gram flour for this recipe. Works well. I prepare the rolled dough a night before so that in the morning all I need to do is pan fry them.
Spicy Corn Fritters by Sunshine And Smile– Again I prep it a night in advance which saves me time in the morning. Omit strong spices if the kid can’t handle it. Sweet corn is always a selling point for my 3 year old.
Quick And Easy Bento by La Fujimama – I loved the idea of adding beans with rice. I also tried adding a zing of lemon juice in the mixture and it was a hit.
Vegetable Poha– This again is a very forgiving recipe. Use whatever vegetable you have in the refrigerator or you can even try adding grilled chicken or eggs.

Khasta Kachori And October Unprocessed 2012

Winters in Charlotte were not exactly bliss, not to me at least. It wasn’t cold enough to be covered with snow so that one could sneak out every now and then with a snow sledge. Neither was it cozy enough for you to be able to walk down the streets without freezing yourself into a popsicle. It was our first few months in the city, far from all our friends and of course the family. Only two things that kept us company were empty frozen roads and my cooking marathons. That’s exactly when nature decided to give us the happiest news any couple would ever hope for! The moment we heard we just looked at each other and cried. Him with joy and me, I am still not sure but I think it was a combination of fear and anxiety.

Kachori

Fear of the unexpected and the anxiety to see it coming. Joy came in, but later, much later! After the alcohol aversions and me gaining a dog’s ability to smell. Ability to smell everything bad and even the smell of good felt bad. Then came mood swings and lethargy. Weeks and months passed of me being miserable and I realized this was the worst decision I had ever made. Cursed the ones who had made it before me, pitied the ones who were going to make it after me and potty mouthed the ones who talked me into it.
Then on a clear spring afternoon while Oprah was on TV and me on the phone talking to, god only remembers who, it happened. It was either a series of bubbles bursting in my belly or maybe she kicked. My feet went numb and words got stuck in the throat. Waited for a few minutes and then she kicked again. Right at that moment, with her miniature feet she kicked out all the fear, every bit of anxiety and told me its gonna be ok and SO worth it!

Kachori2

She only came in my arms a few months after that day but gave birth to a new me right at that moment. That’s when joy came in. It came later but was SO worth it! It has been more than three years since then and those miniature feet inside my belly have grown bigger, stronger, naughtier and has a personality of its own. And the scary part, that personality is a lot like mine and has turned me into a lot like my mother. I never would have imagined I would admit this but its true.
I have no idea why I am telling you this today out of the blue but these memories just stormed in today while I was making these Khasta Kachori and fingers just started typing these words. During my pregnancy food craving and happy eating days spicy Khasta Kachoris with hot cilantro chutney, a drizzle of tangy tamarind chutney, a dollop of yogurt and sprinkle of chopped raw onion were always in my mind. And trust me finding it in Charlotte where there was just one dingy Indian restaurant in a 10 mile radius, was not a cake walk but the husband proved to be very resourceful back in those days. So along with those most treasured memories also sharing a recipe for a Khasta Kachori.

Khasta Kachori Chat

I also wanted to tell you about this challenge that Andrew Wilder started in 2009 and which is gaing more and more fame every year. He named it October Unprocessed. As you might get the idea by the name, its a challenge where if you take part you pledge to go (or try to go) for the month of October without involving or atleast reducing the amount of processed food in your diet. I was determined to participate in the challenge last year but then I caved. This year I convinced myself that its not gonna be as tough as it seems and any attempt in the direction is a good attempt. So if you are eager to participate or learn more head over to Eating Rules and check out the details. More than 4700 people have taken the challenge this year and I am excited to be one of them.

collage1-2
Ingredients:

For the dough:
2 1/2 cups Durum wheat flour (or mix whole wheat and all purpose flour in 1:1 ratio)
1/3 cup oil/or melted ghee
1 tablespoon salt
Water as needed
Oil for deep frying

For the filling:
2 cups boiled potatoes (roughly mashed)
1 cup frozen medley of green peas and carrots (thawed) You can also use fresh if you want. It will just ask for longer cooking time.
3/4 cup onions (chopped)
1 1/2 cups green chili pepper (minced)
1/2 cup cilantro (chopped)
3/4 teaspoon turmeric
1 teaspoon cumin seeds
1 1/2 teaspoon coriander powder
1 1/2 teaspoon dried mango powder
1 1/2 tablespoon cooking oil
Salt to taste
I used one of the most common and traditionaly used filling here but you can use just about anything. Minced meat, any vegetable, cooked lentils or beans(with minimal water used to cook it) or even fruits of your choice.
Method:

For the dough:
Mix salt into the flour. Add oil into the flour and mix it all very well together. To mix the oil well into the flour, take flour in small portions in your hand and rub it between your palms. To make sure that the oil is mixed well, hold the flour in your fist, press tightly and open the fist, the flour should still hold itself. The process of adding oil/ghee into the flour helps making the pastry flaky. 
Now add water into the flour, salt and oil mixture mixing it with hands carefully putting it all together into a dough. Trick to kneading perfect dough – always add water in small portions. Dough for pastry should be a little tougher. As a test, when you press your finger into it, you must have to apply a little pressure and it should not stick to your hand when you pull your finger out.
Work the dough for about 5 minutes and bring it together into a smooth ball. Wrap with a plastic wrap or damp cheese cloth. Set aside for 30 minutes.

For the filling:
Heat oil in a pan. Add cumin seeds. As they sputter add onion.
Saute for a couple minutes and then add all the dry spices, turmeric, coriander powder, mango powder along with minced chilli.
Stir it all together quickly and then add peas and carrots. Mix everything together. If using fresh peas and carrots then turn the heat to medium, sprinkle some water and cover and cook until the carrots are tender.
Add potatoes. Add salt to taste. Mix everything together scraping the sides and the bottom. Mix corinder powder into the mixture. Let it cool down.

Making of Khasta Kachori:
Divide the dough into balls about 1 1/2 tablespoons of dough in each ball.
Set some oil aside to oil your hands before rolling the balls. Now roll the balls into 3-4 inch circles. You can either use the tips of your fingers and start by pinching and flattening around the edges leaving the center thicker than the edges or you can just use a lightly oiled rolling pin.
Fill the center of the flattened dough with the filling. Lift up all the edges and join them all together at one place. Press it down and flatten it between your palms making sure you do not leave any air pockets or cavity.
Follw the same steps for all the dough balls. Cover the ones ready to be fried with a damp cheese cloth so that it does not dry out before you finish filling and start frying.
When all the kachoris are filled. Deep dry them.
There are three important things to be kept in mind when making a flaky Khasta Kachori or samosa for that matter. 
There should be just the right amount of oil mixed to the flour
Dough should not be loose or sticky &
The oil should neither be very cold or very hot. 
I gave you the tips on the top two factors above. Now the last factor which probably is most important is how to check if the oil is hot enough and still not cold. To do that I start my heating the oil on medium heat then to check the right temperature I take a small ball of dough, almost the size of a small pea and drop it in the oil. If the dough first sinks to the bottom and then after a 3-5 seconds sizzles its way to the top then the oil is ready. If its just sinks to the bottom and doesn’t come up, its too cold heat up a little longer. If it sizzle right away then it is too hot, turn the heat down and let it cool down a little.
You can either hot kachoris with tomato ketchup, some chutney or traditionally as we do in India by breaking it into two parts and drizzling some tangy tamarind chutney, hot cilantro chutney, a dollop of spiced yogurt and some fresh salad of pickled onions or radish. Enjoy with some hot spiced tea!

Apple Halva

Apple Halwa 1

For two years I have tried to be a part of Summer Fest an event organized by Food Network. Its a season long garden party where Food Network and HGTv joins hands with bloggers and gardeners and we all share our favorite garden-to-table recipes and tips. A new produce is featured every week and it goes on through out summer.

Apple

This year as you might have noticed I have been away a lot because of which I missed on a lot of fun things going on in the virtual world, Summer Fest being one of them. And even though summer is almost over I still wanted to take part in the event which too is soon to be over with summer. So as I said with this event we explore one seasonal produce every week which for this week is Apple.

collage 1-2

I am lucky to have an apple tree in my backyard and just like my house was flooded with greengages sometime back its soon going to be flooded with apples. I say that with confidence looking at those lean yet strong branches testing their flexibility with the amount of fruit weighing them down. The fruits which are still not fully ripe and still very green but you can see their cheeks slowly turning red as if the change in weather is making them blush. But a three year old doesn’t get it when we say that the apples are not ready yet. It doesn’t stop her from standing under the tree, raising both hands up in the air and jumping in hopes that she might catch a grip of them. Many times she doesn’t but sometimes she does and when she does she would come to us with a couple in her pocket and one in her hand, half eaten and would say, “look maa, they aaal clunchy and yummy. I think they aaal leady!”. So I guess the apples are ready and looks like we are ready to step into fall!

collage 2-2

Apples that I got (or should I say the little one got for me!) although were not fully ripe but still very sweet and so I thought of making halva with them. Halva is a popular Indian sweet dish, very similar to a pudding made with either a type of flour, ground nut, vegetable or fruit as base. The recipe that I am sharing today is very similar to Gajar Halva recipe already on the blog. Hope you enjoy!

Ingredients:
3 cups peeled, grated green apples (Can use any variety of apple. I had easy access to green)
1 teaspoon ghee (clarified butter) + 1 1/2 teaspoon
1/2 cup sweetened condensed milk
1 teaspoon crushed cardamom seeds
2 tablespoon cashews (break into smaller pieces)
2 tablespoon golden raisins
Water as needed

Method:
In a thick bottom saucepan or wok add 1 teaspoon ghee. Turn the heat on. As ghee begins to melt add grated apples. Stir well.
Reduce the heat to medium. Cover and cook for 8-10 minutes. If the apples are too sweet it will begin to stick to the bottom of the pan. Add upto 1/2 cup of water (depending on how ripe the apples are), replace the lid and cook until the apple is soft and form a loose ball. Approximately 10-15 minutes.
Add sweetened condensed milk. Stir everything well together, scraping the sides of the pan if something’s sticking on it.
Cook for another 8-10 minutes on medium low heat until all the liquid is evaporated and the halwa turns into a golden brown, shiny, loose mass.
In the meantime heat the remaining 1 1/2 teaspoon of ghee and fry the cashews and raisins until the cashews are lightly golden and raisins are puffed.
Add fried cashews, raisins and crushed cardamom seeds to the halwa. Mix everything well together and serve either hot or cooled down, as per taste.

Here’s what my friends did with apple this week: 
Jeanette’s Healthy Living: Gluten-Free Jewish Apple Cake  
Virtually Homemade: Apple Pie Muffin  
Chez Us: Baked Apples With Creme Anglaise  
Daily*Dishin: Easier-than-Pie Creamy Apple Bake  
Made by Michelle: Pear Apple Crisp  
Napa Farmhouse 1885: Apple, Fennel and Cheddar Cheese Panini  
From My Corner of Saratoga: Spiced Apple Dutch Baby  
Thursday Night Dinner: Apple Bread Pudding  
Devour: 7 Apple Desserts Beyond Pie  
Healthy Eats: Marrying the Apple With New Flavors  
FN Dish: Let’s Go Apple Picking

Tomato With Pickeling Spices (Tamatar ka Achar)

Ripe and organic tomatoes from my garden

Please don’t kill me today because I have yet another preserve recipe here for you. But I can’t help it. First it was cherries, then apricots and greengages and now tomatoes – summer has been a little hard on me! Not that I am complaining to be on the receiving end of such abundant organic produce at my arm’s reach but how much can a girl take? I have made tamatar aloo, tomato tadka dal and tomato green chutney enough times to be able to scare my family away from the dinner table by just the sound of it. So preserving pounds after pounds of tomatoes was the only option I had! Now that’s what summer is all about right- abundant fresh produce and a lot of preserving? I am sad that its time to hug the season bye but I wanted it to end on this note because that’s what I have happy memories of and assume its a tradition.

Tomato with pickeling spices

Summers would come and my grandma would be after my Papa’s life to go to the haat (local farmer’s market) to get raw mangoes and whole spices so that she can start prepping them up for the whole year. She was in her eighties and could still sit for hours drying whole chilies in the sun to later grind them with her own hands with a mortar and pestle to make garam masala. Jars for aam ka achar (pickled raw mangoes) would come out of the shelves, cleaned, dried and filled with the mango wedges coated with loads of oil and just the right amount of spices. Of course everyone had to still follow the customary rules of not touching or opening the jars for some time or with bare hands – something as trivial as that might spoil the whole batch. Just like any teenage girl, I would try to watch my figure and maa would throw in dollops of ghee (clarified butter) in my daal with a big wedge of pickled mango or lemon canned from last summer. I would frown and she would say, “eat it, this will make you strong!” Well, I had to and no wonder I do the same to my daughter now. Somehow a bowl full of steaming hot dal chawal (steamed rice with yellow lentil soup) with achar (pickle) is all you need to be transported back to that time!  

Collage 2
Tomato Achar is not necessarily a common variety of pickle used in India but mummy has been making it for as long as I can remember and was one of my favorites after her world famous pickled red chili peppers. I have spoken about panch foran here and that is what we are using to pickle the tomatoes here. Also its very simple to make but the amount of salt and oil is very crucial for this recipe. The amount of water in tomato is a good “ingredient” for disaster and if there isn’t enough oil in the pickle then it can go bad pretty fast. So its important that the oil is enough to cover the whole of pickle in the jar. It might seem a lot but trust me, its not.

Collage 1
Ingredients:
4 pounds sliced tomato (I used Early Girl tomatoes but you can use any variety)
1/2 cup or 2 bulbs garlic
1/3 cup thai/cayenne green chili
3 tablespoon Panch Foran spices
1/4 teaspoon asafetida
1/3 curry leaves (coarsely chopped)
1 cup olive/mustard oil
1/2 cup salt

Method:
Using a mortar and pestle, crush garlic and green chili together. If you do not have a mortar pestle handy, you can always use a food processor to coarsely grind it. I like it coarsely ground because I like it when I get little chunks of garlic or chili in my pickle. If you are not a fan then blend it into a paste.
Heat oil in a large thick bottom pan. Add asafetida and panch foran spices. As soon as they sputter, add curry leaves. They will splatter wildly for a few seconds so make sure you are at a safe distance from the pan.
Once the splattering is calmed down add garlic and chili paste. Fry for about a minute until they turn lightly golden in color.
Add tomatoes and salt. Mix everything together and bring it to a boil. As the tomatoes start to boil, reduce the heat to medium low and let it simmer until all the liquid is cooked off, for about 1- 1.5 hours.
Towards the end when all the liquid is evaporated, tomato with reduce to a thicker chutney like consistency and oil will separate. Cook for another 7-10 minutes making sure there’s no water left.
Once cooked through, let the pickle cool down before transferring into a can. Store it in a cool dry place in air tight containers. In a refrigerator this pickle can last for at least a couple months.
Serve as a spread with your choice of bread, as a dip with veggies or the traditional way with a bowl full of steaming hot dal chawal!

Greengage Jelly and Greengage Jam

Answers would be in the head but I couldn’t write them faster on the paper to be able to get out of that hot and stuffy examination hall. Sweat would trickle down my back, breathing would get heavy and the desperation to finish writing the last paper of my final term exams would be immense. Not just because its all going to be over and school will be closed for the next two months but also because I could see those packed bags at home, that day long train journey to Nani’s (grandma) house and those countless mango trees loaded with ripe, juicy mangoes in her huge garden.

Greengage jam and jelly

Summers would come and off we would go to Nani’s to see all of my uncles, aunts and countless cousins. All of us wouldn’t meet for the whole year but the moment we would see each other it felt like we has to pick from where we had left last summer. My mom’s native house was almost a small mansion with big doors after doors, tall staircases leading into huge halls and rooms as big as our whole house. A few of those rooms were just stores, godam, we could call them and during summer those godams would be filled with mangoes. So many of them that the aroma would fill the whole house and also you from within.

Greengage jam with fennel seeds and cracked pepper.

For the next two months we would eat mangoes in all shapes, sizes and forms. Pickled with spices, pureed to make aam panna reduced to make jams and jellies and dried to make fruit leathers. I would be so overwhelmed with all of it that after a few days I would stop eating my favorite fruit through out my stay there. My brother never made that mistake and would relish their sweet and juicy goodness as much as he could. Now I wish I would have done the same because fate brought me so far away from those mangoes that now how hard I try I can’t get that taste here in the foreign land. But fate did bring me closer to and introduced me to many new flavors which I hope is helping my daughter make her own memories.

Greengage

When we moved to a new house last year, along with it we got a sweet gift of some fruit trees two of which are greengage tree. I had never before heard of the fruit and it was only when the fruits loaded the trees I started doing research I found that they are from the plum/plout family. I along with my few dear friends who couldn’t escape receiving a weekly delivery of a box of greengages, was greatly surprised at how unbelievably juicy and delicious this fruit is. The outer skin is tangy and the inside is sweeter than sugar. Both the trees have been graced with fruits more than we, our neighbors or our friends could handle. So I have been doing the same what my aunts at my Nani’s place would do to their mangoes. Cooking them to whatever shape, size and form I can. I have canned a lot of them in the past few weeks so today sharing two recipe with you. One of Greengage jam with fennel and black pepper and the other of Greengage Jelly. I started with approximately 8 quarts of chopped greengages. First I used the juice to make the jelly and then the remaining pulp for the jam. You can always discard the pulp if you do not want the jam or reduce the juice for longer time if you do not want to make the jelly.

Collage

 Recipe for Greengage Jelly:

Ingredients:
8 quarts ripe greengages/green, yellow plums
4 1/2 cups cane sugar (This fruit is really sweet so asked for less sugar but if you are using some other less sweeter fruits then you might want to increase the amount of sugar)
1/2 cup lemon juice
1 pouch (1 3/4 oz) fruit pectin (no sugar added)

Method:
Wash the greengages thoroughly. Core and cut one into 8-10 slices. If you like you can blanch and then take the skin off of the fruit. I was just too lazy to do it and it just helped the jam to be tangier which we love.
Transfer the sliced fruit into a large, non reactive vessel which has a thick bottom, a wide mouth and is not very deep. This should keep the fruit from crowding and would help an easy distribution of heat throughout and that in return reduces the cooking time. I used a vessel similar to this.
Turn on the heat and let the fruit simmer until they are soft and cooked well, for about 30-45 minutes. The fruit I used was really ripe and juicy so I did not have to add any water but if yours is firm you can just about 1/2-1 cup of water.
Strain the fruit through multiple layers of cheesecloth, a sheer white cotton piece of cloth or a strainer.
Transfer the juice into a pot again. Save the pulp for the jam.
Save 1/2 cup of sugar and add the rest to the the fruit juice. Mix well and turn on the heat. Then add rest of the sugar mixed in pectin.
Stir everything well together and bring the mixture to a rolling boil for 1 minute. Skim the foam formed on top.
Reduce the heat and let it simmer for 15-30 minutes. I follow these steps to check whether my jelly or jam is done.
Once it passes the “doneness” test, turn the heat off, add lemon juice and mix it well. Let it sit for 5 minutes before transferring into washed, dried and warm mason jars with air tight lids. I always let my jars run through a dishwasher cycle before I use then for canning. 

Recipe for Greengage Jam

Ingredients:
Leftover pulp from the above recipe (Approximately 3 1/2-4 quart) Please keep in mind that this is cooked and reduced fruit. So if you are starting from scratch then I suggest you start with approximately 5 quarts of fresh fruit.)
4 cups sugar
1 tablespoon fennel seeds
1 1/2 tablespoon crushed black pepper
1 1/2 tablespoon cooking oil
1/2 cup lemon juice

Method:
Heat oil in a thick bottom, non reactive pan preferably with a wide mouth (as linked above).
Add fennel seeds and cracked pepper. As they sputter add the fruit pulp with sugar.
Mix well and bring the mixture to a boil. Reduce heat to medium low and let it simmer for about 45 minutes- 1 hour.
To test if your chutney is done, take some in the back of your spoon and let it stay out in the air for about 10-15 seconds then run a finger through it.
Turn the heat off, add lemon juice and mix it well. Let it sit for 5 minutes before transferring into washed, dried and warm mason jars with air tight lids.