Pav Bhaji

The day was warm, and the sky was china blue. Bees buzzed among the foxgloves, and Daisy wandered down the lane, humming a little tune to herself. Suddenly, from the corner of her eye, she caught sight of a beautiful yellow butterfly stuck in a spider’s web. As she crouched down to take a closer look, a black spider emerged from beneath a leaf and began crawling across the web towards it.

Pav Bhaji 2

It was time for her bedtime story and cuddled at one corner of her bed with my arm wrapped around her, the butterfly (my butterfly!) and I were reading her favorite bookDaisy Dawson is on her way”. A book about this little daydreamer Daisy, just like the one squeezing my arm sitting next to me.
With her feather soft, plush, pink hello kitty blanket drawn till her nose, and her legs slowly curling towards her chest, I could see that she just couldn’t take the thrill. “Do you want me to stop and maybe we can read it later?” I suggested.

“No, no… go on”, she insisted shaking her head, fast, sideways, with eyes still glued on the yellowing pages of her book. And started whispering softly along with me as I smiled and continued …

Pab Bhaji

“Oh, no, you don’t!” said Daisy, cupping her hand protectively around the struggling insect. As the spider scuttled back to its hiding place, Daisy scooped the butterfly out of the web and carefully pulled some sticky strands from its wings …
” Yay!”, she shouted and repeated again after me.
“There you go,” she said. “Back in the world again.”
Then she smiled and opened her palms toward the sky….
 

Lemons from the backyard

And with her plush pink hello kitty blanket thrown to a side, I could see her two arms open wide in the air and then a loud clap. “That is such a nice thing to do Maa. I like Daisy, a LOT! But Maa, why does anyone hurt anyone?”
“I’m really not sure honey”, I responded rather hurriedly for I had no good answer to that question.
“Well, they should not, because its just not nice!”
And just like that she left me feeling proud, blessed and guilty all at the same time. Wish we looked at life with the eyes of a four year old. Things would have been so much simpler and better.

Pav Bhaji 3

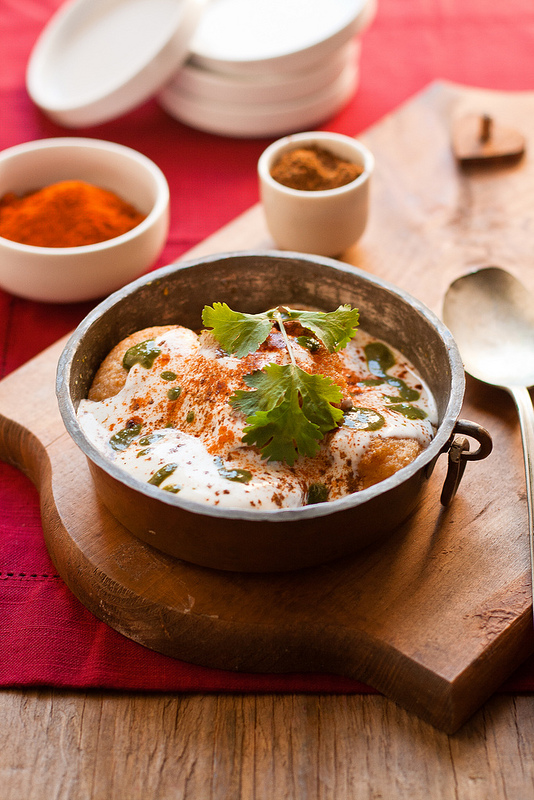
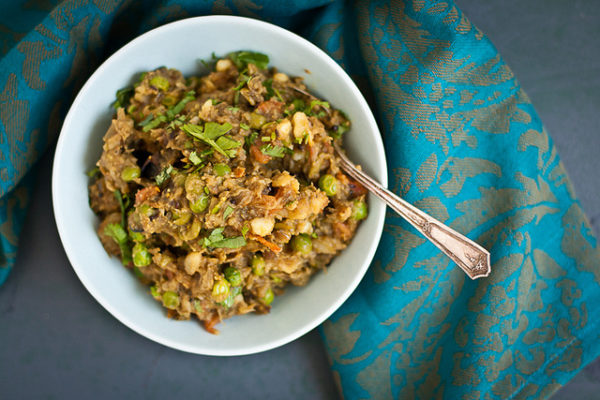
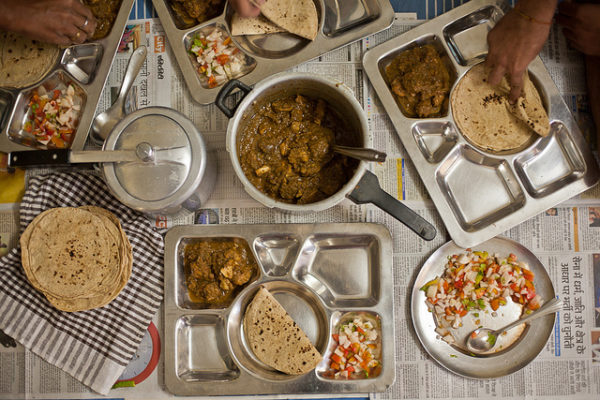
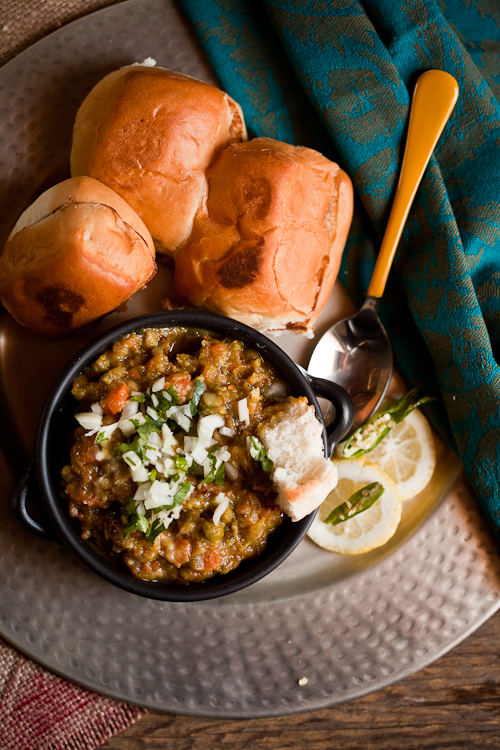
With her belly still warm with the pav bhaji all of us made together for dinner that evening and her heart content, she hugged Pinky, her pink pig, closed her curious eyes and fell asleep. I kept exchanging glances between her peaceful and innocent sleeping self and the moon and stars coming out of the ladybug lamp on her side table and reflecting on the walls of her room.

Ingredients: Serves 6

For Bhaji (vegetable curry):
4 cups coarsely chopped cabbage
2 medium sized potatoes, peeled (any kind is fine)
1 1/2 cups carrots
2 1/2 tablespoon olive oil
1 large sized bell pepper, cleaned, chopped
1 cup onion, chopped
1/2 teaspoon turmeric
Salt to taste
1 teaspoon cayenne pepper
1/2 teaspoon garam masala
1 tablespoon fresh ginger, grated
1 1/2 cups tomato, chopped

1 cup frozen green peas, thawed (fresh is fine too. Adjust cooking time accordingly)
1 tablespoon pav bhaji masala
2 tablespoon freshly squeezed lemon juice (adjust according to taste)
Cilantro for garnish

Pav:
Dinner Roll, approx. 2-3 per person
2-3 tablespoon butter for buttering dinner rolls + extra to be served with bhaji
1-2 teaspoon chili/cayenne pepper powder

Method:
For Bhaji:
Bring first three ingredients together in a pressure cooker or a pot. Boil till cooked through. Drain excess water. Mash. Set aside.
Heat oil in a large thick bottom pan on medium high heat. Add onion and bell pepper. Saute till soft, 3-5 minutes.
Add turmeric, garam masala, cayenne pepper, salt and ginger. Cook for 30 seconds. Add tomato. Turn the heat to medium low. Cook until the tomatoes are soft, 5 minutes.
Add peas. Cook for a minute. Add mashed vegetables. Mix well.
Add pav bhaji masala and lemon juice. Mix well. Cover and let simmer for 5-8 minutes until flavors marry well together.
Turn heat off. Uncover. Garnish with cilantro. Top with a dollop of butter and lemon wedges on the side.

For Pav:
Slice pav horizontally into two cutting from the middle. Brush cut sides liberally (as liberal as you can get!) with butter and sprinkle some pepper powder.
Heat a thick bottom skillet. Toast both sides of pav on the skillet till lightly browned.
Serve pav and bhaji together with a side of simple Indian salad.
Heat a thick bottom skillet.

Shrimp Sizzler With Tandoori Masala

Shrimp close up

It’s a thick diary. Leather bound, dark maroon in color with some golden imprints on the outside. One of the most treasured belongings of my mother in law and also probably one of her best kept secrets. No one can read it, open it or even touch it. So when asked for her tandoori masala recipe during her last US trip, she asked me to go open her cupboard and grab her “maroon diary”, I realized I was now part of the family!

Without losing a breath and before she could change her mind, I turned around and rushed towards the diary. I quickly tried to flip the pages on my way from her cupboard to the living room. Aged pages inside with some oil stains here and there. Aroma of spices trying to escape from between the pages  telling several old stories of their own. News paper cuttings, many of which are more than 30 years old, clipped carefully and hand written recipes in Hindi. There’s everything in there. Everything from 15 ways to pickle a lemon to her famous bharwan masala recipe and also my husband’s favorite gulab jamun.

Shrimp sizzler

I hand it over to her halfhearted. A part of me wanted to hold on to it a little longer – long enough to at least make a quick cheat sheet. Another part of me was still hopeful that maybe she will ask me to put it back in the cupboard too. But instead she asks me to bring a pen and a recipe book of my own. On finding that I did not have one, she sure looked a little disappointed and appeared to rethink her decision. But she doesn’t know I have a popular food blog which some might argue is better than a recipe book. But anyway, we did not have that amount of time. I fetched the closest thing next to a 30 year old, hand written recipe book I could find – the back of my daughter’s last week home work sheet! We spent the rest of the afternoon sharing recipes and noting down techniques.

Shrimp on ice

The recipe I’m sharing today is very simple, quick and soars with the taste of my mother in law’s tandoori masala. This was our go-to summer recipe that paired amazingly well with a bottle of chilled beer. The photos might tell you so, mostly because Abhishek took them back in summer (yes I was nursing them in my computer all these months). We’ve cooked it while camping, served while entertaining friends at home and whipped in minutes for the butterfly’s lunchbox. It will work equally well with family gathered around the toasty fireplace while snow freezes the outside world this Christmas.

Shrimp Tandoori

Ingredients: Serves 4
1 lb shrimp (clean)
1 1/2 cups sliced onion
1 cup cherry tomatoes
1 teaspoon tandoori masala
Salt to taste
1 1/2 tablespoon olive oil

Method:
Heat oil in a thick bottom skillet. Add onion. Saute for 3-5 on medium high heat until soft and golden.
Add shrimp. Toss and cook for 3-5 minutes until cooked.
A couple minutes after adding shrimp, add rest of the ingredients. Toss and stir well. Continue cooking until done.
Serve sizzling hot as part of fajitas, as appetizers with beer or as a side in your holiday feast.

An Indian Thanksgiving Feast and The Guardian

Indian Thanksgiving Feast

We never celebrated Thanksgiving growing up. In fact, I barely knew about the festival before stepping into the US. Then for the first couple years I would more eagerly wait for the day following it than the day itself. You must know why! The Black Friday madness caught me fast. But then one year, slowly the smell of rosemary and lemon stuffed turkey being baked at my neighbor’s house began drifting in through my windows and the laughter of their friends and family was hard not to overhear. The festival slowly began to intrigue me and I had to try and learn more.

Top Sht Chicken

Coming together with your loved ones sounded much like Holi and Diwali, thanking god for his bounty sounded like Sankranti or Baisakhi and enjoying delicious meal sounded exactly like the celebrations I grew up having. And here, oceans away from the family, we have to try a step harder to give our daughter her own family and her own memories. So in our own little way, with a few friends who are like a family now, we started celebrating this beautiful festival.

Murgh Musallam

Recently The Guardian asked a few of us bloggers a simple question. If we can replace one dish from a traditional thanksgiving meal what would it be? Without a doubt, the first thing I thought of was Murgh Musallam. It is a traditional Mughlai specialty that the Mughals brought to India and we welcomed it with open arms. Like the Mughals themselves, this is a rich and regal dish where whole chicken is stuffed and covered in a creamy spice paste. It is then browned on both sides and slowly cooked until tender and juicy.

Spread masala

Like several Indian non-vegetarian specialties, Murgh Musallam was a dish that I learned to cook from Papa. With this Murgh Musallam, I took another take on Papa’s recipe and tried to replace the traditional Thanksgiving turkey. But not just that, I also made two dishes to go with Murgh Musallam and can adorn your Indian Thanksgiving table. For the feast I made green beans poriyal, a simple vegetable pulav and a simple salad. Please visit The Guardian for the recipe for Murgh Musallam. Rest of the recipes from the feast are as follows.

Green Beans Poriyal:
Ingredients:
1 lbs fresh green beans (washed, cut to 1″ sizes)
1 1/2 tablespoon olive oil
1/2 teaspoon black mustard seeds
2 dried red chili (whole)
1 teaspoon urad dal (skinless)
1/2 cup dessicated coconut (can use fresh)
Salt to taste

Method:
Heat oil in a pan. Add mustard seeds, urad dal and dry chili.
As they sputter, throw in beans. Stir. Cover and cook on medium heat for 5 minutes.
Add salt. Mix. Cover. Cook until tender, 3-5 minutes.
Add coconut. Stir well to mix. Turn off heat.

Simple Indian Pulav:
Ingredients:

1 1/2 cup long grain basmati rice (soak in double the amount of water for 15 minutes)
1 1/2 cups vegetable of choice (I used carrots and peas)
1/2 cup onion (thinly sliced)
2 tablespoon ghee
1/2 teaspoon cumin seeds
2 dry bay leaves
1 teaspoon black peppercorns
4-5 cloves
1 cinnamon stick
Salt
Water

Method:
Drain soaking water from rice. Set aside.
Heat ghee in a pot of large pan with lid.
Add cumin seeds and other whole spiced. As they sputter add onion.  Saute on medium  high heat until light golden.
Add vegetables and salt. Saute for 3-4 minutes on medium heat.
Add rice. Stir to coat the rice with ghee. Add 2 1/2 cups water. Bring it to a quick boil on high. Turn the heat to low. Cover and let simmer until rice is cooked.
Allow to rest for 10 minutes before serving.
Can add raisins, slivered almonds, cashews or other nuts of choice as garnish. Fry the nuts or dried fruits in ghee before garnishing.

Simple Indian Salad: 
Ingredients:
1 medium sized onion (thinly sliced)
1 tomato (thinly sliced)
juice of 1/2 a lemon
thai green chillis
handful of chopped cilantro
Salt and pepper

Method:
Toss everything together in a bowl. Serve with the meal.

Chocolate Brownie Recipe

Chocolate Brownie

If I ever have my own hall or wall of favorite brownie recipe, this recipe for chocolate brownie is going to make it to the top. Not just because my 4 year old found this recipe, made a hand written recipe card and baked it all by herself for her Maa (me!). Nor because it was so easy even a 4 yr old could make it. But because these brownies are so darn delicious! They are dense, rich, chocolaty on the inside and nice n crackly on top. They are everything a brownie ever strives to be. Then they have nutella in it and the world knows that nutella makes everything better.
A couple mornings back after her dad left for work, with lazy eyes and bones, butterfly and I were cuddling on the couch. She was still in her PJs as school was closed and there was no hurry to rush anywhere. We were discussing some serious matters like cakepops and the color pink . During this heart to heart I must have said or done something right because she cuddled with me a little tighter and said, “Maa, I want to fill your bucket today!”

Butterfly!

A while back they read this beautiful book at her school. This book was about encouraging positive behavior in children by daily acts of kindness, appreciation and love. It uses metaphors like bucket filling for an act of kindness and bucket dipping for not so positive actions. I highly recommend this book if you have a little reader in your family. So anyway, I don’t exactly know what, but I did something that made her feel like “filling my bucket”. She put on her chef boots and decided to bake me some brownies. Because lets be honest, brownies fill everyone’s bucket! It might give you some extra love handles but it sure fills your bucket. And in mere 4 years of her time in this world, she has figured that part pretty well.

Ingredients

After that decision of hers we got to business fast. She borrowed my phone, asked how to spell the word “BRrrOoWNIEee” and within minutes I was looking at a hand written recipe card handed being over to me. “I cannot reach up that high so could you please get these things for me?”, she said batting those dense, curly eyelashes. Yup, she has figured that part well too!

Cuteness

She started with adding  butter and chocolate to a microwavable bowl.

Mircrowave t

Microwave for a few seconds for the two to melt.

Mix butter and sugar

Whisk melted butter with chocolate and then stir in sugar.

Add eggs and flour

Wait for it to cool slightly before adding eggs. Mix and add flour.
Mixing and pouring
Whisk it all well. Pour it in an oiled baking dish.

Holding in Hand

Microwave some nutella for a few seconds till melted. Pour it over brownie batter. Play around with a butter knife to make some designs. Pop in the oven and bake. And that’s how she made the single most delicious brownie I have ever tasted.
Do you cook with your little one too? I’d love to see some recipes your little chefs cook in your kitchen.

Ingredients: We followed this recipe. Only a few ingredients tweaked due to unavailability.
1/2 cup butter
4-5 oz semi sweet chocolate
1 cup coconut palm sugar (brown or white granulated should work just fine)
2 eggs
1/2 cup all purpose flour + 1/2 cup whole wheat flour
2 tablespoon vegetable oil
3 tablespoon nutella

Method:
Preheat the oven at 350 deg. F. Line and oil an 8×8 baking dish.
In a microwavable bowl place together chopped chocolate and butter. Microwave for about 45 seconds until the butter is melted
Mix with a whisk. Stir in sugar.
Wait for the mixture to cool a little and then stir in rest of the ingredients except for nutella.
Pour batter into the baking dish.
Microwave nutella for 25-30 seconds. Pour over the batter. Make zigzags with a butter knife or tooth pick.
Bake for approximately 30 minutes or until cooked through and leaves the sides.
Cool before enjoying.

Dahi Vada

Dahi Vada 1

“Whip it as long as your hands can take it, and then whip some more. That’s what makes vadas melt in your mouth” mummy would tell me with her fingers buried inside a bowl of smooth urad dal paste. Weather outside was perfect, not too hot and neither too cold, but inside the kitchen, with all that cooking marathon going on, it was steaming hot. A steady stream of sweat kept trickling down her forehead and she kept wiping it with the corner of her yellow cotton saree, which had a gold and red border. Like last year, papa again promised to put an exhaust fan in her kitchen on next Diwali. Like last year, she kept saying it isn’t worth spending so much money.

Sitting on a wooden step stool while waiting for the oil in her wok to be ready, she was trying to teach me how she made her ever so famous dahi vadas. I, on the other hand, found those flaky mathris she fried that morning, more intriguing. I would get a scolding for not paying attention. “You would wish you had listened to me now, when you make this in your own kitchen after marriage. So stop eating and observe carefully”, she would say. I continued to dismiss all of that and instead asked where she had kept her sweet and tangy mango relish which might go well with those delicious mathris.

collage

She would fry more than fifty vadas for Diwali, giving every single portion of batter a good whip with her hand before dropping exactly the same size dumplings into hot oil. No measuring spoon and still all fifty of them would look exactly the same and would be equally soft. I don’t know how she did it because well, I did try doing the same in my own kitchen after marriage and failed miserably! I consoled myself – it must have something to do with the heat in her kitchen that made her vadas softer than mine. I’m sure even hers don’t come out as amazing anymore, considering papa has now put an exhaust fan AND air conditioning in her kitchen!

Last Diwali I gathered the courage of making dahi vadas again, this time for a friend. Once again, I asked mummy for the recipe. “This time tell me everything in detail” I demanded. She never follows a recipe. Its all about eye balling and experience in her cooking but she tried her best to be precise this time. I tried my best to follow. They didn’t come out have as good as I remember hers. But maybe that has more to do with my memories attached of her making them, than the recipe itself? To me the ones I make can never taste as good as hers!

Diya

What is a Dahi Vada?

Dahi vada is a popular Indian snack that consists of lentil or gram flour dumplings known as vadas, which are deep-fried until crispy and golden brown. These fried vadas are then soaked in thick and creamy yogurt seasoned with spices, creating a delightful contrast of textures and flavors in every bite.

Why is my Dahi Vada not soft?

To ensure that your dahi vadas turn out soft and fluffy, it’s crucial to follow a few key steps during the preparation process:

  • Use less water: When grinding the soaked urad dal (skinless black gram lentils) to make the vada batter, make sure to add as little water as possible. The batter should be thick and smooth but not watery, as excess water can lead to dense and heavy vadas.

  • Add Baking Soda: Adding a small amount of baking soda to the vada batter just before frying helps in making them soft and airy.

  • Soak Vadas in water after frying: Soaking the fried vadas in water after frying and before adding yogurt helps in making them soft and moist. This step allows the vadas to absorb moisture, making them tender and more enjoyable to eat. 
Vadas

How to make Dahi Vada (Dahi Bhalla)?

As intimidating as the long recipe card might look here, making dahi vadas is easy. You just need to follow a few simple steps. 

  1. Soak urad dal and moong dal in water for 4-6 hours, then grind to a smooth paste.
  2. Add some baking soda to the batter, then beat well to make it fluffy.
  3. Heat oil in a pan, drop sdollops of batter to make small vadas, and fry until golden brown.
  4. Soak the fried vadas in warm water for 3-5 minutes, then gently squeeze out excess water.
  5. Prepare spiced yogurt and pour it over the soft vadas. 
  6. Garnish with roasted cumin powder, red chili powder, chopped coriander leaves, cilantro chutney and tamarind chutney before serving.

Finally, I am sharing it today. Hope it takes you back to your special moments like it did for me. 

Dahi Vada Recipe

Dahi vada is a popular Indian snack made from lentil dumplings soaked in creamy yogurt, seasoned with spices, and garnished with tangy chutneys and aromatic herbs. It offers a delightful blend of textures and flavors, making it a favorite among food enthusiasts.

Course Side Dish
Cuisine Indian
Keyword Holi, Indian Snack
Prep Time 7 hours 30 minutes
Cook Time 1 hour
Soaking time 6 hours
Servings 10
Author Prerna Singh

Ingredients

For The Vadas

  • 1.5 cup Skinless Urad Dal washed
  • 2 TBSP ginger freshly grated
  • 1/4 tsp asafetida
  • 1 tsp salt
  • 1/2 tsp baking soda
  • cooking oil (canola oil OR vegetable oil) for deep frying

For Dahi (Spiced Yogurt)

  • 3 cup plain yogurt preferably NOT reduced fat
  • 1 tsp roasted cumin powder
  • 3/4 tsp cayenne pepper powder adjust to taste
  • 1.5 TBSP granulated sugar
  • 1 tsp chat masala powder
  • Salt to taste

Garnish

  • cilantro chutney adjust to taste
  • tamarind chutney adjust o taste
  • water as needed
  • 1 TBSP chopped cilantro

Instructions

How to Make Vadas

  1. Wash thoroughly under fresh water and then soak urad dal in twice the quantity of water. 3cups of water for 1.5 cups of urad dal. Let it soak for 6 hrs.

  2. Drain the soaking water completely.

  3. Transfer soaked urad dal into a grinder, blender or a food processor. Except for baking soda, add rest of the vada ingredients into the food processor. Add up to 3/4 cups of water (slowly while blending, and as needed). Grind it into a thick smooth paste.

    In this case add as little water into the paste as possible. Just enough to run the blades to the food processor smoothly.

  4. Scoop out lentil paste and transfer into a medium sized bowl. Add baking soda. Using either your hand or a whisk, whisk the paste vigorously, rotating your hand in one circular motion. Whisk for at least 5 minutes. Set aside.

    This step is important in helping you make really light vadas. So it might feel a lot of work, so take breaks but don't skip it.

  5. Heat oil in a wok or deep fryer, for frying.

    Fill two bowls of water (halfway), one in a large serving bowl for dropping the vadas in, after frying and another in a smaller bowl for you to wet your hands in the next step..

  6. Wet your palms or keep a piece of plastic wrap on one palm. Drop a dollop of urad dal batter (about the size of a lemon) on the palm. Shape into a circle.

    Keep a small bowl with water handy.

  7. Carefully slide the batter into the hot oil. Fry util they are deep golden brown in color, turning them a couple times.

    Be very careful at this step. Wet palms make it very easy to slide the batter off the palm and into the oil. So dip your hand in water after every couple vadas to make sure they are wet enough.

  8. Once done, fish vadas out of the oil and drop into the large bowl of water. Let the fried vadas soak in water for 3-5 minutes. Then lifting them one at a time, place them between your palms, very gently squeeze excess water out into the bowl. Transfer squeezed vada on to a serving platter.

  9. Repeat this process for the rest of the batter and the same for the vadas after they are all fried.

Spiced Yogurt (Dahi)

  1. In a mixing bowl, mix all the ingredients well, with a whisk. Add up to 1 cup of water depending on how thin you want the yogurt to be.

    Typically yogurt should have the consistency of a pancake batter. But some people like them thicker OR thinner, so you decide what works best for you.

  2. Pour over vadas that were set aside.

  3. Garnish and enjoy!

Recipe Notes

Dahi Vada

Baigan Bharta

Bharta Papa owned a Vespa scooter. A blue LML Vespa dx, with silver rims. For someone living in a small town of central India, that was sort of a matter of pride. Even though after Papa and mummy took their seats there was practically no room left for a seven and four-year-old to squeeze in but we somehow made room and we were very proud of that scooter. We have so many childhood memories attached to that little blue wonder wheels of ours.
But one day for some reason my parents decided there’s need for a change. It might have something to do with my 4′ 3″ brother sitting on a tiny seat right in front of papa while he would drive, but they decided that we as a family need to graduate to a car. They brought home a second hand Fiat car. I really can’t recall what model it was but I do remember me looking at it for the first time and thinking, boy this is a beauty! It was after that car came into our lives was when the real fun began. It sure stopped at some of the most random places and Papa would ask my brother and I to hop out and push, but by then we were big and strong enough to do that and we did not mind it a bit. Nothing can beat the pride of being one of the few kids in your class whose dad owned a car, right? And then those road trips to grandma’s house, long drives and picnics.

Eggplants

There used to be a hanuman temple on top of a mountain and right on the foothills ran a beautiful river. So most summer Sundays would begin with a drive up to the hanuman temple and then a lunch picnic by the river. Mummy and aunts would either take the kids for a hike or we would play in the river with our dog and dads would be in charge of food.

Raw Ingredients

Papa would generally cook his chicken curry on campfire. Uncles would make batti (thick wheat bread) and baigan bharta. A very simple recipe but carried a punch. It would start with eggplants being covered under hot ashes until almost cooked and then charred on direct flame. Peeled, mashed and mixed with chopped onion, tomato, hot chili, cilantro and salt. That’s it! A recipe doesn’t get simpler than that but the smokiness of charred eggplant skin married with the heat from chili was just a party in your mouth.

Baigan Bharta

The Baigan Bharta recipe I am sharing today is not exactly the same as what uncles made 20 years back but it still brings back those memories.

Ingredients: Serves 4
1 medium sized eggplants (approx. 1lb)
2-3 garlic cloves (whole, peeled)
2 thai green chili (adjust per taste)
2 tablespoon cooking oil (I use mustard but any other oil is fine too)
1 pinch asafetida
1/2 teaspoon cumin seeds
1/2 teaspoon mustard seeds
3/4 cup onion (chopped)
1/2 teaspoon turmeric
1 tablespoon coriander powder
1 teaspoon garam masala
1 cup tomato (chopped)
1/2 cup green peas
1 cup potato (boiled, peeled, coarsely mashed)
Salt to taste
1/4 cup cilantro (chopped)

Method:
Wash the eggplant clean. Make shallow slits. Press whole garlic cloves and chili in the cuts.
Roast it over direct flame, turning on intervals until the inside is cooked through and outside is charred. Once done, place in a deep dish or bowl and cover with lid.

Another way of cooking the eggplants is to wrap it with aluminum foil. Place on lower rack of oven. Bake for approximately 3 hours at 400 deg. F until fully cooked. Pull out of the over. Let it cool for 10 minutes. Finish charring on direct flame. Once done, place in a deep dish or bowl and cover with lid.

Once eggplant is cool enough to handle, peel the skin out. Coarsely mash the flesh and set aside for later.

Heat oil in a heavy bottom pan over medium heat. Add asafetida followed by cumin and mustard seeds. As they sputter, add onion. Saute for 2-3 minutes until they begin to get translucent.

Add turmeric, coriander, garam masala. Quick stir. Add tomato. Cook on medium heat for 5-8 minutes until the tomatoes melt and form a loose paste.

Turn heat to medium low. Add green peas. Cook until tender.

Add salt, potatoes and cooked eggplant. Stir to mix well. Cover and cook for 3-5 minutes.

Uncover. Add cilantro. Stir well. Turn off heat. Serve with hot naans or roti.

Indian Simmer Lunch Box

Life was definitely simpler when I was growing up. There was no rush to get anywhere. Things take time. Everyone knew that and was OK with it. As a parent you could trust your neighbors and you did not have to sniff and poke into everything to confirm if it was real and true. Hot and fresh school lunches were a norm and our mums had enough help to make that possible, day after day, every day for years.
Well, to say that things have changed quite a bit in these years would be an understatement. And for obvious reasons. Decades have passed and we have grown. Money has lost its value and so has trust. Time has taken that place so everything has to be fast. Faster cars, shorter movies, crisper messages and quicker food. So for someone like me who grew up eating piping hot parathas and dal chawal (steamed rice with lentil soup) for school lunch, it was tough to adjust to the fact that my daughter will eat microwavable hot pockets and cold pizza for her lunch. So I promised myself not to fall in that trap. Its not always easy but trust me, not as difficult as they say it is! Just a little homework and preparation is all it takes. Here’s what I do to keep myself on track and to keep it “fast”:

Plan ahead and make a list: Every Friday night just 10 minutes before going to bed, I make a list of five dishes I plan to send in her lunchbox the coming week. I try to keep the dishes simple that do not ask for a lot of prep work. Like me if you like bookmarking or “pinning” great recipe ideas, when running short, just go back to those recipes and try something new.

Shop for the week: Weekend is when we get time to shop for groceries. Just like lunchbox food, I also plan my meals for the whole week and shop for everything during weekend.

Do major prep the night before: I usually pick recipes that do not ask for a lot of prep work but if there is any, I finish it off the night before.

Wake up before them: Set up the alarm and get out of bed at least 30 minutes before the rest of the crew to save yourself the chaos of having to run to the bathroom when tea is on the stove or when the little one spilled her milk. Extra points if you can squeeze in your morning yoga or run in there too!

Don’t skip breakfast. Just keep it simple and quick: Milk and cereal, granola fruit parfait,  pre-boiled eggs and toast or just a banana. This will save you time to concentrate on the hot lunch you are cooking instead of juggling between breakfast and lunch.

Assemble and put things together in the morning: If time consuming work is done the night before, then in the morning all you need to do is put it all together. Pack in the lunchbox and send them off.

Below is a list of things I sent in her lunchbox this week:

Monday: Avocado Paratha with lemon pickle Night prep: Mash avocado. Add salt and lemon juice. Knead with whole wheat flour. Refrigerate.
Roll and cook paratha in the morning.


Tuesday: Tuna cakes with rice cakes for lunch. Mini bagel with honey almond smear for snack: Night prep: Drain canned tuna. Mash with boiled potatoes (add vegetables of choice), dried mint, salt and panko. I make shapes using ongiri mold, just for cuteness factor. You can roll into little patties. Refrigerate.
In the morning pan fry tuna cakes. Cook rice and make shapes using ongiri molds. Assemble bagel.

Wednesday: Grilled veggie cheese pita for lunch. Apple and cheese for snack: Night prep: Frozen steamed veggie medley. Thaw at night. Use choice of meat if you like. Refrigerate.
In the morning, toss veggies with cheese. Adjust salt. Fill into pita halves. Wrap in aluminum foil. Cook like grilled cheese sandwich. Cut into quarters.

Thursday: Sausage fried rice for lunch. Apple sauce, cherry tomatoes and cheese for snack: Night prep: Chop sausage and choice of vegetables. Cook rice. Refrigerate.
In the morning, saute vegetables and sausage. Toss with rice.

Friday: Mini Idly with honey for lunch. Olives, cucumber and cheese for snack: I prepare my own idly batter a day in advance using this recipe. You can also use store bought batter.
In the morning, cook idly.

Hope this list gives you some ideas on what to pack as a healthy lunch for your kiddo. I am always looking for new, interesting ideas because there’s just not enough of them. So please feel free to share yours with a possible link in the comment section. I will come back with another plan next week!

Turkey Burger

Turkey Burger

There was this new fancy “American” burger place that just opened up in town. It was quite a drive away from my college but everyone in college was raving about it. Not just the people who got to try it but also the ones who never even stepped inside the place. We were a group of 5 close friends who had to try every new place in town. So we were kinda set back by the fact the we had not eaten at this new fancy “American” place yet. That needed to be changed so we set sail!

Turkey Burger 3

For the first time we had to stand in line for an hour and half before we got to get inside. If that had happened today, I’d be bummed by the wait but somehow, at the time, a long wait meant something exciting! I mean the place gotta be awesome if people are standing outside for hours just to get in, right? We finally got in and I remember thinking, “this is cool!”. Large room covered in shades of red, green and yellow beaming from techno lights. The place was stuffed with people, mostly standing and Pearl Jam and Nirvana were filling the air. All of us ordered whatever sounded interesting to us. I ordered a BBQ Chicken Burger. That burger blew my mind and the rest of the gang seemed blown away too. The place soon became our favorite hang out place.
That was when I had my first “American” burger. Its another thing that after moving to the US and eating a real “American” BBQ chicken burger, I realized that that burger was definitely not American. And I am pretty sure they had sneaked in some Garam Masala and coriander in there too! But still, that burger holds a special place.

Turkey Burger 2

So today, while making a burger for you, I thought I’ll sneak some “Indian” in there too! With a healthy turkey burger patty (being loyal to my favorite burger place, I sneaked in some coriander seeds), I made a cooling cumin and mint yogurt sauce with a punch from cloves. I loved how just a little bit of cloves just fill your mouth here. Try the recipe and let me know what you think!

Ingredients: Makes 4 medium burgers

For Burger Patty:
1/2 lbs turkey (ground)
1/2 cup onion (chopped)
1 teaspoon coriander seeds (coarsely crushed)
1/2 cup sun dried tomato (chopped)
Salt to taste

Yogurt Sauce:
1/2 cup hung yogurt (you can also use greek yogurt)
1 1/2 tablespoon mayonnaise (optional)
8-10 mint leaves
1 teaspoon roasted cumin powder
1/2 teaspoon cloves powder

Also need:
4 medium burger rolls
Greens- Any choice of lettuce, baby spinach, arugula or clover sprouts
Sliced heirloom tomatoes
Sliced red onion
1 1/2 tablespoon Olive oil for brushing

Method:
Burger Patties:
Bring ingredients of burger patty together in a bowl. Mix well using spatula or hand. Divide into 4 equal parts.
Take one part in hand. Using both hands roll into a ball. Press between palms to make a flat 1/2 – 3/4 inch thick patties. Pop in the refrigerator for 15-20 minutes.
Heat a grill or grill pan to medium high.
Lightly grease the grill pan. Cook patties both sides until done, about 3 minutes.

Yogurt Sauce:
Pound mint leaves in mortar and pestle.
Whisk ingredients together in a bowl. Set aside for later.

Assembly:
Brush the cut sides of rolls with oil. Place on hot grill. Lightly toast for 30 seconds.
Spread bottom roll half with yogurt sauce followed by burger patty then some some more sauce if wanted. Place tomato, onion and greens topped by the top roll half.
Serve with a side of chips, spicy sweet potato fries or coleslaw.
Oh, and do not forget that bottle of chilled beer to enjoy a summer meal!

Food Styling by Prerna Singh
Photography by Abhishek Singh 

Seekh Kabab

Seekh Kabab

No I am not writing another book. I wrote one last year and I still get nightmares of those days so I’m fine for now.

NO, I am not pregnant either. I already got a 3 feet long bundle of “joy” (read insanity) who is trying hard to climb on my shoulders right now while I write this, so yeah I’m fine for now even in that field.
No I’m not in jail or run by a truck or trying to quit blogging.
I’ve just been busy with life.

Tablescape 3 Another

Busy folding laundry, reading a book, taking the kid to the zoo or to the park or the museum, chatting with my mum for hours planning my only brother’s wedding, taking a long walk with the husband followed by some cuddling.
You know things that do not really count but actually they do? Yes that.
And some work in between. The never ending work which almost felt like writing a book, or being pregnant or being in jail. Yes that!

Collage-2

I can give you countless reasons why I was away from blogging all this while but let me tell you the truth.
I started my food blog, Indian Simmer to get away from the craziness. It was like my mental spa. A spiritual retreat. A place where I could come, talk to the unknown and feel relaxed. Its other thing that the “unknown” became one of the most important parts of the journey. But never for once I wrote a post in order to land a book deal, or score an award or gather hits. Whatever followed was out of pure luck. I believe that and want to keep it that way.

Turkey Seekh Kabab 2

For me fingers just do not move on the keyboard until I feel I have a good enough story. Photographs never come out decent until I feel that all the components are willing to play. I can not write a post or put something out here just for the heck of it. Just to keep the blog going and keep my readers occupied with just about anything.  I am sure its the same for a lot of us. So I could not blog for all this while because something was not right and I did not feel like.

IMG_1041-2 IMG_1046-2

Well, until a few days back when we as a family went for a picnic by the ocean. Deep in the Muir woods, by the Stinson beach, barbequing with my almost four year old, while my husband was standing on top on a picnic table trying to take top shot of the cilantro I was chopping. For the first time in months I regretted not blogging for so long.  After a long time I felt like telling you a story about this quiet, fun and Ah, so relaxing family time that we were having.

IMG_1031

Aashvi

Felt like telling you about how my butterfly was trying to clean the grill for her Maa and ended up bathing herself in ashes from head to toe. How the charcoal just won’t burn and Abhishek and I argued hopelessly about who was doing it all wrong. Then the little one dipping bamboo skewers in a bottle of water, prepping them patiently one at a time while I mix minced chili pepper, onion and spices into ground meat. Grill finally decided to light up. All of us wet our hands and packed meat on the skewers. He grilled while the girls lay plates on the table. There were a lot of chuckles and laughter filling up the gaps in conversation. Food was finally on the table and everyone went quiet for a moment making room for Mmm and Umms.

IMG_9942

It was a nice evening, perfect to be shared here. So I came back!

Ingredients:
1/2 lb ground meat of your choice. I used turkey.
1 1/2 teaspoon thai green chili (minced)
1/2 cup onion (chopped)
1 1/2 tsp ginger garlic paste (fresh)
3 tablespoon chickpea flour (besan)
1 1/2 tsp whole coriander seeds (coarsely crushed)
1/2 teaspoon roasted cumin (powder)
Salt to taste
2 teaspoon butter/olive oil/ ghee

Things needed:
8 bamboo or metal skewers
basting brush
grill (any kind) 

Method:
Soak bamboo skewers (if using) in water for 30 minutes.
Mix the first eight ingredients in a mixing bowl.Divide into 8 parts.
Lightly wet your hands. One portion meat mixture at a time, pack layer on the length of the skewer. Set aside.
Heat the grill to medium high heat. 
Line skewers on the grill. Cook for 2-3 minutes.
Turn the skewer, grill marks facing up. Baste with butter/oil/ghee. Continue cooking for another 3-5 minutes until kababs are cooked through and clear liquid drains on cutting.
Serve with choice of salad, raita and your favorite beer.

All the images in this blog post are taken by Abhishek Singh.

Moist Lemon Cake with Blackberry Cream Frosting

Moist Lemon Cake With Blackberry Whipped Cream Frosting

“Maa” she says, “my other mommy says that lemons are good for you. You should eat them ALL the time.”
Yes, normal kids have an imaginary friend or maybe an imaginary pet? My daughter doesn’t like normal, so she just took the liberty of creating an imaginary mommy. A mommy who lets her eat ALL the candies in the whole wide world, because candies make you strong. A mommy who buys her ALL the sparkly things in this whole wide world. A top of the line mommy she is. In short the “other mommy” is everything that this mommy is not!
So like every morning after waving and kissing everyone at home for a good 15 minutes and after promising that we will see each other soon, we left for school. She and I. With my hands gently yet firmly wrapped around her tender and pillowy ones, we started walking. Down the sidewalk, kicking every single stone on our way and cuddling with every passerby dog, we kept moving.

Moist Lemon Cake

Then like every day we crossed this lemon tree outside of a house down the street. As usual we stopped under the tree, looked up and counted the lemons. Only this time the “other mommy” had a news for me and only this time she was right.
“Lets pick some Maa” she then said. “We can make yummy lemon cake”. A very intelligent girl I have.

Lemon

People say and with a very heavy heart I agree that she has taken everything after her dad. The way she looks, the way she reacts at situations and even the way she folds her hands when asleep.
On the other hand one can count in fingers the things she and I have in common. Our love for anything lemon is one of them.
So hearing her suggestion my heart yearned to just lift a hand, reach out and pick some of those unbelievably aromatic and juicy little devils. But “its not nice to take things without the owners permission”. I had to go by that principle, at least in front of her.
“How about I buy a big bag of lemons before you get back from school?”, was what I said instead. Squeezing her eyes and with a faint smile, just like her dad, she shook her head in agreement. We moved forward.

Baking with Kids

Sure enough as soon as the garage door opened in the evening and she plunged out of the car her first question was, “did you buy a big bag of lemons for a yummy lemon cake, Maa?”. “Yes, lets wash our hands and make the cake!”.
We washed our hands, and got straight to measuring, cracking, melting and stirring. “Let’s drop some blackberries in there too”, she suggested in between munching on them and so we did.

Blackberries

By the end there was flour all over my kitchen floor and she ate more sugar than what went into the cake. But the cake that came out was definitely the best cake in this whole wide world!
We have saved some for our Mothers Day celebration. A day to celebrate the best title I can ever have and a day to celebrate our love for anything lemon.

This recipe was my inspiration for the lemon cake. Although I adjusted the sweetness according to our liking and made a few tweaks. Also the original recipe is that of a cupcake and does not ask for a frosting. But the cupcake recipe by The Alchemist is a winner too if you wanna give it a try.

Ingredients:

For the Lemon Cake: Makes 2 (6 inches) cake. Recipe from The Alchemist‘s cupcake recipe, with slight changes.
1 cup butter
1/2 cup lemon juice
1/2 cup water
1 1/2 cups sugar
2 eggs (beaten)
1/2 cup thick yogurt
2 tsp vanilla extract
2 cups flour (all purpose)
1/2 tsp salt
1 1/4 baking soda
15-18 blackberries (about 3/4 cup)

For the Blackberry Whipped Cream Frosting:
1 1/2 cups heavy whipping cream
1/2 cup powdered sugar
1/4 cup blackberries

Method:
For the Cake

Preheat the oven to 350 deg. F
Butter and dust two 6 inches cake pans and set aside.
Drop the cold butter into a large sauce pan. Over low heat melt the butter. Remove from heat as soon as the butter is melted. Mix lemon juice and water in a bowl. Pour it into the saucepan with melted butter. Mix. Throw in the sugar too. Stir. Whisk in the beaten eggs. Once everything is mixed set the saucepan aside.
In a separate bowl, sift together flour, salt and baking soda.
In a slow and constant speed pour the liquid mixture into the bowl of dry ingredients while whisking continuously. Prevent any lumps from forming.
Pour the batter into the prepared cake pans.
Drop the blackberries equally into both the pans. Spread them out evenly to keep them separate.
Bake for about 30 minutes or until a toothpick comes out clean from the center of the cake. My oven acts funny sometimes and heats up faster than normal so please adjust the baking time according to your oven and keep an eye.
Once the cake is one pull them out. Let the pans cool for 10 minutes. Transfer them to a cooling rack and let it cool for at least 30 minutes before putting the frosting on.

For the Blackberry Whipped Cream Frosting:

Using a fork mash all the blackberries. Set aside.
In the bowl of an electric mixer whip up the frosting on a medium high speed. Once the cream is whipped half way add sugar and continue whisking until it forms firm peaks.
Combine mashed blackberries into the whipped cream and carefully fold it in until just combined. Go easy while folding the whipped cream, heavy hand can pull the soft whip down.
Frost your cake and enjoy with your honey!

Chicken Curry

Relishing my dad's chicken curry in India.

My brother – he is mummy’s favorite kid. She never admits to that and always gives me that, “what on earth are you talking about?” look every time I say this to her, but I know. He is the gentler of us two (at least on the outside!), doesn’t leave back any trail of his crimes AND he ate his greens. Me, quite the contrary! But still the quieter him and crazy me, together managed to keep mummy on her toes all the time. She was either in the kitchen cooking for us, making rounds to our school explaining for us, pulling us apart while we try to kill each other or in her mandir (temple) praying for us. On her toes all the time!

IMG_9568

But Sundays were different. Sunday was the day she looked forward to the whole week. Sunday was when we, the kids would behave. Sunday was when I ate my greens with no whining in the vicinity. Sunday was when Papa was home and he took over from Mummy, the kitchen, the chores and the kids.

IMG_9686

So our Sunday morning would start with the sound of mummy reciting her prayers in the prayer room and to the smell of chai simmering away in the copper pot my grandma gave to her. Papa would come in our room, move the curtain for the sun to glare right at our faces, pull away our blankets, plant a big fat kiss on both of our cheeks and lift us in his strong muscular arms taking us straight to the bathroom. By the time we could snap out of our sleep, our teeth would already be brushed and we would be in our running shoes all set for our morning run. Well, Papa’s morning run and our- “dragging the feet behind Papa” run! I remember him running towards the sun with the rays falling on his face and the two of us running behind him, hiding in his shadow to save our sleepy eyes from the shine. We would run past the nearby mandir, some local shops, wave hello to half the town and be back home for breakfast.

IMG_9684

The hours after breakfast was what we looked forward to more. It was Sunday so it was a chicken curry day! We knew Papa would get us ready, load us on his scooter, one kid standing in front and other sitting on the back seat, wrapping our two arms around his waist tightly and we would go to the Sunday haat (farmer’s market). Carrying our jholas (bags) we would stop at every vendor looking for the plumpest tomatoes, choosing the freshest greens and bargaining for the best deal on potatoes and onions. Last stop would be the butcher shop located at the end of the haat. While waiting for the butcher to get our chicken ready, we would enjoy our ice creams or savor a glass of sweet sugarcane juice. Then head home.

IMG_9691

At home everything from the haat would be washed, twice. Then we would sneak out in the backyard and Papa would get in the kitchen to make his world famous chicken curry. It took him at least two hours to make that chicken curry. The process would start with onion, ginger, garlic paste prepared using a stone grinder. Whole spices ground along until everything turns into a smooth paste. Then his loyal pressure cooker would be pulled out, which by the way was used just on Sundays, just for the chicken curry. The process would begin and the aroma of masala floating in the backyard would get strong and stronger.

collage Two hours later we would lay newspaper on the floor, put or plates on it and lunch would be served. There would just be chicken curry, steaming hot rotis and a simple salad on the side. But that is still and will ever be the best meal one could ever serve to me. So today when I thought of sharing a couple of exciting news with you, I could not think of a better recipe and images to go with the post. Photos here might not be the best ones, but they carry boatloads of memories. Some happy moments we spent with my family during our last visit to India and another golden opportunity where we relished Papa’s world famous Chicken Curry. Every family has their own version of chicken curry recipe. A few spices here and there but the soul still the same. This is my family’s recipe.


collage2

Now the happy news. Because of all the love and support you show to Indian Simmer, it has been nominated again for this year’s Best Food Blog Awards hosted by SAVEUR Magazine. The nominations are now open for voting till Friday, April 19th. So if you think an Indian food blog deserves to win this year, then please vote for Indian Simmer in the Best Regional Cuisine Category. Every vote counts so please take two minutes and vote. Other than that, I am really excited to be featured on some amazingly popular websites like Refinery 29 and Edamam.com. Feeling so honored right now!

5 from 9 votes
Print Recipe

Chicken Curry

Every family has their own version of chicken curry recipe. A few spices here and there but the soul still the same. This is my family's recipe.
Course Main Course
Cuisine Indian
Keyword chicken curry
Prep Time 20 minutes
Cook Time 25 minutes
Marination 30 minutes
Total Time 1 hour 15 minutes
Servings 6
Author Prerna Singh

Ingredients

  • 1/4 cup lemon juice
  • 1/2 tsp salt
  • 1/2 tsp cracked pepper
  • 2 1/2 pounds whole chicken cleaned and cut into 16- 18 pieces

Curry:

  • 1 1/2 cups chopped onion
  • 2 inches ginger root
  • 3-4 cloves of garlic
  • 2-3 hot green chili peppers adjust according to how much heat you can handle
  • 1/2 cup mustard oil can substitute with vegetable or olive oil
  • 2-3 bay leaves dried
  • 1 1/2 cinnamon stick
  • 3-4 whole black cardamom
  • 1 teaspoon cumin seeds
  • 5-6 cloves
  • 1/2 teaspoon turmeric
  • 2 1/2 tablespoon coriander powder
  • 1 1/2 cups chopped tomatoes
  • 1 tsp Salt to taste
  • 1 1/2 teaspoon garam masala powder
  • 1 1/2 tablespoon ghee clarified butter
  • Handful of chopped cilantro

Instructions

Marination:

  1. Clean the chicken throughly. Drain any excess water from the chicken.

  2. Mix the marinade (lemon juice + salt + pepper) to the chicken. Set aside for at least 30 minutes OR up to overnight, covered, in the refrigerator.

Wet Masala:

  1. In a blender or food processor, grind onion, ginger, garlic and green chili into a smooth, thick paste. Set aside.

  2. Roughly pound the whole spices - bay leaves, cinnamon stick, black cardamom, cumin and cloves.

Cooking process:

  1. Heat oil in a thick bottom pan with slightly higher sides. A pressure cooker or wok would be a great alternative.

  2. Add pound spices to the hot oil. Stir as they sputter.

  3. Add turmeric. Stir. Add the wet paste prepared before. Turn the heat to medium and cook while stirring occasionally until all the liquid has evaporated and the paste is reduced to a dense, golden brown paste, 8-10 minutes.

  4. Add salt, coriander powder and chopped tomato. Turn the heat to medium high and cook, stirring occasionally. As the tomato cooks, it breaks down into and mixes into the masala, turning it into a slightly smooth and loose paste.

  5. Cook, until the oil separates, 8-10 minutes.

  6. Add garam masala. Stir in the chicken and mix everything very well. Reduce the heat to medium. Cover and cook, uncovering and stirring occasionally, every 3-4 minutes.

    Initially chicken will lose a lot of water but after cooking for 15-20 minutes the water will begin to reduce. At this point you can either uncover and cook, stirring occasionally or put on the pressure cooker.

Pressure Cook:

  1. If proceeding with the pressure cooker then cover, lock and wait for two whistles and then turn the heat off leaving covered for another 15 minutes.

Instant Pot:

  1. If cooking in an Instant Pot, lock the lid and cook on "meat" for 8 minutes.

Cooking in a pan or wok:

  1. If following the traditional stove top method, turn the heat to medium low and let the chicken simmer for another 18-20 minutes OR until the chicken is cooked well and the gravy is reduced to a nice thick consistency.

  2. Once the chicken is cooked, add ghee and cilantro. Stir well. Cover and let it rest for 15 more minutes before serving with your choice of bread or rice.

[amazon_link asins=’B074PHL51Y,B00006ISG6,B0000CCY1M,B018FUN24W,B0046IIPMW,B00309S13Q,B00X9RJXLI’ template=’ProductCarousel’ store=’indiansimme0b-20′ marketplace=’US’ link_id=’8a37d57a-c84a-11e8-af8a-c571cd584647′]

Chai and A Giveaway

Chai

Summer afternoons would be commonly spent with the uncles crowded around the television watching cricket matches and aunties busy in the kitchen gossiping and sending out pots and pots of chai and glucose biscuits. We kids would only get to eat the biscuits. On a lucky day, a kind aunty would fry us some samosas or pakoras. But chai? Nope! “Kids don’t drink chai” mummy would reply with a gentle tap on the back of our head. That’s the memory that chai brings for me or sometimes it takes me back to those monsoons.
The ones where we would be sitting under a tin shade in front of the tea stall outside our college building. Rain would be pouring and we would all be half drenched in water, shivering with cold. A glass of hot masala chai tucked tightly between our palms, breathing in the aroma of cardamom and ginger we would slowly be sipping away that chai warming ourselves from inside. Chemistry practicals, latest fashion, secret crushes and disastrous dates, everything would be discussed over “one cutting” (a term commonly referred to half a cup of chai in India). For Indians chai isn’t just a beverage; it’s also a way of cherishing the simple things in life, and an excuse to bring people together and celebrate the present.

IMG_9268

Chai commonly served in Indian homes is not as milky as the ones you find at the coffee shops across North America, popularly known as “chai tea” or “chai latte”. There’s an interesting article Manisha Pandit wrote on chai and titled it as “Drop the Tea; its already there in your Chai“. This post made me giggle and talks about a few misconceptions people have about their greatly loved Indian chai. Give it a read!
Masala chai is an essential part of life in India, where having a cup or two (or maybe three) of chai in the morning is akin to brushing your teeth every day. I still think there is still no “recipe” to a right chai masala, in order to make a masala chai. Chai masala, Masala chai?! Confused? Well, Chai masala is a blend of spices used to make a spiced tea which is called Masala chai in Hindi.
The spice preference in a masala chai recipe varies from family to family and from person to person, but some of the most common spices used in a masala chai are ginger, cardamom, cloves, cinnamon, fennel, black pepper and nutmeg. Either mix all these spices in equal quantity, adjust the amount according to your taste or just pick a few of your choice. I personally like mine with ginger only and sometimes with cardamom. Towards the end of this blog post I have shared a recipe to my favorite Ginger and Cardamom Chai. 

IMG_8880-2
But before that I have to tell you about a company called Gitadini. Its a small company started by a husband wife duo who design and sell original housewares, home decor and furnishings. As a food blogger you are approached by companies and brands on a daily basis with offers to try their product and talk about them. I am normally very hesitant at saying yes because I have a strict set of rules that I follow, one of which being not talking to my readers about things that I don’t stand behind 100%. So a couple of months back when nice people at Gitadini approached me you might understand why I was reluctant. After being assured that there’s no commitment I agreed to try their product. I tried, tested and have been using them for the past two months and I think now I am at a place where I can say that yes I am happy with all the products.

IMG_8843-2
Along with home decor and furnishing, Gitadini also has a small but interesting line of kitchenware. I was impressed by their modern take on the traditional Indian kitchen quintessential and also at their usability. I made sure I used all the products enough before I talk about them. I can say by their usability that it shows it has been designed by someone who has been in and around Indian kitchen for a while. I personally loved the ones displayed here in this post.

IMG_9328

Gitadini was kind enough to giveaway any featured product of their choice to one lucky reader of Indian Simmer. In the comments section below please tell me which product you would want to try. Choose from Rotito Rolling Board Set,  Medium Saucepan or Yin Yang Storage Bin. This giveaway is open till April 1st 11:59 pm PST. On April 2nd I will randomly select a winner and announce on the blog.

IMG_9309

Alright lets get to the recipe for Ginger Cardamom Chai, the kind that I make in my kitchen.

Ingredients: serves 4
3 cups water
3/4 cup milk (whole or 2%)
3 teaspoons loose darjeeling black tea (or can also use 3-4 black tea bags)
4-5 teaspoons sugar (the family prefers dark brown sugar and I like honey.)
3/4-1 tablespoon tablespoon fresh grated or crushed ginger
2 smashed cardamom pods

Method:
In a medium sized saucepan heat water on stove top.
Add sugar and tea. Let the water come to a boil. Then turn the heat to medium and add milk.
Let it cook for 3-5 minutes or until the white froth of milk on top settles down.
Add ginger and cardamom. Cover the saucepan with a tight lid, turn the heat off and let the flavors steep into the chai for 3-5 minutes
Using a strainer strain out the tea, ginger and cardamom out of your chai.
Transfer into tea cups and serve steaming hot with some glucose biscuits!

Entry to this giveaway has been closed.