How to make fruit leather?

Having a toddler at home in itself consumes a lot of you (both energy and time) and if you have a picky eater like mine, then God bless you! I have memories of my childhood where my mom used to run after me with a glass of milk all around the house and now when I have to do the same with my little monster, I know what a pain it can be! At this age the last thing they want to do is sit at a dining table and waste their time having a hearty meal when they can have so much fun running all over during that time!

IMG_2966

A lot of my friends both from the blog world and my real world, who are in my shoes right now, have asked me to share some foolproof recipes which I use for my little one. So today I thought I’ll come to you with a quick post where I wanted to share an easy recipe of something which I always stuff my refrigerator with and that is a Fruit Leather. I’m almost obsessed with fruit leathers now and make them out of all kinds of fruit from apples to pear, to berries! You just roll it up and hand it over to your toddler and they are good to go and best part is that they are so easy to make. So obviously its both my and my little monster’s favorite.

IMG_2922

You can make fruit leather with any kind of fruit. Nectarines, apples, pears, all kind of berries whatever you want. I had tons of apples at home so I used that. So here’s what you will need:

Fruits
Sugar (optional) – Since I don’t want to give the little one unnecessary sugar, I don’t add any extra sugar into my fruit leather but you sure can add if you want.
Lemon juice


Method:

If you are using fruits like apples or pears, peel and core them and dice into smaller chunks. If using berries clean them and cut into small chunks.
Place it in a big pot and add water. To every 4 cups of fruit add 1/2 a cup of water or if the fruit is really juicy you can even try adding a little less or no water.
Bring it to a boil. Reduce heat to low and add sugar and lemon juice. To every 4 cups of fruit add 1- 1 1/2 tbsp of sugar and 1 tsp of lemon juice.
Let it simmer until the fruits are cooked. Now comes out every mom’s best friend…. a hand blender! Blend the fruits into a smooth puree. Almost like baby food.
For the last time, if you want to taste and add some more sugar or lemon or even some spices like cinnamon or nutmeg you can do that now.
I skip this part to give a texture to my fruit leather but if you want you can strain the liquid through a strainer to get rid of any seeds.

IMG_2929

Now line a cookie sheet with oven proof plastic wrap. Transfer the mixture into the sheet. Spread it all over the sheet and the mixture should be about 1/4 inch thick. Try to keep the plastic wrap from falling over the liquid on the sides and covering it because then that part would not dry.
Preheat the oven to the minimum temperature that your oven can go into. Mine goes somewhere between 145-160 deg. F
Place the fruit puree into the oven for 8-10 hours. I put it inside the oven before going to bed and when I’m up my fruit leather is usually ready (you can even use a dehydrator if you don’t or can’t use an oven).
To test if its ready, touch it with a finger and if its not sticking to your finger and you can peel the leather off the plastic that’s when you know you can take it out.

IMG_2968

Let it cool and then roll it up along with the plastic wrap and put it in the refrigerator. You can even cut it into smaller pieces and then roll and store but I’m just too lazy to do that!
Hope your little one enjoys eating fruits after this!

fall-fest-logo-ruled This recipe goes to the fall fest event going on at Margaret’s blog.

P.S:- Some of my lovely readers were not sure if using a plastic wrap would be safe since plastic might have BPA in it. I did a little research and it was confirmed my one of the blog readers that Glad Clingwraps which I recommended in my comments below is safe to use since they are BPA free.

Food Photography – My Process (and Giveaway Winners!)

51

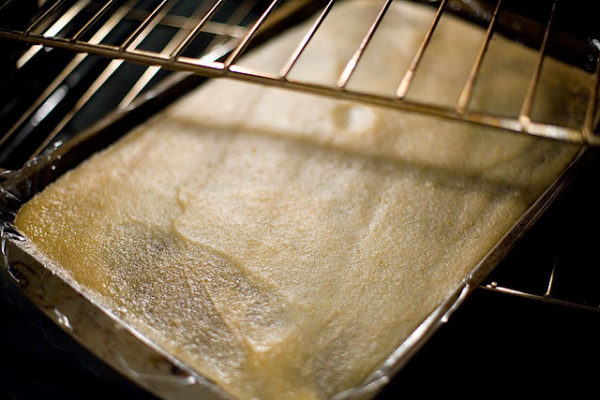
Finally!! After so many requests from you lovely friends and after a lot of pushing myself I am finally here with my first Food Photography post. Well! This post also has a good news for some of you which you’ll only get to know once you go through this WHOLE post (wait and desperation makes the result even more interesting, doesn’t it?) But let’s talk about some photography first!

If I were to pick between great food and great food photography, I’d honestly be torn. Because in the world of blogging (where I present most of my food), photography is truly the way to the palette. We all know a great food photograph when we see it we can nearly taste the food just by looking at it for long enough. That is what I strive towards when I photograph. I’ve had a few requests from my readers to share my photography process. Most of my workflow is a result of whatever I’ve picked up by reading books, browsing the internet for resources and most importantly studying the work of photographers I admire. Therefore, I am always looking to learn so please feel free to leave a comment and let me know if something can be done differently/better as it would benefit not only me but everyone else who is reading. There is so much involved in food photography, from gear to lighting to camera techniques to food styling to post-processing (phew!) that a single blog post can of course not cover it all. Broadly speaking, my workflow has these stages (not particularly in the given order):

Planning

Shooting

  • Lighting
  • Gear: cameras and lenses
  • White Balance/Color correction
  • Camera settings/tripod use (aperture, ISO, shutter-speed); RAW shooting
  • Composition – rule of thirds, vertical or horizontal, breaking the composition rules

Styling

  • Props

Post Processing

  • Why post-process
  • RAW Settings:   White Balance, Exposure, Shadows and Highlights, Vibrance, Saturation
  • Photoshop Settings: Cropping, Curves, Levels, Sharpness, Resizing
  • Image Resolution
  • Preparing images for the web
  • Hosting photographs for blog display

I cannot talk about all the stages in a single post and this really was the part that kept me from coming to you with this post. It’s difficult to decide what is important and what is not, so I decided to start with something that any photography is impossible without. LIGHT. For starters, I’ll talk about my take on planning and lighting.

Planning:
As David duChemin says ‘Gear is good, vision is better’. Planning is important for me because it gives me a chance to think about the shots ahead of time and I can focus on the ideas/vision more in this stage and less on whether I’ll be able to get it all done at all. Considering that I have a 1-year-old, going into shooting without a clue about the setups is bound to give me a brain-freeze within minutes of shooting. But this is really up to personal preference – I guess some people are able to juggle a bunch of things at the same time better than others. I know I’m not the best at it especially if it involves the right brain.

IMG_2855

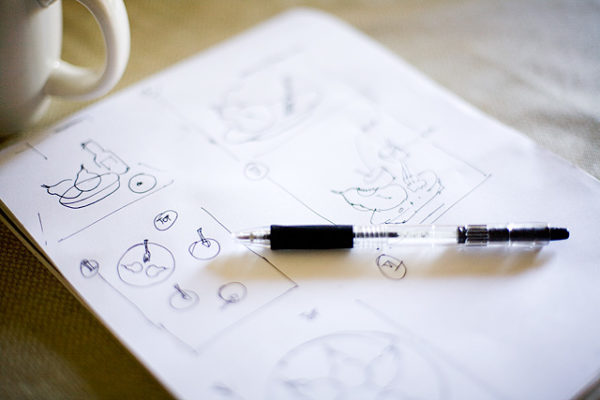
For me planning really means that I think about the setting in which I want to photograph and do some rough sketches to set a general direction while shooting. As you can see they are hardly detailed, but they give me a good starting point so that I don’t get brain scatter when I start to shoot.

Lighting :
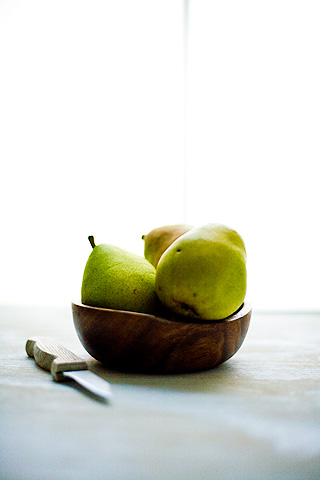
I don’t really experiment a lot when deciding on lighting. I photograph in 100% natural light so that makes my job easier. If you don’t own any studio lights, you check out all the windows in your house and pick one that gives you the right setting to place your food and photograph it. I chose a setting in my apartment that allowed me to photograph food with good back and side lighting.

IMG_2830

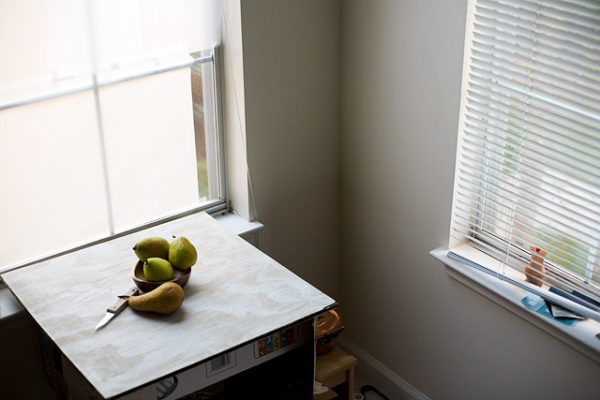
Also, it left me enough room for the food to be placed at around 3 feet from the ground so that most pictures could be taken standing up. In some cases, I’ll drag a chair to stand up on it and photograph from higher level (for e.g. for top views). I do wish at times that I had bigger windows that would let more light in. Also on my wish list is a large window that gets lots of direct sun so that I can get really bright lighting. The left window in the setting above does get some direct sun but not for more than an hour. As you can see I have covered the window with a translucent sheet of paper to diffuse the light into a soft bright glow. If you don’t diffuse the light, you may get uneven contrast and patches of really bright highlights and shadows in your images. This set up usually works for me.

Now let me share with you some of my favorite lighting conditions:

Backlighting
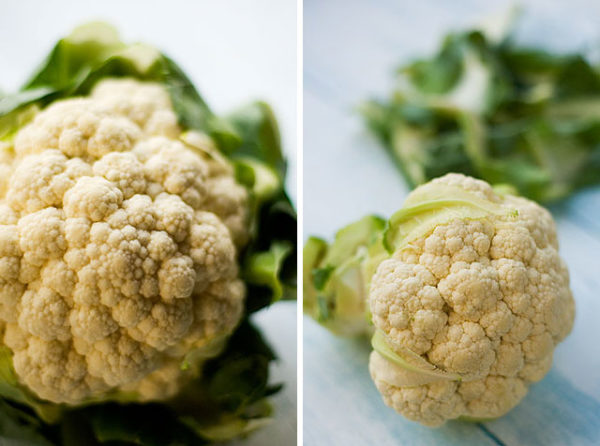
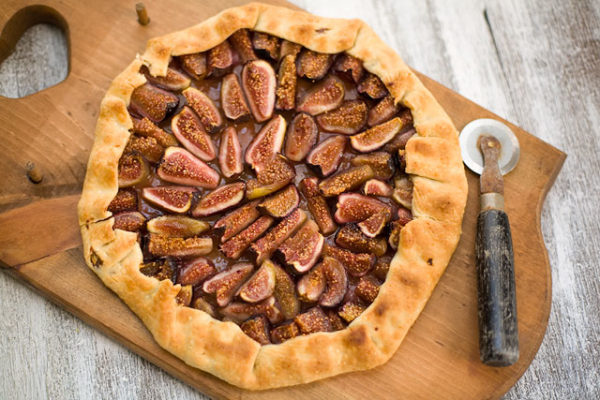
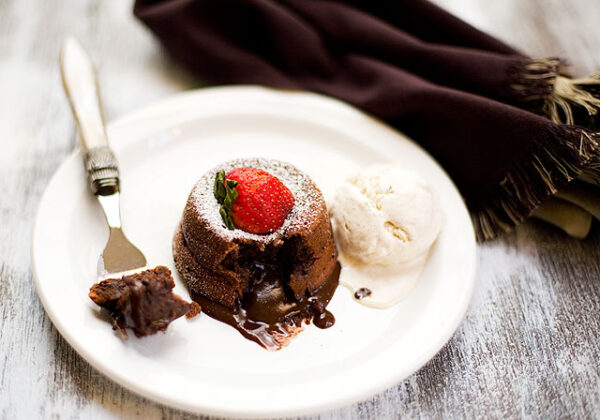
I use backlighting because I read somewhere that it is the best lighting condition for food. And for the most part, this has been true (so to whoever wrote that – thank you!). Here is a photo I took with the left window in the background (source of backlight):

IMG_2820

This was taken with just one light source (the left window in the setting) behind the subject. If your light source is very bright, you may see the subject itself gets a bit dark (almost like a silhouette) – in such cases you can use any post processing software to brighten up the image which should illuminate the subject to an ideal exposure.

Fill Light
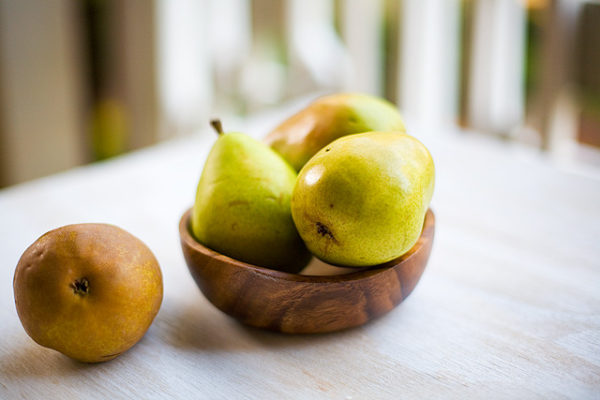
Another lighting condition I frequently use is a natural fill light. Technically speaking, a fill light scenario in a studio typically eliminates all shadows. I am using this term to describe a setup where I am shooting in a semi-outdoor setting. I could have called it “patio-light” too! Because that’s where I find soft light from all directions that gives the subject a uniform overall illumination. Here is an image of the setting:

IMG_2837

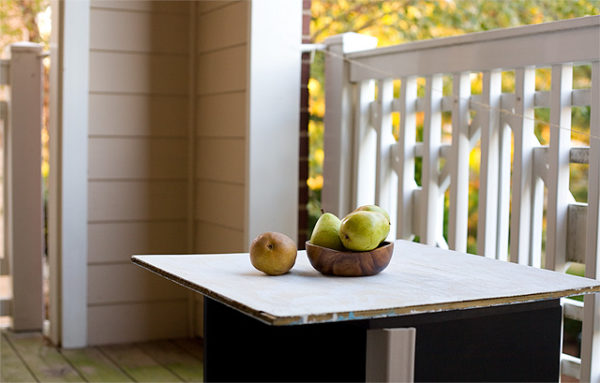
And below is what I got under these conditions:

IMG_2838

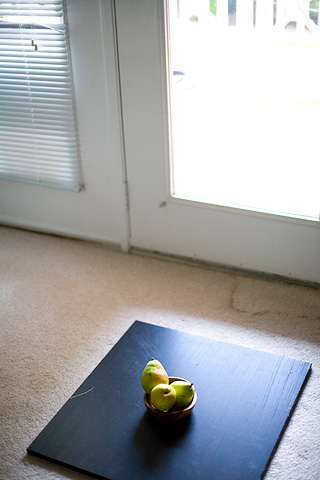
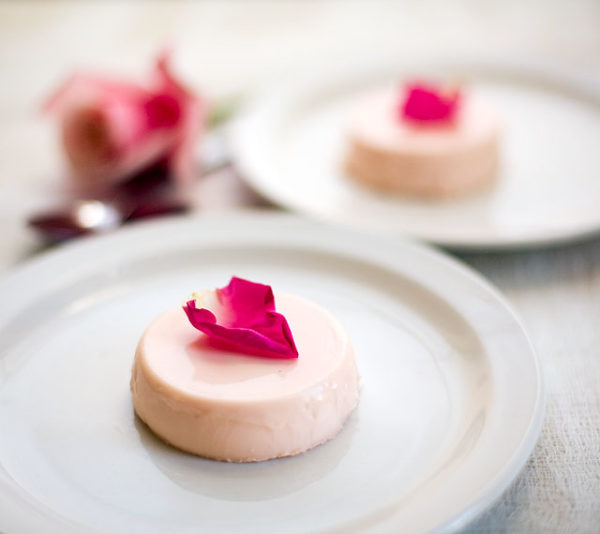
Dark Backgrounds/Reflection

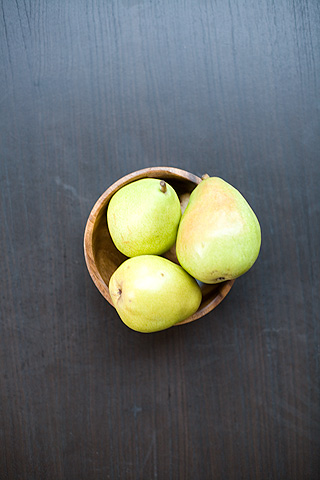
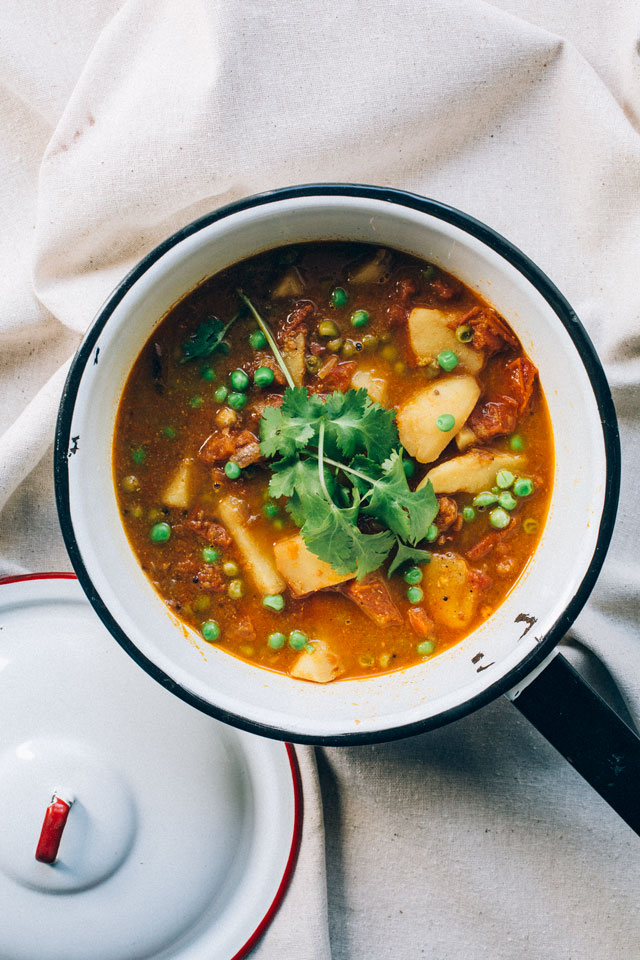
I usually work with white surfaces but depending on the subject, I at times use darker surfaces that serve as backgrounds. I find it more challenging to shoot against darker backgrounds – primarily because they reflect light. The dark surfaces I have are made out of wood with a coat of dark paint. Now you may be able to find a paint type that does not reflect light at all or perhaps a tile based background that is non-reflective. If that’s the case, do let me and my readers know! I know it exists. But if your surface is reflecting light you’re likely losing color saturation. Here is an example shot:

IMG_2844

To get around this, I reduce the light significantly and keep it uniform to cut down on the reflection itself. So I pull all the blinds down and leave just one light source so that there is more control over reflection as well (if there are multiple light sources then it becomes difficult to assess where the reflection is coming from):

IMG_2851

With such an arrangement, I am usually able to orient the subject in a way that I get the least amount of reflection from the background. Here is the same subject but with a single light source (and straight off the camera sensor):

IMG_2842

Do you see how much more saturated the background is? Another setting that has worked for me in the past is surrounding the subject with three dark surfaces as walls around it and then shooting from the fourth side (opening). This would of course require you to set up your camera to photograph in low light (wide open aperture, high ISO; I will try to cover my typical camera settings later).

Controlling light with reflectors or foam-core boards:I am still learning to use reflectors. In some cases they seem to work but in others they seem to take away the natural beauty of a scene (my paranoia may be?). Adding a reflector effectively introduces another light source. You can hold it in the direction opposite to the natural light source and it would counter the shadows. But with reflectors I sometimes lose the predictability I get with photographing with just natural light. Also walls in my apartment are painted white so there is ample reflection already. But since I am still learning to use reflectors, I would suggest that everyone who is learning experiment and see what works and what doesn’t for them. Photography, just like any other art, is all about practicing and coming up with answers to your own questions!

Alright guys! I guess that’s enough of my monologue. Hoping that I didn’t bore you to death, I still don’t think I was able to cover a lot of what I set out for. All of these topics are so wide and ever-evolving and every one encounters different challenges. That is why it is so much better when it’s a conversation where I get to learn too – so with that in mind I am opening the lines for your comments here. Teach me what you know and ask what you would want to know or we can connect on twitter/facebook to share more. Happy shooting!

Oh wait, we have something else to share! We have two lucky winners today and http://www.random.org/ helped me find them.

So the winners areeee …..

untitled2

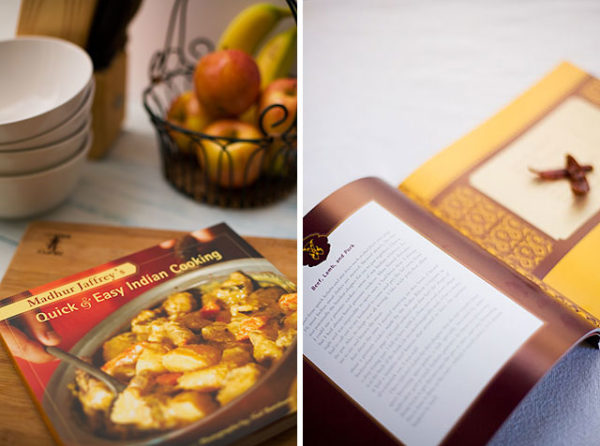
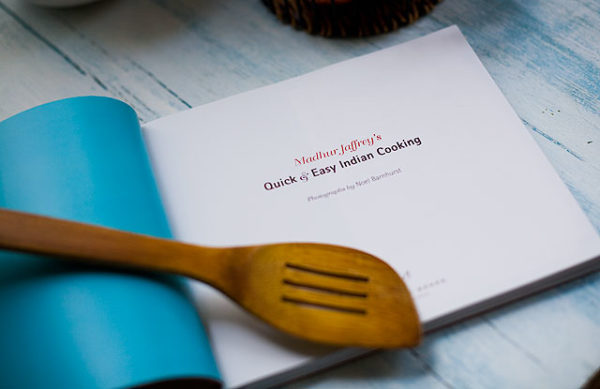
runningblond wins Madhur Jaffery’s Cookbook.

untitled

waspyredhead wins my home made Garam Masala.

Yay! Congratulations you guys! Please send me an email acknowledging your win and also please send me your postal address so that I can ship your prizes.

Wordless Wednesday

17

IMG_0784_2

It’s not even peak of fall season here yet and I’m already going crazy with all the color around me. I just can’t get enough of this season! If you are not a great admirer of the fall colors (which I greatly doubt!)then I’m sorry because you are going to see a lot of such photographs for a few weeks at least!

A Simple Hindu Pooja Meal

We celebrated Dussehra yesterday! Dussehra is a Hindu festival which is celebrated all over India under different names and ways but all have a common reason – celebrate the triumph of good over evil. According to Hindu mythology, Lord Rama worshiped Goddess Durga who is an epitome of the nine aspects of a woman – strength, patience and kindness being some of them. Lord Rama asked for all those powers from the goddess to help him fight Ravana (evil) – the abductor of his wife Sita. He worshiped the goddess for nine days and finally defeated the evil on the tenth day which is celebrated by Hindus all over the world as Dussehra.

What do you do in Kanya Pooja?

Kanya Pooja, also known as Kanjak Pooja or Kumari Puja, is a significant Hindu ritual observed during Navratri, particularly on the eighth or ninth day, depending on regional traditions. During this auspicious ceremony, young girls, usually aged between one to nine years, are revered as manifestations of the divine feminine energy. Devotees worship these girls, symbolizing the nine forms of Goddess Durga, by washing their feet, offering them sacred items like flowers, fruits, and sweets, and seeking their blessings. This ritual holds great spiritual significance as it celebrates the innocence, purity, and divine nature embodied by young girls, emphasizing the importance of honoring and respecting women in Hindu culture. Additionally, Kanya Pooja is often accompanied by charitable acts, such as offering food and gifts to the girls, as a way to express gratitude and spread joy during the festive season.

IMG_2721

Hindus believe that little girls are a form of goddess and she is smiling over families that are blessed with little girls. So during the nine days before Dussehra that are also called  Navratri (Nav-nine and Ratri-nights) we worship all the nine strengths of a woman and on the ninth day the little girls or ‘goddesses’ are pampered a little extra. We dress them like dolls, we wash their feet and then we serve them some GOOD food! So it was time for our little monster goddess to be pampered as well. That’s my little goddess right there rocking her traditional Indian attire and busy talking to her friend SPIDER!

IMG_2715

Food for Nine Days of Navratri

During the nine days of Navratri, the festival dedicated to the worship of the Hindu goddess Durga, special attention is paid to food. Observers typically adhere to a strict vegetarian diet, abstaining from meat, fish, and eggs. Instead, they indulge in a variety of delectable dishes made from ingredients such as potatoes, paneer (Indian cottage cheese), and various flours like buckwheat and water chestnut flour. These dishes are not only delicious but also symbolic, representing purity and spiritual significance. Fasting during Navratri is a common practice, and many devotees consume meals only once a day, focusing on light, nutritious options such as fruits, nuts, and dairy products. The food prepared during this auspicious period reflects both cultural traditions and spiritual reverence, making Navratri a time of culinary delight and spiritual renewal for believers.

There are a few restrictions in regards to food that is served today. It should of course be vegetarian with not even onion or garlic as ingredients. So the food is very simple with no spices or garam masala or even chili. I just thought it would be interesting for some of you to see how Indian food with almost little or no spices can taste good and look appealing. Here’s what was on the menu.

Poori – Deep fried Indian bread
Gulab Jamun Fried dumplings dipped in a sugar syrup
Sooji Halwa
Aloo Tamatar – Boiled potatoes in a simple tomato sauce
Chcikpeas with grated coconut

Poori – Deep fried Indian bread

Puffed pooris in a basket

Ingredients:

1 1/2 cups whole wheat flour
1  tsp salt
1 tsp ajwain seeds (optional)
1/3-2/3 cup water
Oil for deep frying

Method:

Mix flour salt and ajwain seeds together and make a dough out of it using water just like you make a Roti dough. If you want a step by step method of how to knead a roti/poori dough click here. Poori dough is just a little tougher than a roti dough so you need to add comparatively less water.
Roll out the dough into 3-4 inch circles and then deep fry them.
Poori will puff into little balls when fried and when both sides have turned golden brown (which would take seconds if oil is hot enough), take them out and let excess oil drain in paper towels.

Gulab Jamun –
I took a little short cut with this and if you have to make so many things on the menu and have less time this is the way to go! Just go to the store and buy an instant Gulab Jamun mix. It would make your life a little easier and it tastes the same!

Ingredients: Makes 18-20 

1 packet gulab jamun mix
3-4 oz milk
18-20 mishri raw sugar crystals
10 oz sugar
10 oz water
1/2 tsp cardamom seeds (crushed)
almond flakes for garnish
Oil for deep frying

COLLAGE
Method:

Mix cardamom to the Gulab Jamun mix and then add milk slowly and try to knead a dough out of it (Indian cooking involves a lot of dough kneading but once you get a hang of kneading a Roti dough then rest all is very easy. Just a little variation of water to flour ratio here and there). First cover the dough with a damp towel. Then grease your palms with a little butter or oil and make tiny balls out of the dough.
To make the Gulab Jamuns taste even better, my mom presses the balls in the center to make a little hole, add a raw sugar crystal and then make the balls again. Doing this when you deep fry them the sugar inside melts and makes the Gulab Jamun sweet from the core.
Deep fry the balls until they are really brown.
Now make sugar syrup by boiling sugar and water for about 5-8 minutes. Turn off the heat. Drop the deep fried balls (Jamuns) into the hot sugar syrup and cover with a lid. This will help the Jamuns soak the liquid and they will puff up to double their size.

There was another sweet dish in the menu. Sooji (semolina) Halwa with saffron but it didn’t turn out the way I would have wanted it to so I didn’t felt like sharing the recipe here. The day I’m satisfied with the result I’ll share it with you.

Tamatar Aloo – Potato and Tomato

Aloo Tamatar ki Sabzi

Ingredients:

2-3 medium size potatoes
15-18 cherry tomatoes cut into halves (if you don’t have cherry tomatoes you can use 3/4 cup of any fresh tomato)
1 tsp turmeric
1 tsp cumin seeds
1 tsp salt
1 tbsp oil

Method:

Boil the whole potatoes with skin on until you can poke a fork into them. Set them aside and let them cool enough to be peeled. Then cut them into small chunks.
Meanwhile heat oil in a thick bottom pan. Add cumin seeds and when they start popping add tomatoes to it. Cook the tomatoes well.
Add salt and turmeric and cook the tomatoes until they loose their skin.
Now add the potatoes and mix it all together. Cook for 3-4 more minutes. And its done!

Chickpeas with coconut

Ingredients:

2 cans chickpeas (If you are using dry chickpeas use 1 cup of that to begin with)
Salt
1/2 cup grated coconut
1 tsp red chili powder
1 tsp turmeric
1 tsp black mustard seeds
1 tbsp oil

If you are using dry chickpeas, soak them in water overnight.
Boil them with lots of salt in a pressure cooker. If you are using canned chickpeas, clean them well with tap water and then boil them with a hint of salt for about 5 minutes.
When cooked, drain excess water and set it aside.
In a pan heat oil and add mustard seeds.
When mustard seeds pop add grated coconut. On a medium low heat cook the coconut for 2-3 minutes then add chili powder.
Mix and add boiled chickpeas. Mix everything together and the dish is ready.

Rose Panna Cotta – Celebrating Pinktober!

“Almost all words do have color and nothing is more pleasant than to utter a pink word and see someone’s eyes light up and know it is a pink word for him or her too.”
–Gladys Taber

Isn’t that a beautiful quote? I read this quote on Deeba’s blog a while back and it just resonated with me. Deeba is one of the food bloggers whose sense of food styling and photography I love and her recipes always awe me. So she had this quote on one of her posts where she was celebrating PINKTOBER (also known as National Breast Cancer Awareness Month). It is an annual international health campaign organized by major breast cancer charities every October to increase awareness of the disease and to raise funds for research into its cause, prevention and cure. The campaign also offers information and support to those affected by breast cancer. After reading the post I felt that I needed to talk about it here in my small space as well and I had my own reasons for that.

IMG_2584

Having lost a close family member to cancer not too long ago I know how this six letter word can change the fate of a family. Almost 7.6 million people die of cancer every year and every 13 minutes a woman dies of breast cancer in the US. A huge part of the affected population get to know about their illness when it is too late. Were they more educated about the screening methods, the results would be very different. The Breast Cancer Research FoundationAmerican Cancer Society and many such organizations are doing a great job at prevention and cure of the disease. If we are educated enough about the disease then its our duty to spread the word.

IMG_2613

I thought of doing my bit as well and what better way than doing it all with food! So I decided to keep it simple, keep it sweet and keep it PINK. I thought about it for a few days but nothing that came to mind was good or worthy enough to be called a pinktober recipe. Then, being as twitter bugged as I am these days, I tweeted about it and asked my tweet buddies if they could suggest something.

IMG_2595

To my greatest surprise people came up with so many great ideas (thank you so much you guys!). A fellow tweeter suggested I make a strawberry tart, then another friend said I should make a berry shortcake and pink champagne and then a pink mousse was also in the list. But the two suggestions that I couldn’t stop thinking about were from my blogger friends Pick Yin who asked I make this gorgeous torte and the other was from Terri who thought a Panna Cotta would be a good idea. So you know whose suggestion I went with! Not because others were not interesting and YUM enough but being a lazy bone as I am I found a panna cotta to be easier to put together and it needed the least cleaning after!

IMG_2632

Since the dish was supposed to be pink, a panna cotta with berry sauce or actual berries inside would have been an obvious choice. So I thought of doing something that I had never tried before. I therefore decided to make a Rose Panna Cotta. If you’ve never tried making a panna cotta then let me tell you this is the easiest dessert to put together in the whole entire world! If my one year old was not into a bad habit of shoving everything into her mouth then she could have made it! Yes! You just grab all the ingredients, mix them all together and pour into containers!

collage1

I had never tried making a Rose Panna Cotta before, so I went to google! The top two recipes that I liked were this and this. I went with the latter one albeit with a few changes. And just to show you proof how delicious the dessert turned out to be, I have a before and after photograph for you!

collage2

So now the recipe… But before that let me remind you that if you have not checked out the giveaway that’s going on on this blog then you have to go here.

Ingredients: (adapted from www.marthastewart.com)
Though the original recipe says it serves 4, I found that it only serves 2.

1 cup heavy cream
2 tbsp sugar
1 tsp unflavored gelatin
1 tbsp cold water
1/3 cup mascarpone cheese
2 to 3 tsp rose water
1 drop pink or red gel paste food coloring (optional)

(Again the original recipe had a raspberry and lychee syrup which I omitted)

IMG_2624

Method: 

Place a sauce pan on medium heat and add heavy cream and sugar into it.
Bring it to simmer while constantly stirring until the sugar dissolves. Remove from heat.
In a small bowl add water and gelatin, stir to dissolve and let it sit for a couple minutes for it to soften.
Then add the hot cream n sugar mixture into the gelatin while stirring for the gelatin to dissolve.
With mascarpone in a bowl now, strain this mixture into the cheese and stir for everything to mix well.
Add rose water and color.
Strain mixture into a measuring cup and divide it into ramekins.
Place the ramekins in the refrigerator and let it chill for atleast 3-4 hours or until the panna cotta becomes firm enough, almost like a jelly.
When ready to eat, dip the ramekins in hot water for a few seconds. Take them out and run a sharp knife around the edges to loosen them up and then flip it over on a serving plate. Sometimes they won’t come out easily so take a sharp knife and while the ramekin is inverted over the plate insert the knife somewhere in the edge to release the vacuum and panna cotta will ease out.
You can serve it with a berry sauce but I liked it as is with a rose petal as garnish.

50th post with Madhur Jaffrey’s Egg Curry and A (no Two) Giveaways!

I know its Wednesday and its supposed to be Wordless, but trust me you won’t mind me talking today! I had to jump in and give the series Wordless Wednesday a tiny pause because I was happy today. Happy because this is my 50th post! When I started this blog it was like my recipe journal where I wanted to collect all my recipes because I was missing pages from my old recipe-book a little too often. Fifty posts ago I had no idea that it would bring so much along with it. Not only was I able to save my favorite recipes at one place but it also introduced me to a whole new world out there – I got to know so many gorgeous people who I can now call friends. It’s a great feeling and if I have never said this before then today I just want you to know how much I cherish each and every one of you. Thank You for being here to support me and cheer me up!

collage3

I was am not a very good cook and I am a new mom so I don’t even have a lot of time to cook but I and my family are BIG foodies. I always hunt for recipes that are simple, with minimum ingredients and are quick to make so that I can put dinner on the table while juggling with my crazy day-to-day life. I guess that’s what most of my friends/readers try to do. So when I decided to do something for them, I thought I would help them find some interesting ideas from my recipe-book which they could try. Since Indian food is something I’m most comfortable with, I thought how about I share a simplified version of Indian food and make it approachable to those who love the cuisine but don’t have a lot of time. Like this recipe, which I can’t call mine but you’ll soon know why I’m sharing it with you today. The recipe is for hard boiled egg curry and it is from Madhur Jaffrey’s Quick and Easy Indian Cooking.

IMG_2500

I love this recipe because it falls right in my comfort zone. It’s quick and easy and tastes delicious! And this book is full of such recipes. Traditional Indian recipes which otherwise people dread trying because they look so complex are a breeze with this book. Madhur Jaffrey has done an awesome job with this book by making the recipes look simple and not adding a zillion ingredients in them. If you like Indian food even a little then you would find these ingredients in your pantry any time. I love this book and I love you! So I thought if I could share this book with you, it would be great. But since I can’t give it to all of you, I would love to randomly pick any one reader who I can send a copy to.

IMG_2526

And now one of my favorite recipes from the book. The recipe for Masaledar Ublay Unday or Hard Boiled Egg Curry.

Ingredients: (from Madhur Jaffrey’s Cookbook)

1/2 tsp cayenne pepper
1/2 tsp ground turmeric
1 tsp ground cumin
1tsp ground coriander
1tsp fresh lemon juice
3/4 tsp salt
Freshly ground black pepper
2 tbsp vegetable oil
1/2 tsp cumin seeds
5 tbsp (2 1/2 oz) onion, peeled and finely chopped
1/2 inch piece fresh ginger, peeled and finely chopped
1 cup canned tomatoes (or lightly drained, canned whole tomatoes, finely chopped)
1/4 tsp sugar
3-4 tbsp chopped fresh cilantro (Chinese parsley, fresh green coriander)
4 hard boiled eggs, peeled and cut into halves lenghtwise.

Method:

Combine the cayenne, turmeric, ground cumin, ground coriander, lemon juice, salt, black pepper, and 1 tablespoon water in a small bowl. Mix.
Put the oil in a medium-sized, non stick frying pan and set over medium heat.
When oil is hot, put in the cumin seeds. Ten seconds later, put in the onion and ginger. Put in the spice paste.
Stir and cook for 15 seconds. Now put in the tomatoes and sugar. Bring to simmer.
Cover and simmer gently for 10 minutes. Put in the cilantro.
Stir once or twice. Lay the cut eggs in the sauce and spoon more sauce over them.
Cover and gently simmer for 2-3 minutes. And then serve with rice or even bread (toasted or plain).

collage1

When I got married and set out to build my first home and kitchen as a new bride, my mother in law gave me a big box of stuff which among other things had a large helping of her famed garam masala. She was making it in her kitchen from as far as she could remember. As I began to run out of it, I started getting frequent shipments of garam masala all the way from India from her. But it was not long before my worst fears came true! Early last year, a combination of events left me without a stock forcing me to the grocery store. Then came a spell of several months when I was trying every brand of curry powder on the shelves. But neither of them came close. Again – MIL to the rescue! She shared her much cherished recipe for home-ground garam masala and after several shots at it (ok may be more than that), I think I perfected it. So for my 50th post, I also want to share with you this integral part of my kitchen in the form of a 5 oz bottle of my homemade Garam Masala powder.

collage2

I use the same masala in all my curries like this egg curry recipe where just a teaspoon of this masala makes up for several ingredients. Even in little quantities, this masala brings with it some of the freshest aromas and that’s probably why it lasts me a lot longer too.

Rules of the giveaway: No you don’t need to follow me on twitter or like me on facebook! You visiting my blog and spending a little time on it is good enough for me. To enter this giveaway, all you need to do is leave a comment below stating your preference as “Option A” or “Option B”:
Option A: Madhur Jaffrey’s Cookbook – Quick and Easy Indian Cooking
Option B: IndianSimmer’s home made Garam Masala 
Also I would love to hear from you your thoughts on what can make IndianSimmer a better experience (optional). I will randomly select two winners one for each giveaway and post the results in my 22nd Oct. post. Since I’m currently unable to ship outside USA, I will have to pick a winner from within the US.

Now there is something I have to add for those picking Option B (here comes the fine print!). While this home made Garam Masala does not contain egg, peanuts, tree nuts, fish, wheat or dairy products, it has been prepared in a kitchen where these products are used. It’s primary ingredients include cloves,cinnamon, cumin, black pepper, black cardamom, and bay leaves. It has been prepared using my own recipe. Please do not choose Option B if you are allergic to any of these ingredients.

Fig Galette

IMG_2403

Farmer’s market and grocery stores have become my second home lately. Every now and then if I don’t have anything important to do I would get my little monster, pick up the diaper bag, grab the keys and off to the farmer’s market! Everyone knows me there now and I guess very soon people would start giving me a call if they don’t see me for long. But fresh foods really are so interesting and intriguing! Sometimes because of the way they are grown or because of the taste and sometimes just because of the way they look and feel.

collage1

Photographing food helps you appreciate it even more and for many more reasons other than just the taste of it. It was one of those reasons that last week I bought a pound of these cuties! Figs are one of the most gorgeous fruits. Aren’t they like most of us? Looking at the exterior, you could never imagine what they’ll be like from the inside. Luckily in their case, its a beautiful surprise! When you cut into their contrasting colors, they bring summer back and that’s exactly what I needed. After days of rain and dark gloomy weather when sunshine finally decided to shower some love on us, I pulled out these figs from my refrigerator.

IMG_2386

So after a lot of thinking I decided to make a Fig Galette. Why?? Because I love galettes! What I like most about them is that you don’t need anything extra, just throw your fruits on the dough and bake them and out comes a sweet present wrapped up in a little purse of crust. You can actually taste the real sweetness of fruit with a slight hint of savory. Very simple and very tasty!

IMG_2427

Now to make it even more simple and easy, I actually cheated a little. I was in so lazy much in hurry that I actually used a store bought pie crust. But if you want to make your galette from scratch, I would recommend you try Simply Recipes perfect pie crust. I’ve tried it many times and it never disappoints me. Recently Sam of Today’s Nest also shared one which also looked great to me, so you can try that as well.

IMG_2415

But whatever you want to do about the crust – buy it from the store or make it at home – I promise that’s the only work that you need to do! Here’s what the rest of the work is:

Ingredients:

1 pie crust (I used Pillsbury frozen pie crust)
1/2 lb of ripe figs
4 tbsp sugar
1 tsp olive oil
whipped cream or vanilla ice cream (optional)

Method:

Preheat the oven upto 375 deg. F.
Trim stems from figs and cut each lengthwise into 4 or 5 slices.
Roll out pie crust and transfer it to a cookie sheet lined with parchment paper.

collage2

Sprinkle a little sugar on the dough.
Arrange figs on the dough in concentric circles leaving a little border around the circle.
Sprinkle the rest of the sugar on the figs. Lift pastry edge and fold over filling to make a pleated border.
Brush a little oil on the border.
Bake it for about 50 minutes. (I’m a bit of a restless person so I start peeking inside the oven after 40-45 minutes.) So if you see the rolled over crust to be golden brown and the fruits are bubbling then you know your galette is ready to get out.
Remove from the oven and let it cool for 15 minutes.
Top it with a little whipped cream or a nice vanilla ice cream if you want. I like mine as is.

Molten Chocolate Liquor Cake

IMG_2351

I’ve been spending a lot of time on twitter lately. I mean its sort of getting out of hands now. With a toddler at home, my life is crazy as it is right now and twitter is making it crazier! But I can’t help it, it is so much fun! And I can’t believe that I had no idea how to tweet a month back. And if you are one of my tweet buddies, you might know that it was “A’s” birthday last week. Unlike all the other birthdays in the past, I just didn’t get time to plan anything for him. So when asked a day before that what he wants for his birthday, his answer was “cook me some GOOD food.”

IMG_2303

Cooking ‘good’ food for him (specially food that would make him happy) is not difficult at all. My husband is the simplest and most predictable person when it comes to food. If you know him even a little you know that making him some rajma or a nice curry or baking something chocolate will make him the happiest man in the world. But since it was his birthday, I tried to make it a little fancy for the two of us. Of course there was curry in the menu but for dessert I made some individual molten chocolate lava cake and to make things a bit interesting I added some liquor into it (Ok, a little more than ‘a little’!). Cake was a hit and the man was super happy!

IMG_2342

I had these two molten chocolate lava cake recipes bookmarked and they had been sitting there for a while now. One of them was from the pioneer woman and the other one was on Foodista. Both the recipes are so simple and quick but in my household if you want ice cream, you better be on my side and if you want anything chocolate then the husband leads the way. So I waited for him to taste this beauty on his birthday.

collage1

I love a recipe if it is quick and easy and if it tastes anything like this cake, then its a home run! If you’ve not tasted this cake, PLEASE give this recipe a try. You will be surprised how good it comes out after putting in almost no time and energy. Just put everything in a bowl, whisk and bake. How simple can it get? I served this cake with vanilla ice cream that added a whole new dimension to the cake. I felt that if you add something lightly sweet with cake, it balances the taste and in this case light vanilla cake did the same.

IMG_2362

Ingredients: serves 6

3 1/2 oz of Dark Chocolate
1/3 cup Butter
1 cup Powdered Sugar
2 whole Eggs
2 whole Egg Yolks
2/3 cups Flour
1 tbsp Liquor Per Ramekin (optional) I used coffee liquor because I think coffee brings out the chocolate’s taste even more.

Method:

Preheat oven to 425 degrees.
Spray 4 medium or 6 small ramekins with oil and place on cookie sheet.
Microwave chocolate and butter in large bowl on high for about 1 minute, until butter is melted. Whisk until chocolate is also melted.
If you think the chocolate is hot, let it cool down or else you’ll get scrambled eggs instead of a cake batter!
Stir in sugar until well blended. Whisk in eggs and egg yolks. Stir in flour.Add liquor.
Divide between cups.
Bake 13-14 minutes until sides are firm and center is soft.
Take it out of the oven and let it stand for a minute.
Invert cakes on dishes and decorate a little if you want.
Serve with ice cream like I did or you could serve it with whipped cream.

Wordless Wednesday – An interesting experience!

16

I’ve told you before about my trip Atlanta for the Food Blog Forum conference which was such great fun but what I didn’t tell you was that on our way back home we went to this flea market which I always wanted to go visit every time we drove past it. I was so happy that we finally decided to stop and see around. This was the first time I ever went to a flea market and it was such an interesting experience. Trying to share that eperience with you through some photographs.

IMG_2087

collage4

IMG_2089

collage1

IMG_2115

IMG_2098

collage3

collage2

Aloo Gobhi (Potato and Cauliflower)

IMG_2172

When I married A and came to the US I had to leave a lot behind! It was a strange feeling to leave your country, your family and your childhood friends and step into a whole new world. But what is even more strange is how this new country, his family and his friends have become so important and close to me. I know that whenever I need them they are just a phone call away. A is lucky enough to be with his friends from childhood and college even today and its crazy when they all come together! And one such friend is A (Yes, yet another A in my life!)

IMG_2222

She was my husband’s friend when I met her for the first time and one among the many new faces I knew nothing about except her name and today she has become one of my closest friends. She has been so appreciative of whatever I’m doing. I receive an email from her every other day suggesting what I should make or what I can do to improve my photography or the blog. One thing she has been asking me again and yet again for is a recipe for Aloo Gobhi. I supposedly made this Aloo Gobhi for her once and she is in love with it since and has been asking me for its recipe forever! So today finally I sat down to share the recipe with her and with all of you.

IMG_2169

Now there are a number of ways in which I make Aloo Gobhi. My mom’s way, my mom-in-law’s way, my way, with gravy, without gravy…… But I am sharing the recipe with which I made it that day (only if I remember clearly enough) for ‘A’. So this one’s for you A!

IMG_2142

Ingredients:

1 medium size cauliflower
2 potatoes (peeled and cut into 1 inch size chunks)
1/4 cup chopped onion
2 tbsp coriander powder
1 tsp red pepper powder (If you want it hotter add to taste)
1 tsp cumin or mustard seeds
1 tsp turmeric
1 tsp curry powder
2 tbsp olive oil
1 tbsp chopped cilantro
Salt

IMG_2202

Method:

Heat oil in a medium size wok or a shallow pan.
Add cumin or mustard seeds (whatever you are using). Once it starts popping, add chopped onion to it.
Saute the onions until it turns golden and then add all the dry ingredients to it.
Mix it all together and then add cut cauliflower and potato. Stir it all together and turn the heat to low.
Cover the pan with a lid and let it cook by stirring occasionally.
Once the vegetables are a little undercooked, take out the lid and let it cook uncovered by stirring after every few minutes until its well cooked.
Garnish it with chopped cilantro and serve with hot roti / paratha or with dal and rice.